DIRECT
Not sure which integration to use? See the Google Pay overview to compare all three options.
Requirements
Before starting, ensure you meet the general Google Pay requirements. Additionally, you need to register with the Google Pay Business Console to obtain a Google merchant ID. Complete the console configuration by following these steps:- Complete the Business Profile
-
Review the information required in Google Pay API > Integrate with your website:
- Your website – This must exactly match the domain of your hosted checkout page (with or without “www”)
- Integration type – GATEWAY
- Screenshots:
- Payment method screen – Your hosted checkout page
- Google Pay API payment screen – The Google Pay payment sheet (shown after clicking the GPay button)
- Post-purchase screen – Transaction confirmation page
- Submit the screenshots, indicate that you have submitted the request, and share the merchantId (BCR)
Integration
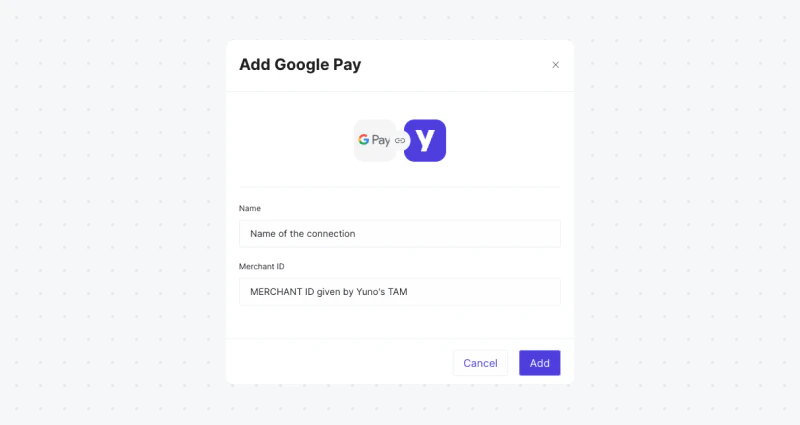
To integrate Google Pay with Yuno, follow these steps:- In the Yuno dashboard, go to the Connections tab. Find Google Pay and click Connect. Enter your credentials in the side panel. Choose a name for the connection and use the merchant ID obtained from the Google Pay Business Console in the Merchant ID field.
- Create a route in Yuno’s dashboard using the processor you want for Google Pay payments. See the Configure dynamic routing guide for more information.
Enable and test Google Pay with Yuno
After integrating, you can enable and test Google Pay with Yuno as follows:- Create a Google Wallet Test Account:
- Visit the Google Wallet Test Account Sign-In page.
- If you do not have a Google account, create one to proceed.
- Once signed in, you will be redirected to the Google Wallet business console.
- Access the Google Wallet API Section:
- In the Google Wallet business console, navigate to the API management or integration section (usually under developer or integration settings).
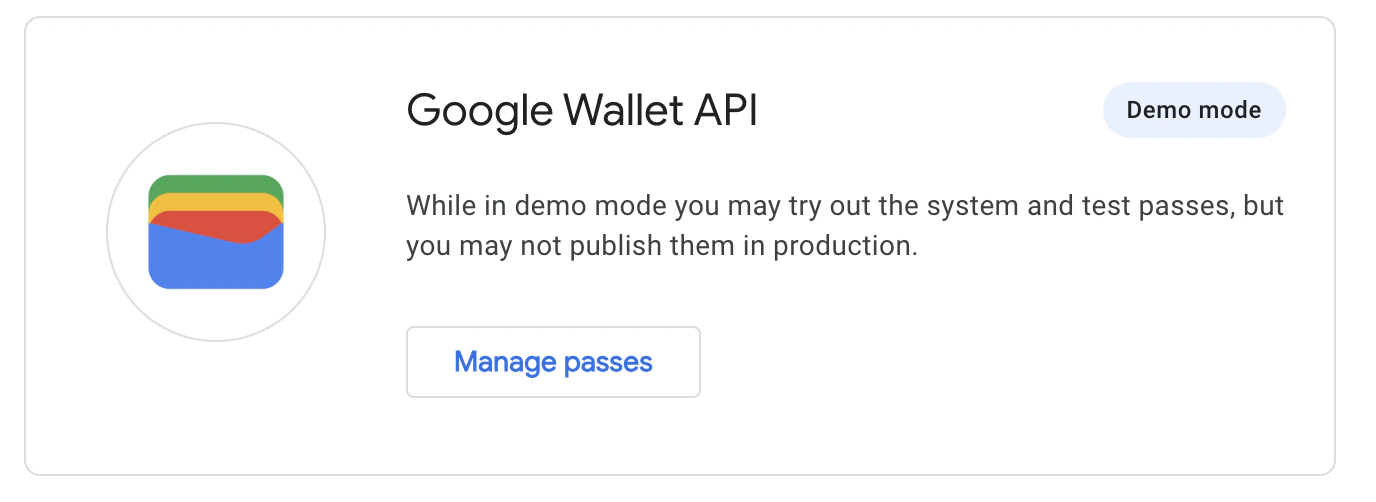
- Select Create a Pass to enable Demo Mode:
- In the Google Wallet API section, find the option labeled Create a Pass.
- Click this option to enable Demo mode. This allows you to simulate and test pass creation and interactions without real transactions.
- Download the Google Wallet App from the Play Store.
- Go through the payment flow to test the integration.
Go live
After completing all integration steps in the testing environment, request Google Production Access and contact your Technical Account Manager. The Yuno team will help verify your configuration and confirm you are ready to go live.Implementation details
Key details for your Google Pay integration with Yuno:Google Pay API authorization methods
Yuno supports both Google Pay API authorization methods:PAN_ONLY: Card credentials stored in the user’s Google account. When used, Yuno automatically handles 3D Secure authentication if enabled.CRYPTOGRAM_3DS: Device-based card credentials with built-in authentication. These credentials include cryptographic authentication and don’t require additional 3DS processing.
PAN_ONLY and CRYPTOGRAM_3DS in your allowedAuthMethods array for maximum payment success rates.
- 3D Secure (3DS) for
PAN_ONLYcredentials: If Google Pay returns aPAN_ONLYcredential (a card stored in the user’s Google account), Yuno will automatically handle the 3D Secure authentication flow if 3DS is enabled. On the frontend, make sure your Google Pay API request includesPAN_ONLYin theallowedAuthMethodsarray. - Gateway and GatewayMerchantID configuration: When registering with the Google Pay Business Console, ensure that under Google Pay API > Integrate with your website, the Integration type is set to GATEWAY. The
Merchant IDfrom the Google Pay Business Console is used in the “Merchant ID” field when setting up the Google Pay connection in the Yuno dashboard. Setgatewaytoyunoand use your assigned Merchant ID as thegatewayMerchantIdin your Google Pay API configuration. - Authorization methods: Yuno supports standard authorization methods (purchase, authorization, capture). Availability depends on the payment processor and acquiring bank for each country and payment.
- Billing address requirements: If your payment processing requires the customer’s billing address (e.g., for AVS checks), configure this in your Google Pay API request. Google provides
BillingAddressParametersto specify the required detail (e.g., MIN or FULL). See Google’s documentation. Only request billing address details if necessary, as this can increase checkout friction. - Transaction data and payment cryptography: Merchants integrate Yuno’s SDKs (Android, iOS, Web) into their applications. When a customer chooses Google Pay, Yuno’s SDK interacts with the Google Pay API and securely receives the encrypted payment data (payment token) from Google. This token is passed from your app to your backend server, which then uses Yuno’s server-side APIs to submit the token for payment processing. Yuno handles decryption and processing with the payment processor.
Pass Google Pay payment token in request
When you initiate a transaction with Google Pay, a payment token containing encrypted payment data is returned. Pass the complete token received from Google Pay in thepayment_method.detail.wallet.payment_token field as a JSON string in your payment request.
Google Pay wallet response object
The Google Pay SDK returns the following object structure, which must be passed as the completepayment_token value: