Headless SDK (Payment)
Yuno's Headless SDK gives you full control over the checkout UX and UI without requiring you to be PCI-compliant. With Headless SDK, you can make card payments or enroll card information into your customers' accounts. Access the Headless SDK (Enrollment) for more information. This page covers the payment operation. Below you can check the guides available.
Payment workflow
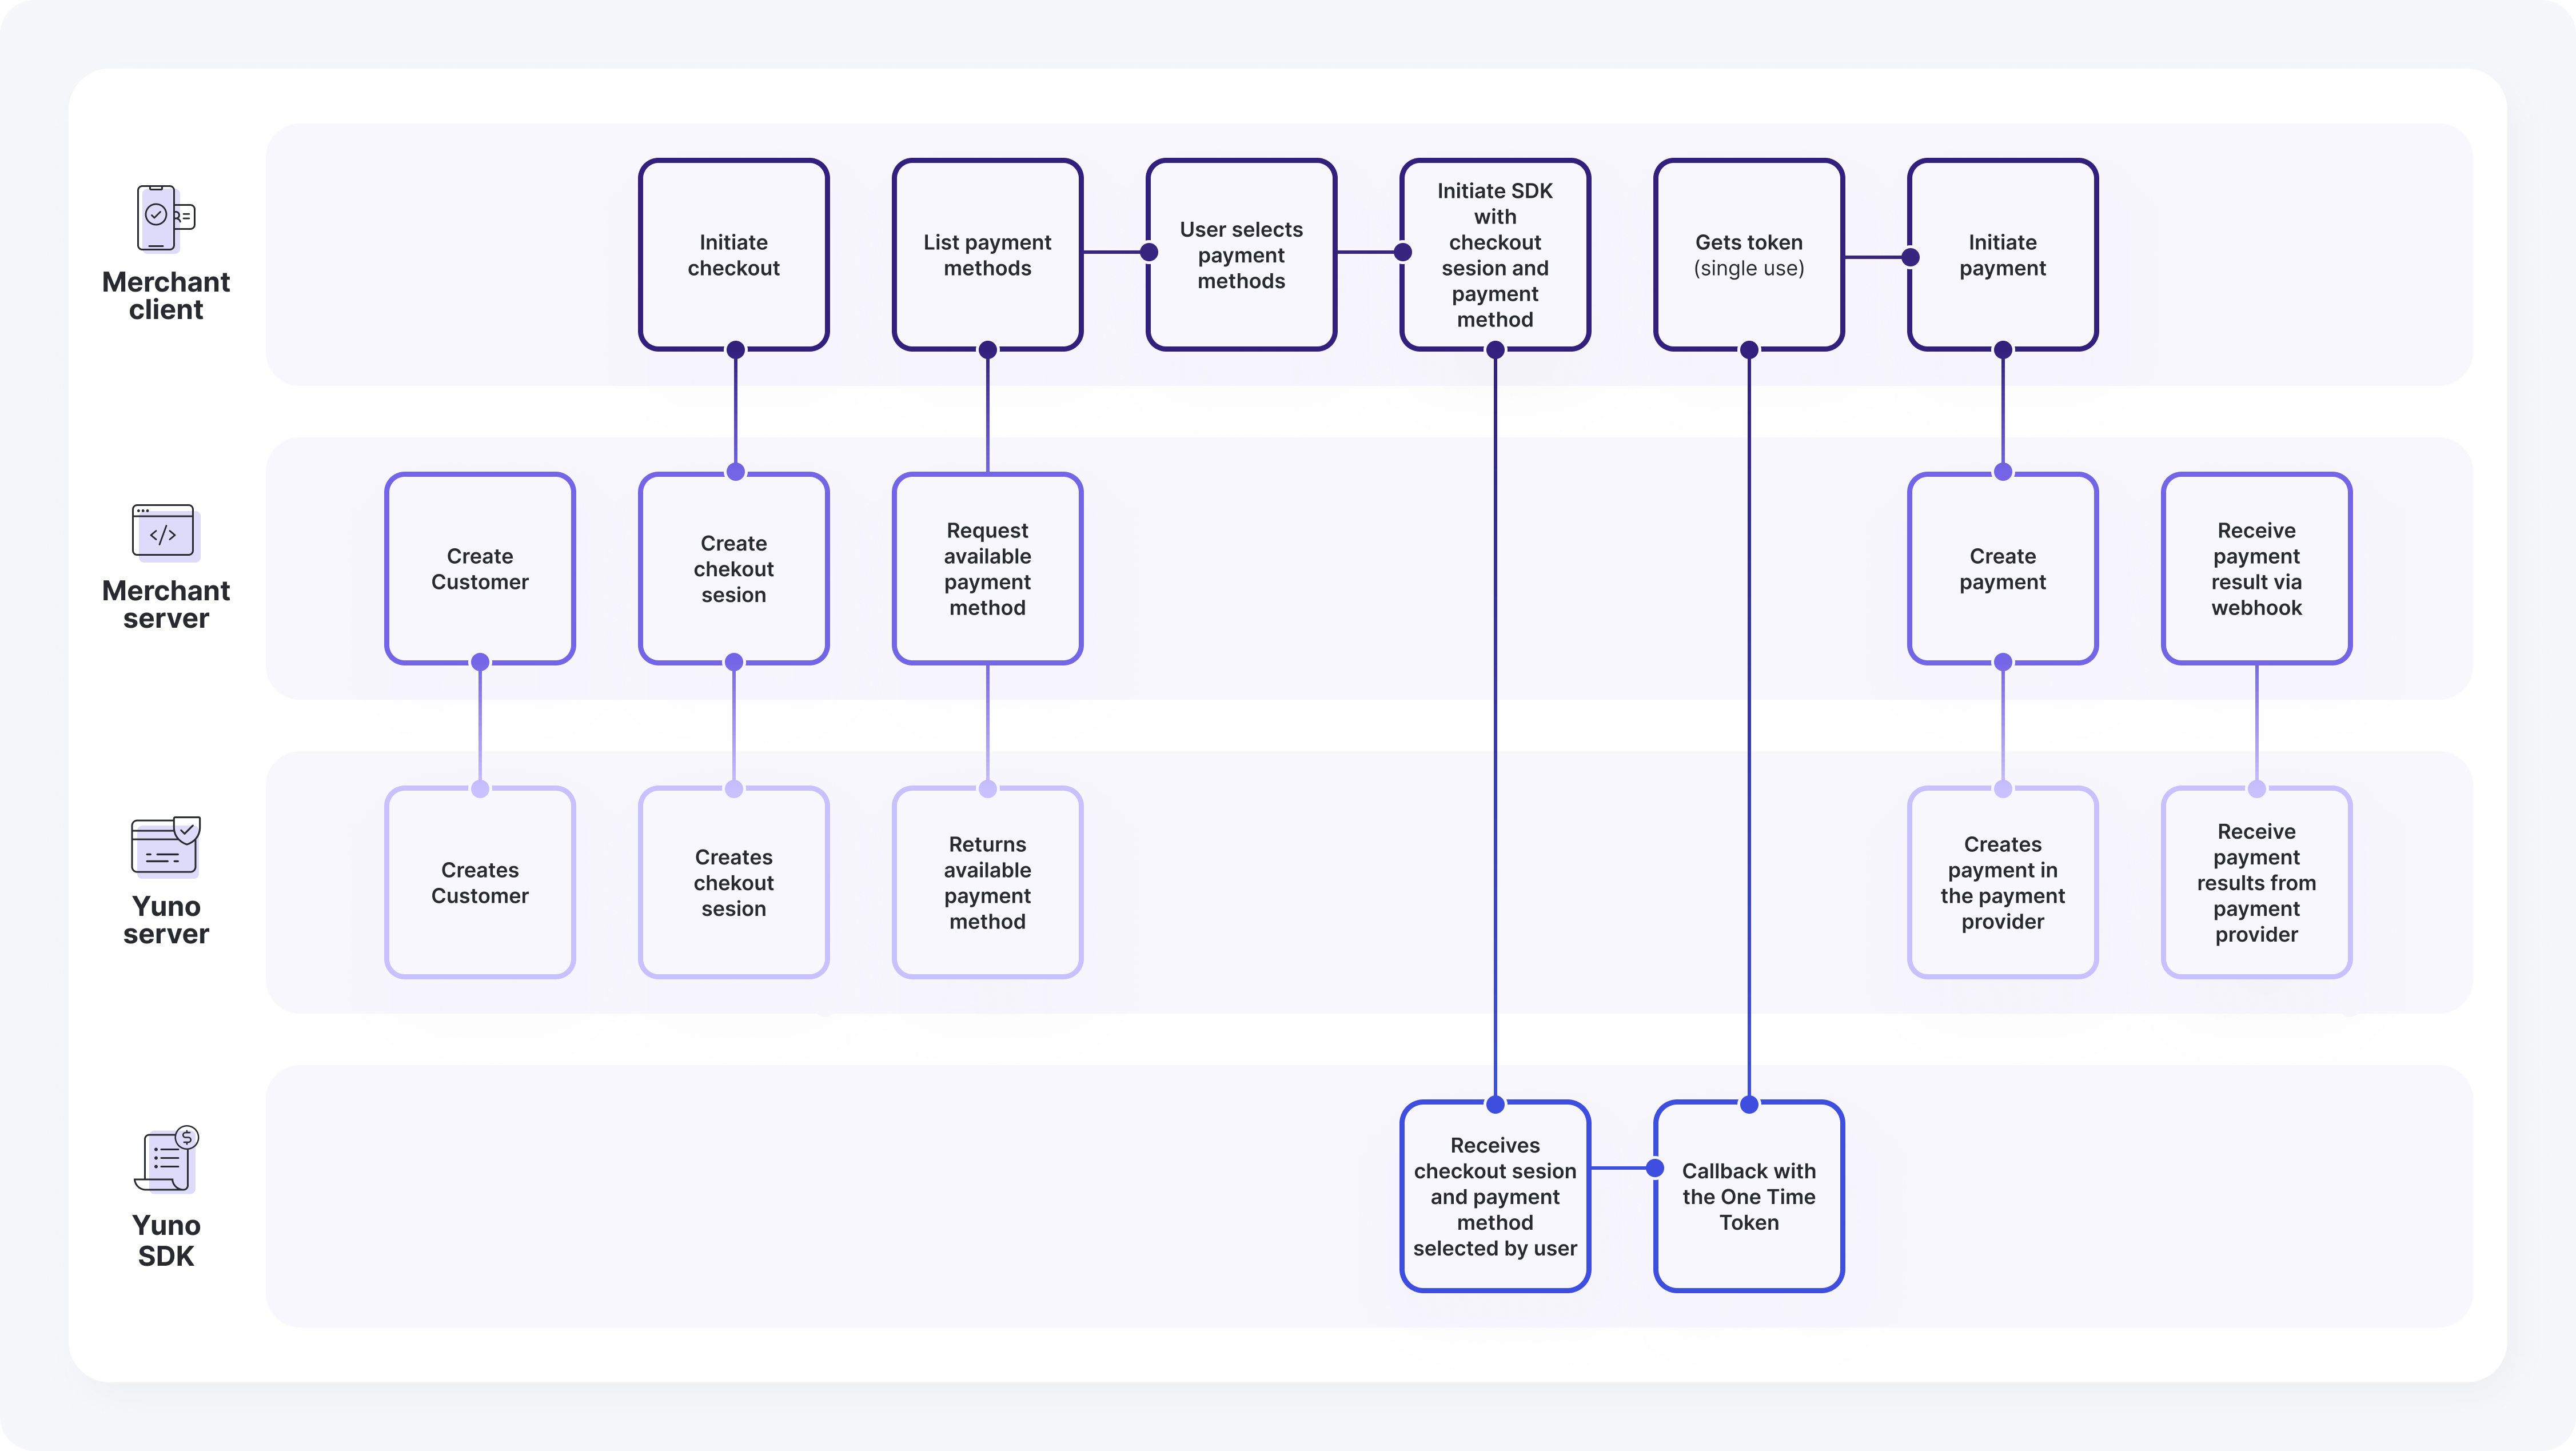
The diagram below illustrates the complete payment workflow. Each step is explained in detail in the following sections. For platform-specific implementation details, refer to the corresponding guide:

SDK Headless Payment Flow
This diagram illustrates the headless payment process using the SDK, detailing the interactions between the Merchant Client, Merchant Server, Yuno Server, and Yuno SDK. It outlines the steps from initiating a checkout and requesting payment methods to creating and receiving the payment result.
Merchant Client
The Merchant Client represents your frontend application that interacts with both your backend server and the Yuno SDK. It handles the user-facing aspects of the payment flow, including:
- Initiate checkout
- List payment methods
- User selects payment methods
- Initiate SDK with checkout session and payment method
- Gets token (single use)
- Initiate payment
Merchant Server
The Merchant Server represents your backend application that handles server-side operations and communicates with Yuno's servers. Its key responsibilities include:
- Create Customer
- Create checkout session
- Request available payment method
- Create payment
- Receive payment result via webhook
Yuno Server
The Yuno Server handles all backend operations related to customer management, checkout sessions, and payment processing. Its main responsibilities include:
- Creates Customer
- Creates checkout session
- Returns available payment method
- Creates payment in the payment provider
- Receive payment results from payment provider
Yuno SDK
The Yuno SDK handles the user interface and payment flow on the client side, managing payment method selection, token generation, and payment completion. Its key responsibilities include:
- Receives checkout session and payment method selected by user
- Callback with the one-time token
Flow
The following steps outline the complete interaction flow between all components of the SDK Headless Payment integration, detailing how each request and response moves through the system:
- Merchant Server: Create Customer --> Yuno Server: Creates Customer
- Merchant Client: Initiate checkout --> Merchant Server: Create checkout session
- Merchant Server: Create checkout session --> Yuno Server: Creates checkout session
- Merchant Client: List payment methods --> Merchant Server: Request available payment method
- Merchant Server: Request available payment method --> Yuno Server: Returns available payment method
- Merchant Client: List payment methods --> Merchant Client: User selects payment methods
- Merchant Client: User selects payment methods --> Merchant Client: Initiate SDK with checkout session and payment method
- Merchant Client: Initiate SDK with checkout session and payment method --> Yuno SDK: Receives checkout session and payment method selected by user
- Yuno SDK: Receives checkout session and payment method selected by user --> Yuno SDK: Callback with the one-time token
- Yuno SDK: Callback with the one-time token --> Merchant Client: Gets token (single use)
- Merchant Client: Gets token (single use) --> Merchant Client: Initiate payment
- Merchant Client: Initiate payment --> Merchant Server: Create payment
- Merchant Server: Create payment --> Yuno Server: Creates payment in the payment provider
- Merchant Server: Receive payment result via webhook --> Yuno Server: Receive payment results from payment provider
Choose your integrationThe Headless SDK is designed to accept payments using cards only. If you need to perform a payment using another payment method, you need to choose another Yuno integration:
Enroll a credit card while paying
With Headless SDK, you can save credit/debit cards for future purchases within the same payment request without the enrollment integration. You can obtain the vaulted token while executing the apiClientPayment.generateToken function in Step 4.
Provide a checkbox on your checkout for users to choose if they want to save their card for future use. If the user selects this option, set payment_method.card.save = true when calling the apiClientPayment.generateToken function. You'll receive the vaulted_token in the function response.
Alternative Payment MethodsTo enroll alternative payment methods, see the Lite SDK (Enrollment) page.
After enrolling in a payment method, you can use the vaulted token to perform payments. To access information about the payment methods enrolled by each user, you can use one of the following endpoints:
Using a vaulted tokenEven if the user selects an enrolled payment method, Yuno recommends using the SDK to tokenize the information instead of directly using the vaulted token with Yuno's API. This approach provides several benefits:
- Support 3DS: Enhanced security for online payments.
- Fraud Screening: Better protection against fraudulent transactions.
- Collect Required Information: Gather additional fields required by the provider if necessary.
To implement this, send the
vaultedTokenwhen mounting the SDK. The SDK will handle the rest. If the payment method requires an extra step (such as a 3DS challenge), use theyuno.continuePayment()method. This method handles any required redirections and works for both enrolled and regular payment methods that need additional customer actions.
Updated 3 months ago