Lite SDK (Enrollment Web)
Recommended SDKWe recommend using the Web Seamless SDK for a smooth integration experience. This option provides a flexible payment solution with pre-built UI components and customization options.
Follow this step-by-step guide to implement and enable Yuno's Lite Web SDK enrollment functionality in your application.
Step 1: Include the library in your project
Before proceeding with the Lite SDK implementation, please refer to the SDK Integration Overview for detailed instructions on how to properly integrate the SDK into your project.
The integration guide provides three flexible methods:
- Method 1 (HTML): Add a single script tag to your HTML file. This is the simplest method, ideal for basic implementations and quick prototypes
- Method 2 (Dynamic JavaScript): Load the SDK programmatically with custom error handling and loading states. Best for applications needing more control over the integration
- Method 3 (NPM): Use our NPM package in modern JavaScript applications. This is our recommended approach, with dependency management, tree-shaking, and TypeScript support
1. Add the SDK script directly in HTML
The simplest way to integrate the Yuno SDK is by adding a <script> tag to your HTML file. This method provides a quick implementation while maintaining proper asynchronous loading. The SDK exposes an event that notifies when it's fully loaded, ensuring you can safely initialize and use its features at the right time.
First, set up the event listener, then load the SDK:
<script>
  window.addEventListener('yuno-sdk-ready', () => {
    console.log('SDK loaded');
    const yuno = await Yuno.initialize(PUBLIC_API_KEY);
  });
</script>

<script defer src="https://sdk-web.y.uno/v1.5/main.js"></script>
2. Inject the SDK dynamically using JavaScript
The dynamic JavaScript injection method provides enhanced control over SDK loading and initialization. This approach enables you to:
- Load the SDK programmatically when needed
- Implement custom loading states and error handling
- Precisely control when the SDK becomes available
- Synchronize SDK initialization with your application logic
- Create tailored error handling for your use case
This method is ideal when you need granular control over the SDK's loading process and want to handle various scenarios with precision.
Create a function to inject the SDK dynamically:
export const injectScript = async (): Promise<boolean> => {
  const head = document.getElementsByTagName('head')[0];
  const js = document.createElement('script');
  js.src = "https://sdk-web.y.uno/v1.5/main.js";
  js.defer = true;

  return new Promise((resolve, reject) => {
    window.addEventListener('yuno-sdk-ready', () => {
      resolve(true);
    });

    js.onerror = (error) => {
      const event = new CustomEvent('yuno-sdk-error', { detail: error });
      window.dispatchEvent(event);
      reject(new Error(`Failed to load script: ${js.src} - ${error.message}`));
    };

    head.appendChild(js);
  });
};
Use the function to inject the SDK:
await injectScript();
const yuno = await Yuno.initialize(PUBLIC_API_KEY);
3. Use the NPM module
For projects using NPM package management, you can install the SDK as a module through NPM. This approach provides better dependency management, version control, and seamless integration with modern JavaScript build tools and frameworks. It's particularly beneficial for applications using bundlers like webpack, Rollup, or Vite.
npm install @yuno-payments/sdk-webThen, load and initialize the SDK as follows:
import { loadScript } from '@yuno-payments/sdk-web';

await loadScript();
const yuno = await Yuno.initialize(PUBLIC_API_KEY);
Choose the integration method that best suits your development workflow and technical requirements. After completing the SDK integration, you can proceed with the following steps to implement the lite enrollment functionality.
TypeScript LibraryIf you are using TypeScript, Yuno provides a library that you can use to see all available methods available in the Yuno Web SDK.
Step 2: Initialize SDK with the public key
In your JavaScript application, create an instance of the Yuno class by providing a valid PUBLIC_API_KEY. Check the Get your API credentials guide if you do not have your credentials. In the example below, the initialized class is attributed to the yunoconstant.
const yuno = await Yuno.initialize(PUBLIC_API_KEY);Step 3: Create a customer session and an enrollment payment method object
Before continuing with the process, you will need to create a customer session and a payment method object to use in the setup of your SDK Lite integration for enrollment. While creating the payment method object, you will need to define which payment method is going to be available for your customer to enroll.
ImportantThe customer session and enrollment payment method object must be created on your server-side to keep your private API keys secure. The payment method type is set on the server-side, unlike other integrations where it may be set on the client-side.
Server-side example
Create a customer session and enrollment payment method on your backend. This keeps your private API keys secure.
// 1. Create customer session
const customerSession = await fetch(
  "https://api-sandbox.y.uno/v1/customers/sessions",
  {
    method: "POST",
    headers: {
      "Content-Type": "application/json",
      Authorization: `Bearer ${PRIVATE_SECRET_KEY}`,
    },
    body: JSON.stringify({
      customer_id: "your-customer-id",
      country: "US",
    }),
  }
).then((res) => res.json());

// 2. Create enrollment payment method
const enrollment = await fetch(
  `https://api-sandbox.y.uno/v1/customers/sessions/${customerSession.id}/payment-methods`,
  {
    method: "POST",
    headers: {
      "Content-Type": "application/json",
      Authorization: `Bearer ${PRIVATE_SECRET_KEY}`,
    },
    body: JSON.stringify({
      type: "CARD",
    }),
  }
).then((res) => res.json());

// Return customerSession to your client
return customerSession;
Client-side example
After receiving the customerSession from your server, initialize the Yuno SDK and mount the enrollment form on the client-side.
// Initialize Yuno SDK
const yuno = await Yuno.initialize(PUBLIC_API_KEY);

// Mount the enrollment form
yuno.mountEnrollmentLite({
  customerSession, // Received from your server
  countryCode: "US",
  language: "en",
  showLoading: true,
  onLoading: (args) => {
    console.log(args);
  },
});
VerifyIn case you want to verify cards (zero value authorization) before the enrollment, you can complete the
verifystruct while defining the payment method object for the customer session.
Step 4: Mount the enrollment lite
The configuration and mounting are done in the same step for the Enrollment Lite. To do it, use the yuno.mountEnrollmentLite function and provide the necessary parameters. The following table lists all parameters and their descriptions.
| Parameter | Description |
|---|---|
customerSession | Refers to the current payment's customer session. Example: e15648b0-fcd5-4799-a14c-cc463ae8a133. |
country_code | Country for the payment process. Use an ENUM value; see Country Coverage. |
language | Language for payment forms. Use any code listed in Supported languages. Example: en-US. Defaults to browser language when available. |
showLoading | Controls visibility of the Yuno loading/spinner page during the payment process. |
onLoading | Required to receive notifications about server calls or loading events. |
elementSelector | HTML element where the Yuno SDK is mounted. |
card | Define specific settings for the credit card form. |
yunoEnrollmentStatus | Callback after enrollment ends; receives vaultedToken and status. Status options: CREATED, EXPIRED, REJECTED, READY_TO_ENROLL, ENROLL_IN_PROCESS, UNENROLL_IN_PROCESS, ENROLLED, DECLINED, CANCELED, ERROR, UNENROLLED. |
issuersFormEnable | Enable the issuer's form (bank list). |
texts | Custom text for payment form buttons to match your application's language or branding. |
card.isCreditCardProcessingOnly | Optional. Forces card transactions to process as credit only—useful where cards act as both credit and debit. |
The next code block presents an example of the Enrollment Lite parameter configuration and mounting.
yuno.mountEnrollmentLite({
  customerSession: 'e15648b0-fcd5-4799-a14c-cc463ae8a133',
  /**
   * The complete list of country codes is available on https://docs.y.uno/docs/country-coverage-yuno-sdk
   */
  country_code: country,
  /**
  * Language for payment forms (see Supported languages)
  * Defaults to browser language when available
  */
  language: 'en-US',
  /**
   * Hide or show the Yuno loading/spinner page
   * Default is true
   * @optional
   */
  showLoading: true,
  /**
   * Required if you'd like to be informed if there is a server call
   * @param { isLoading: boolean, type: 'DOCUMENT' | 'ONE_TIME_TOKEN'  } data
   * @optional
   */
  onLoading: (args) => {
    console.log(args);
  }
  /**
   *  API card
   *  @optional
   */
  card: {
    /**
     * Mode render card can be step or extends
     * Default extends
     */
    type: "extends",
    /**
     * Write custom CSS to style the card form. Your CSS will be injected into the iframe.
     * Example:
     * `@import url('https://fonts.googleapis.com/css2?family=Luckiest+Guy&display=swap');
     *  .Yuno-front-side-card__name-label {
     *    color: red !important;
     *    font-family: 'Luckiest Guy' !important;
     *   }`
     */
    styles: '',
    /**
     * Show checkbox for save/enroll card
     * Default is false
     */
    cardSaveEnable: false,
    /**
     * Custom texts in Card forms buttons
     * Example:
     *
     *  texts: {
     *    cardForm?: {
     *      enrollmentSubmitButton?: string;
     *       paymentSubmitButton?: string;
     *     }
     *     cardStepper?: {
     *       numberCardStep?: {
     *         nextButton?: string;
     *       },
     *       cardHolderNameStep?: {
     *         prevButton?: string;
     *         nextButton?: string;
     *       },
     *       expirationDateStep?: {
     *         prevButton?: string;
     *         nextButton?: string;
     *       },
     *       cvvStep?: {
     *         prevButton?: string;
     *         nextButton?: string;
     *       }
     *     }
     *  }
     */
    texts: {},
    /**
     * Hide or show the document fields into card form
     * Default is true
     * @optional
     */
    documentEnable: true,
  },
  /**
   * Call back is called with the following object
   * @param {{
   *  status: 'CREATED'
   *    | 'EXPIRED',
   *    | 'REJECTED',
   *    | 'READY_TO_ENROLL',
   *    | 'ENROLL_IN_PROCESS',
   *    | 'UNENROLL_IN_PROCESS',
   *    | 'ENROLLED',
   *    | 'DECLINED',
   *    | 'CANCELED',
   *    | 'ERROR',
   *    | 'UNENROLLED',
   *  vaultedToken: string,
   * }}
   */
  yunoEnrollmentStatus: ({ status, vaultedToken}) => {
    console.log('status', { status, vaultedToken})
  },
  /**
   * If this is called the SDK should be mounted again
   * @param { error: 'CANCELED_BY_USER' | any }
   * @optional
   */
  yunoError: (error) => {
    console.log('There was an error', error)
  },
});
continuePayment return value or null
continuePayment return value or nullFor payment methods that require merchant-side action (e.g., when the payment provider requires a redirect URL in a webview), the await yuno.continuePayment() method will return either an object with the following structure or null:
{
  action: 'REDIRECT_URL'
  type: string
  redirect: {
    init_url: string
    success_url: string
    error_url: string
  }
} | null
When the method returns an object, it allows you to handle your application's payment flows that require custom redirect handling. When it returns null, no additional merchant-side action is needed.
Demo AppIn addition to the code examples provided, you can access the Demo App for a complete implementation of Yuno SDKs. The demo app includes working examples of all Yuno SDKs and can be cloned from the GitHub repository.
Complementary features
Yuno Web SDK provides additional services and configurations you can use to improve customers' experience:
Loader
Control the use of the loader.
| Parameter | Description |
|---|---|
showLoading | You can hide or show the Yuno loading/spinner page. Enabling this option ensures that the loading component remains displayed until either the hideLoader() or continuePayment() function is called. The default value is true. |
yuno.startCheckout({
  showLoading: true,
});
Mode of form rendering
| Parameter | Description |
|---|---|
renderMode | Determines how payment forms are displayed. - type: modal or element.- elementSelector: element where the form is rendered (required if type is element). |
elementSelector | Required when type is element. Specifies where to mount the Yuno SDK. - String (Deprecated): ID or selector for mounting the SDK. - Object: Provide apmForm (where the APM is displayed) and actionForm (button that opens the modal to complete provider steps, e.g., PIX QR). |
yuno.startCheckout({
  renderMode: {
    /**
     * Type can be one of `modal` or `element`
     * By default the system uses 'modal'
     * It is optional
     */
    type: "modal",
    /**
     * Element where the form will be rendered.
     * It is optional
     * Can be a string (deprecated) or an object with the following structure:
     * {
     *   apmForm: "#form-element",
     *   actionForm: "#action-form-element"
     * }
     */
    elementSelector: {
      apmForm: "#form-element",
      actionForm: "#action-form-element",
    },
  },
});
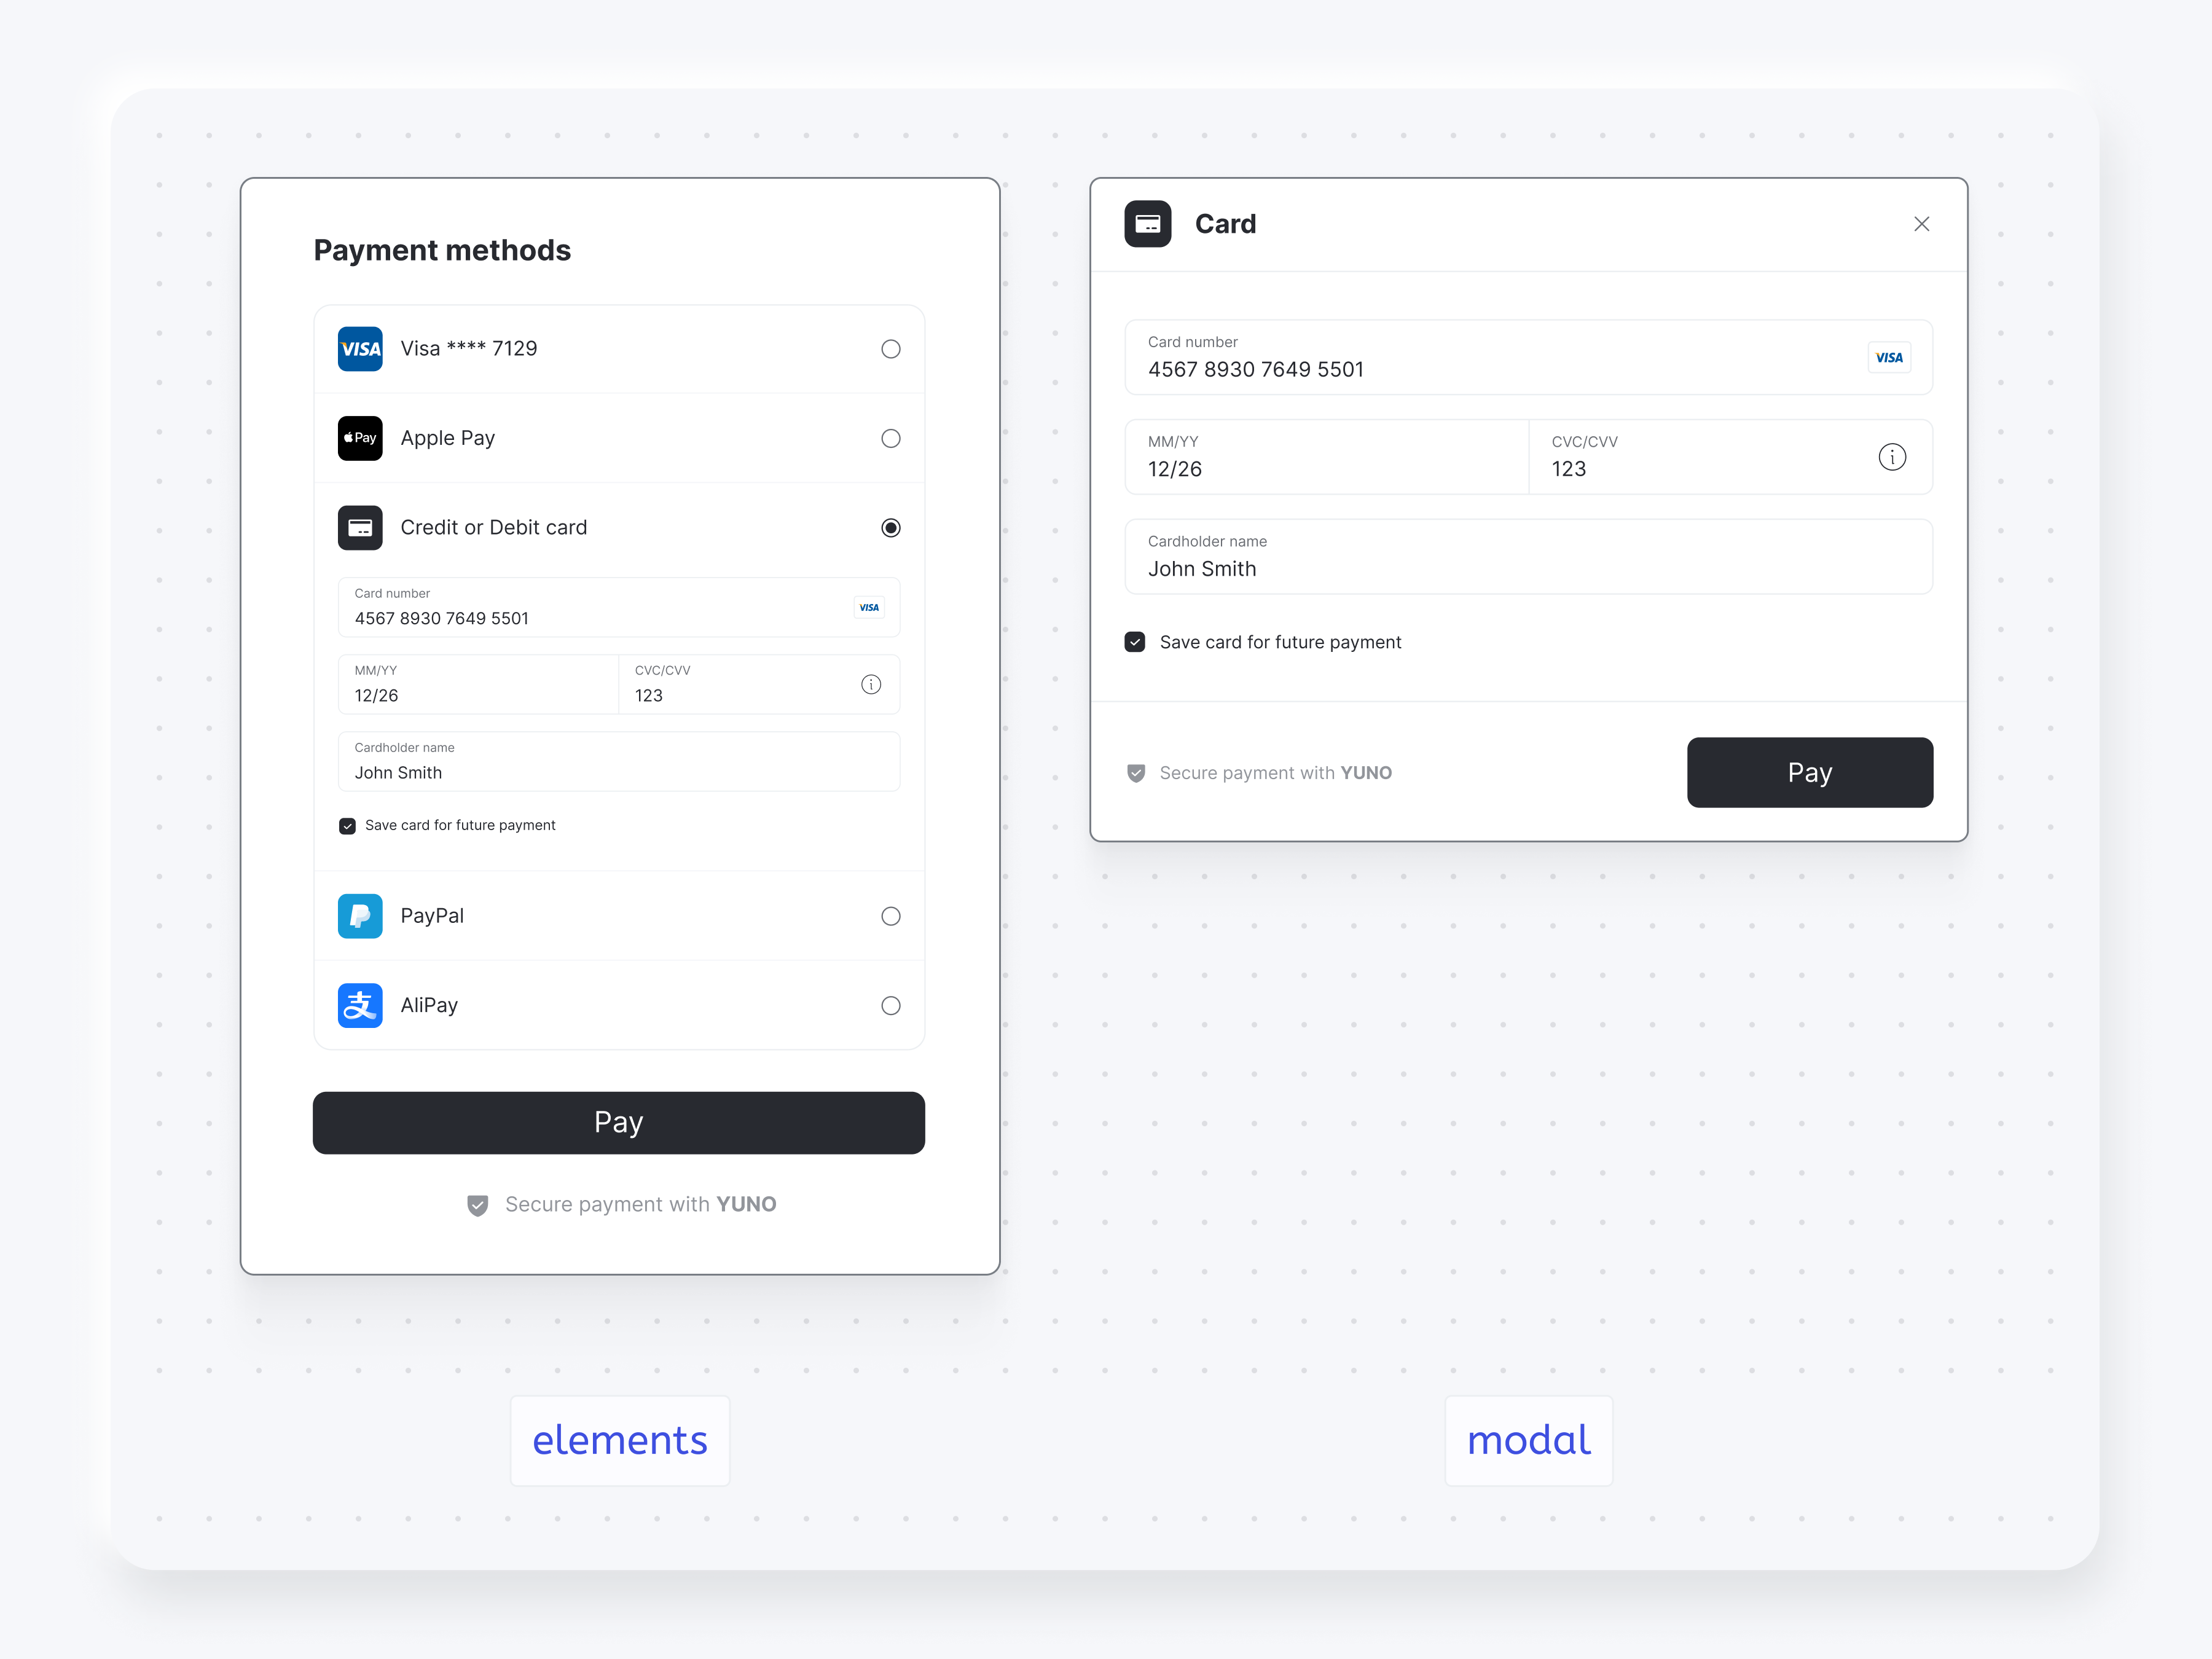
Below, you will find screenshots presenting the difference between the render modes modal and elements for the payment method list.

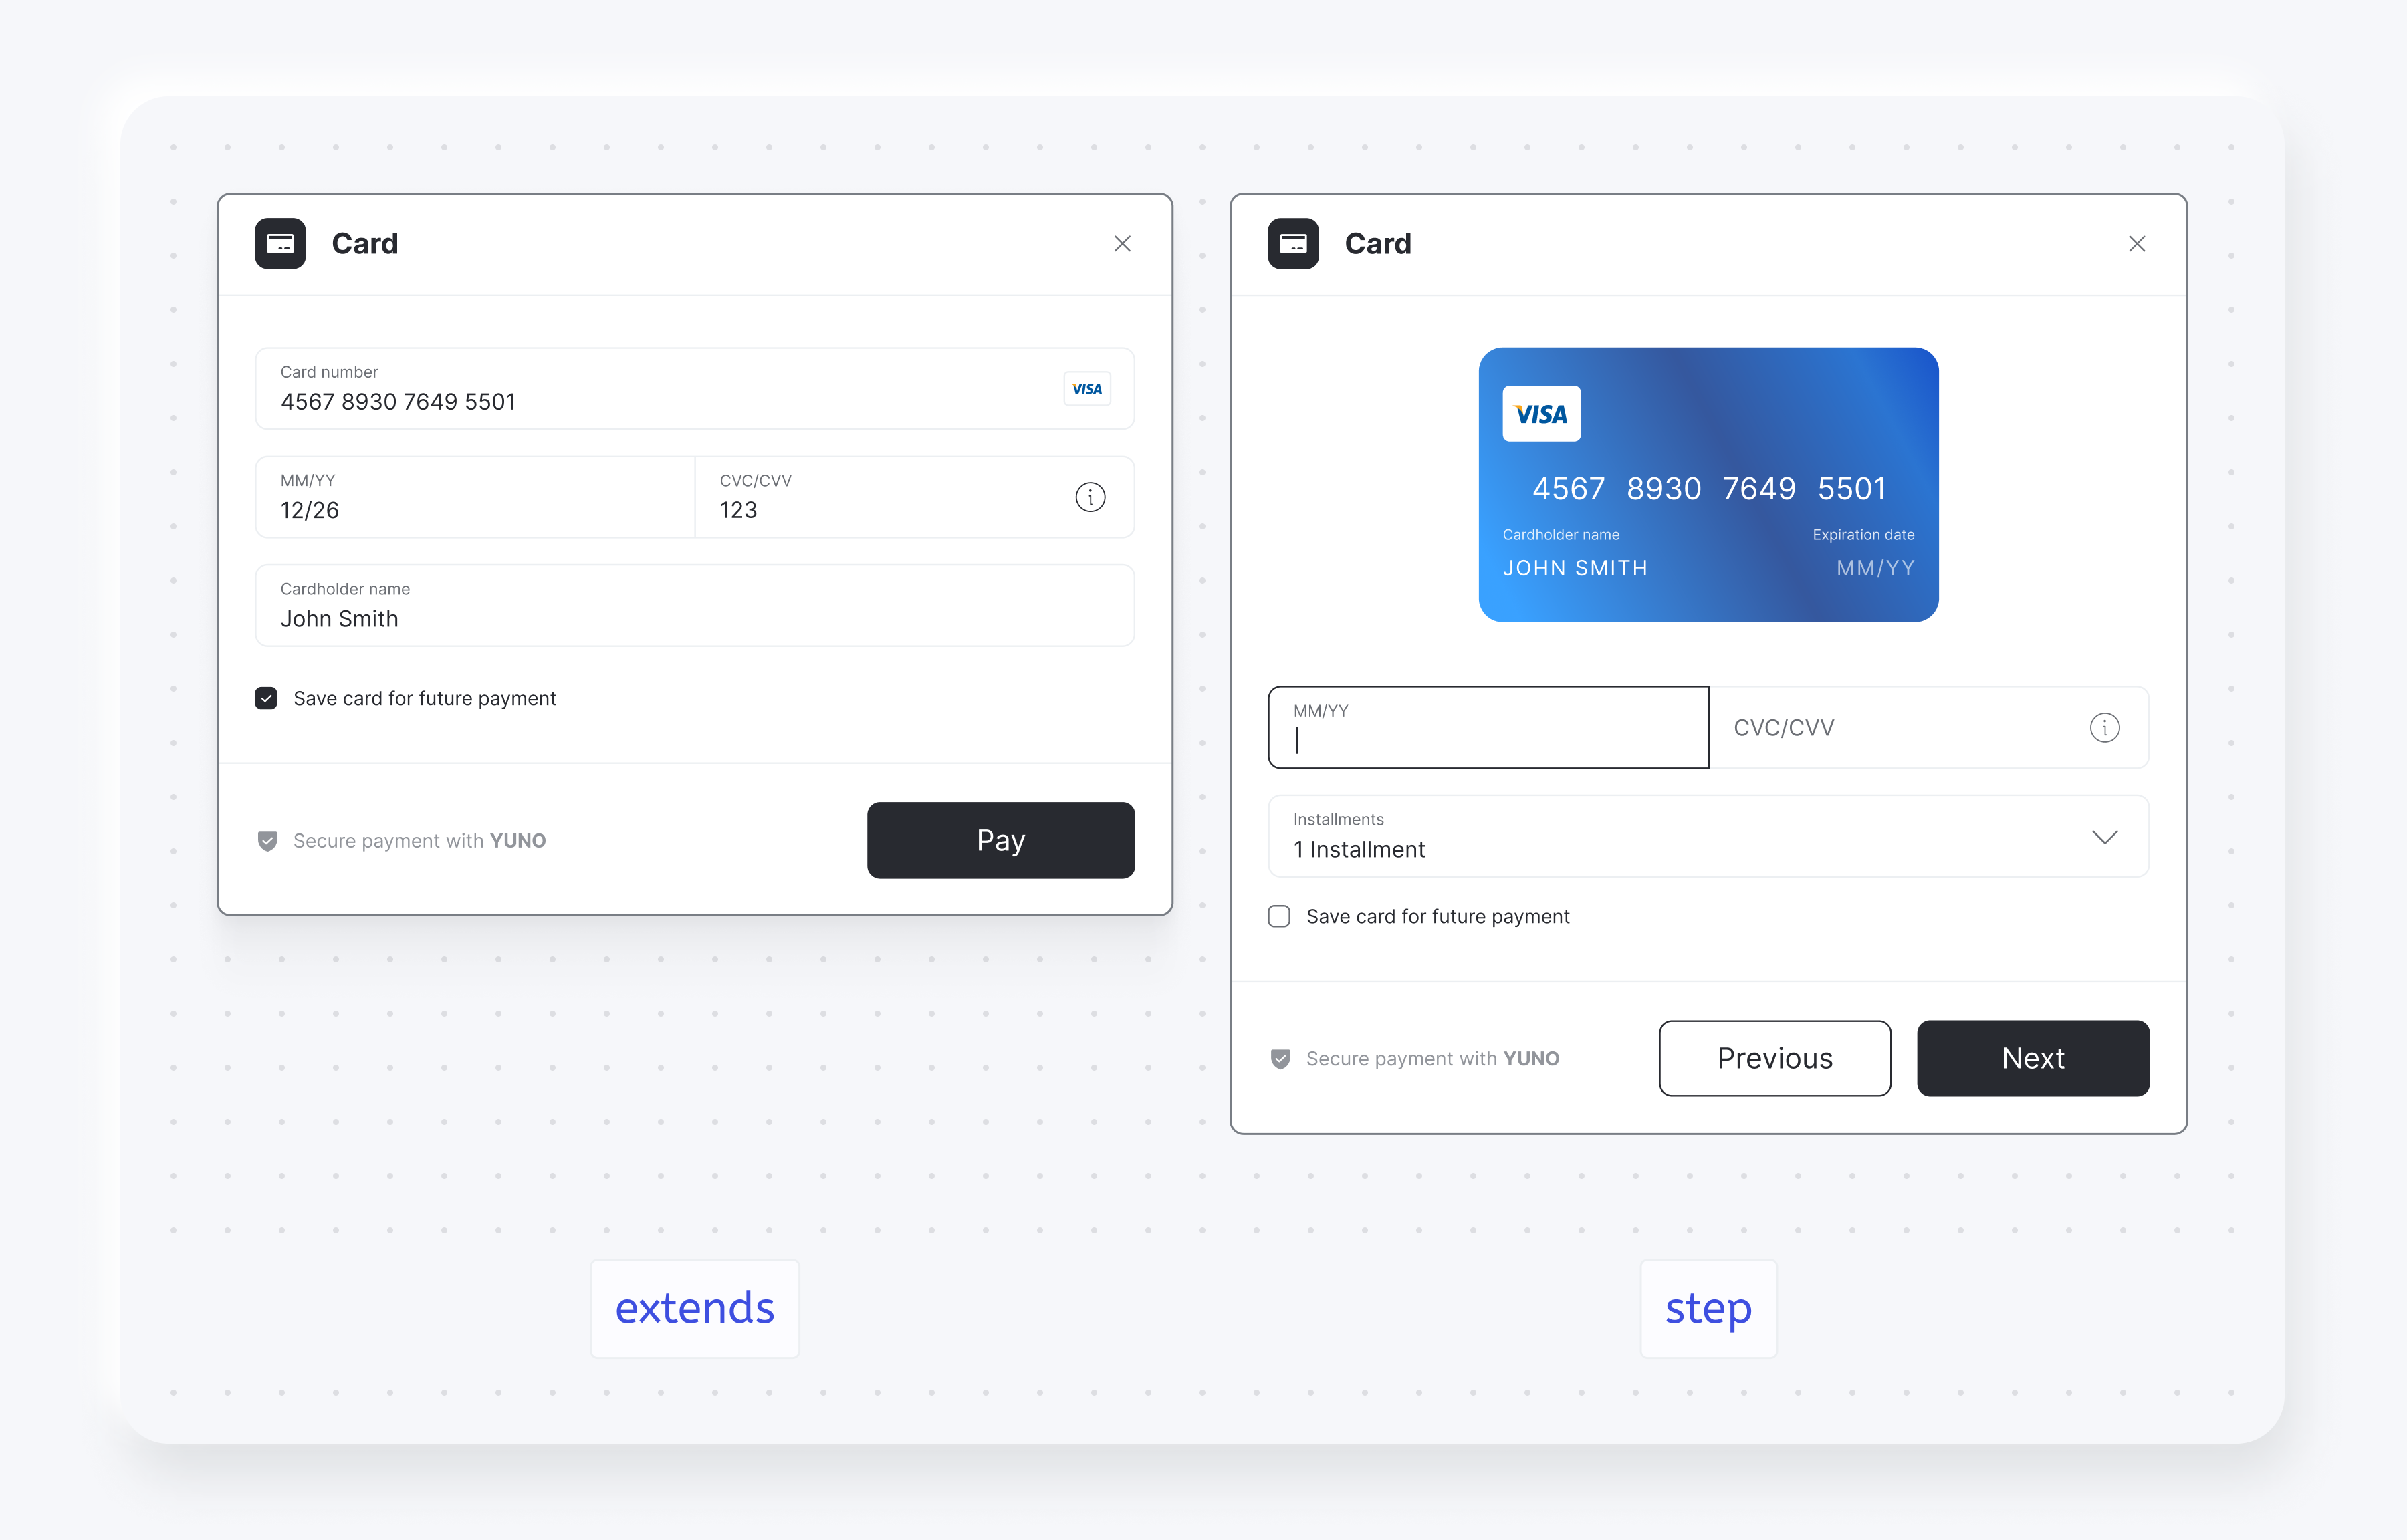
You also can choose one of the render options for the card form, step and extends:

Card form configurations
| Parameter | Description |
|---|---|
card | Define settings for the credit card form: - type: step or extends.- styles: Write custom CSS to style the card form; your CSS is injected into the iframe.- texts: Custom texts for the card form buttons. |
yuno.startCheckout({
  card: {
    type: "extends",
    styles: "",
    texts: {},
  },
});
Text payment form buttons
| Parameter | Description |
|---|---|
texts | Provide custom text for payment form buttons to match your application's language or branding. |
yuno.startCheckout({
  texts: {
    customerForm?: {
      submitButton?: string;
    }
    paymentOtp?: {
      sendOtpButton?: string;
    }
  }
})
SDK customizations
Use the SDK Customizations to change the SDK appearance to match your brand.
Stay Updated
Visit the changelog for the latest SDK updates and version history.
Updated 10 days ago