Complementary features
Yuno Web SDK provides additional services and configurations you can use to improve customers' experience:
- Form loader
- Render mode
- Card form configurations
- Mercado Pago Checkout Pro webview handling
- Optional initialization
optionsparameter
Form loader
Control the use of the loader.
Parameter | Description |
|---|---|
|
|
| |
|
yuno.startCheckout({
  showLoading: true,
})
Form of the issuer
| Parameter | Description |
|---|---|
issuersFormEnable | Through this parameter, you can configure the SDK to enable the issuer's form (bank list). |
yuno.startCheckout({
  issuersFormEnable: true,
})
Mode of form rendering
Parameter | Description |
|---|---|
| This parameter is optional. It determines the mode in which the payment forms will be displayed. |
| |
| |
| Required only if the type is |
| |
| |
This button triggers a modal that shows the steps to complete a payment with a provider. For example, with PIX, it displays a QR code. |
yuno.startCheckout({
  renderMode: {
    type: 'modal',
    elementSelector: {
      apmForm: "#form-element",
      actionForm: "#action-form-element"
    }
  },
})
Card form configurations
Parameter | Description |
|---|---|
| Define specific settings for the credit card form: |
| |
| |
| |
|
yuno.startCheckout({
  card: {
    type: "extends",
    styles: '',
    cardSaveEnable: false,
    texts: {}
  },
})
Save card for future payments
In addition, you can display a checkbox for saving or enrolling cards using the cardSaveEnable: true. Below are examples of the checkbox for both card form renders.

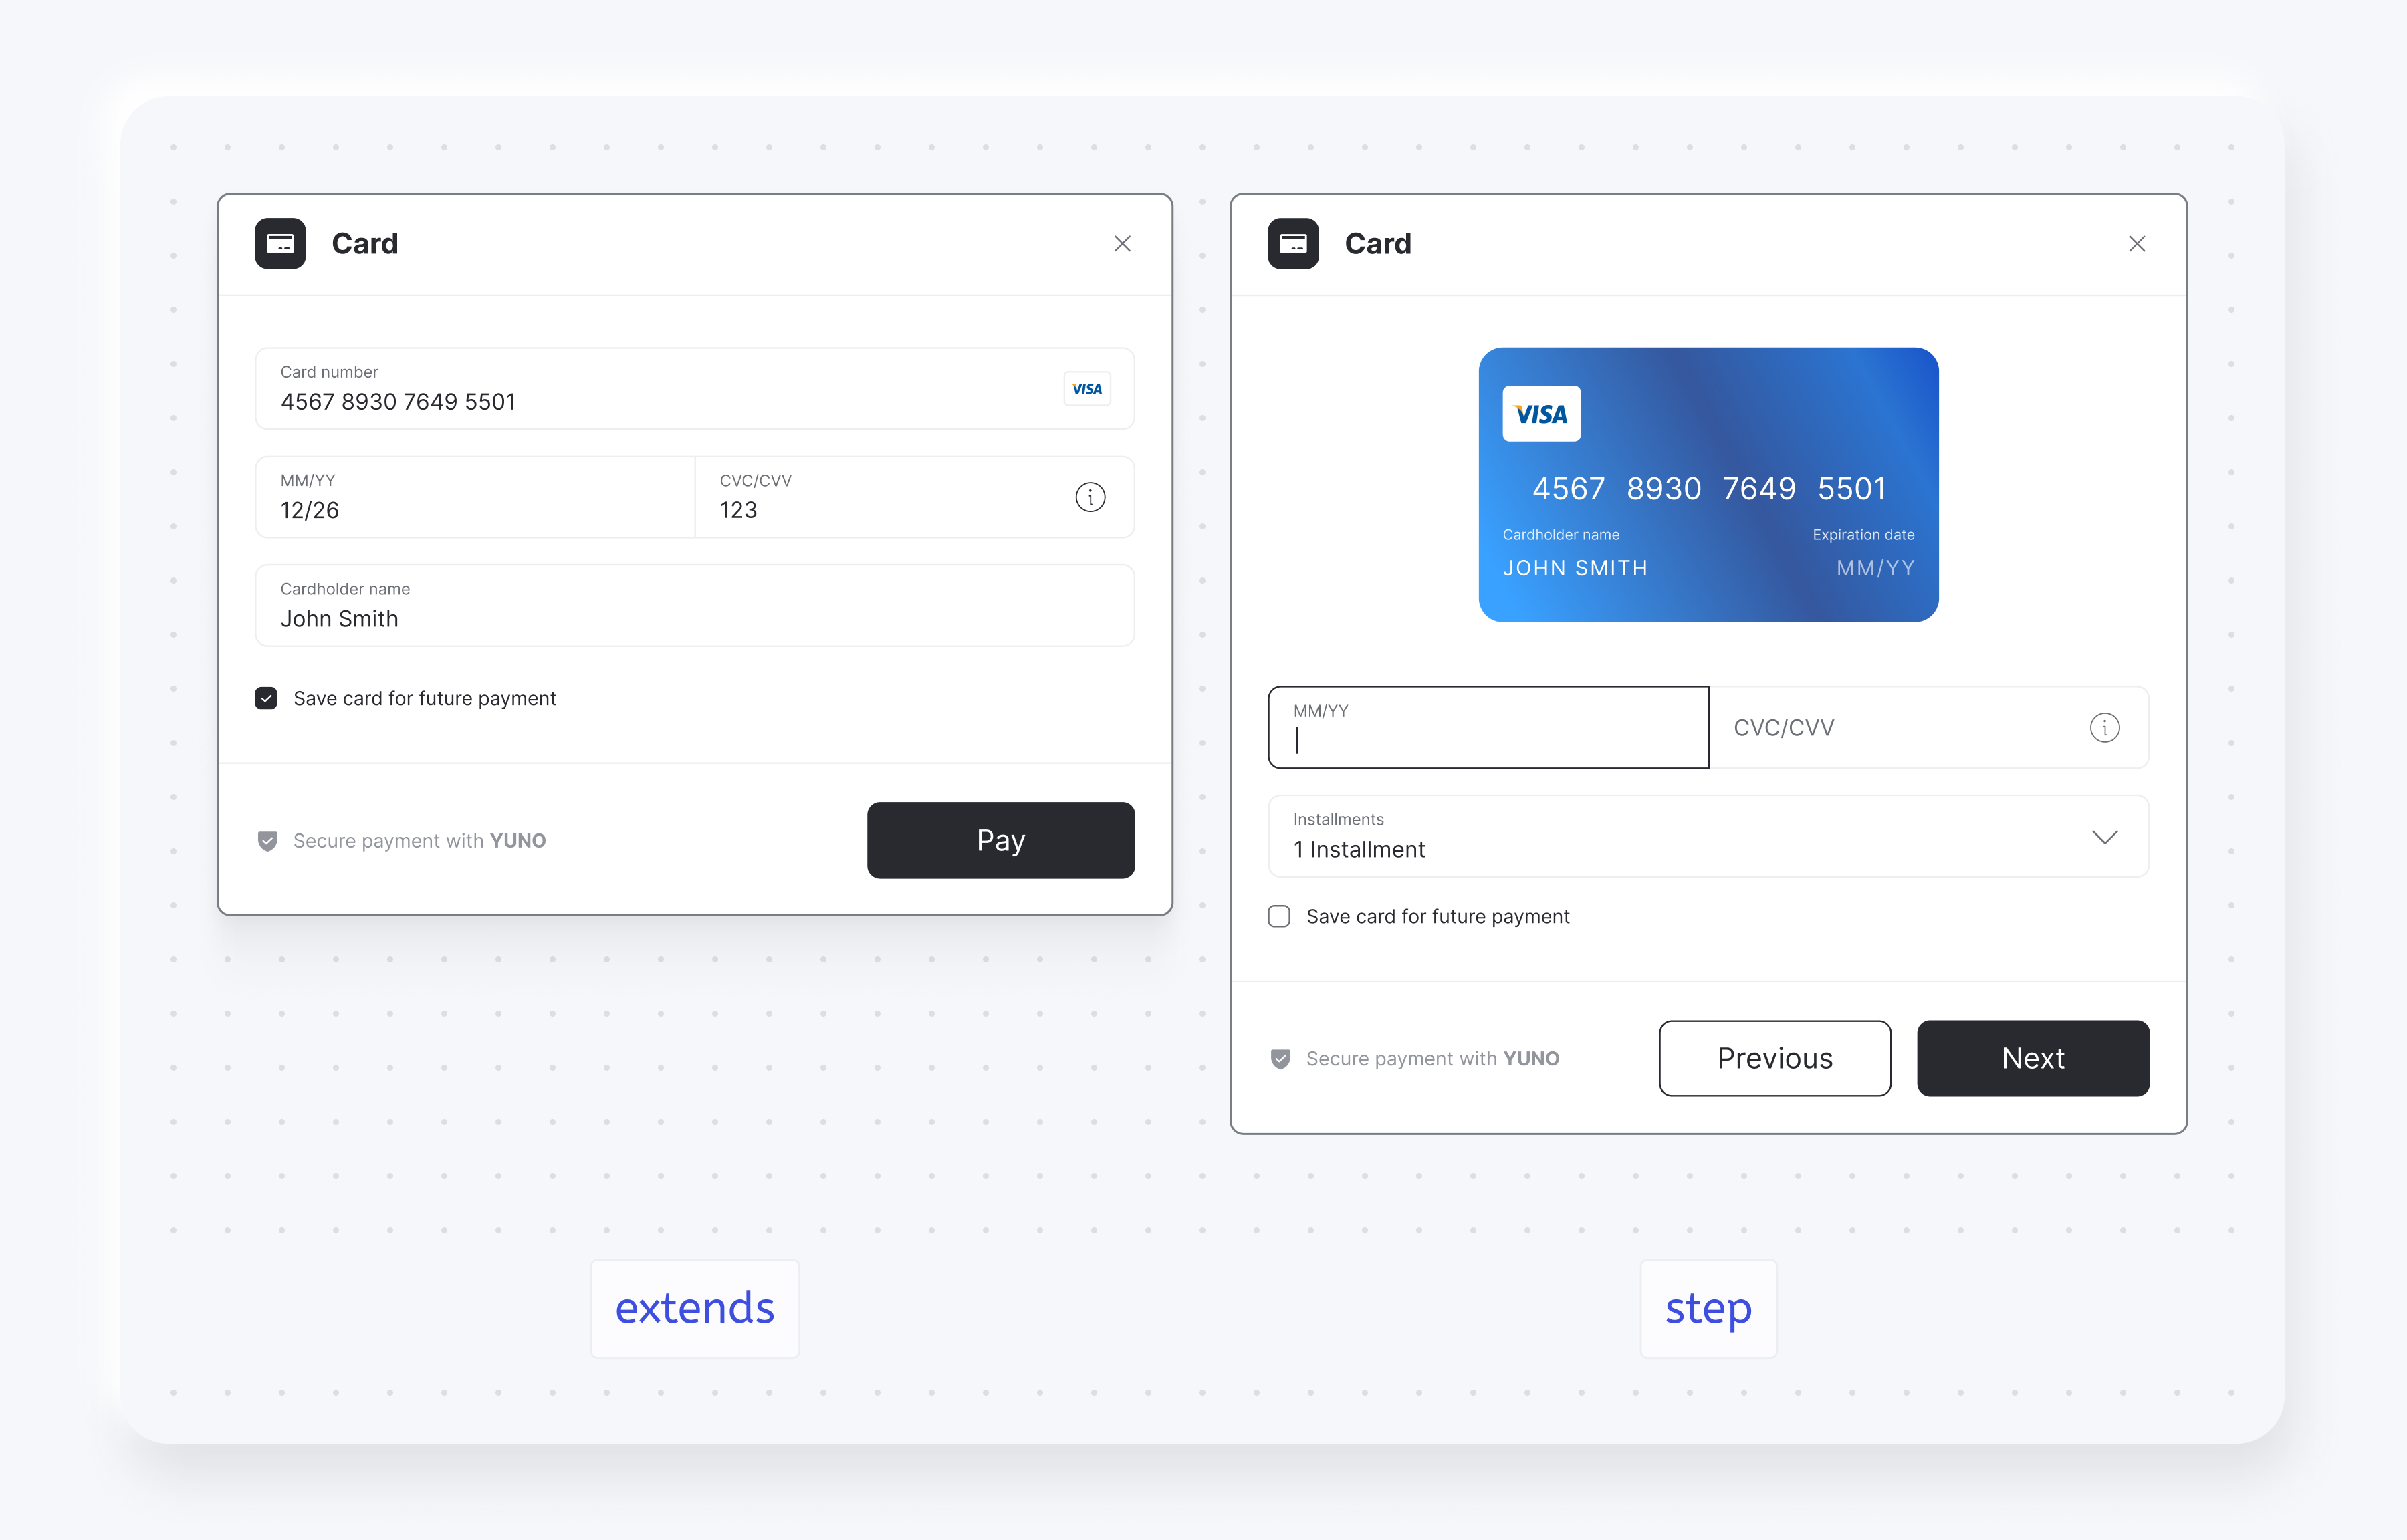
Rendering modes
Below you find screenshots presenting the difference between the following:
- Render modes
modalandelementsfor the payment method list. - Render modes
stepandextendsfor the credit card form.
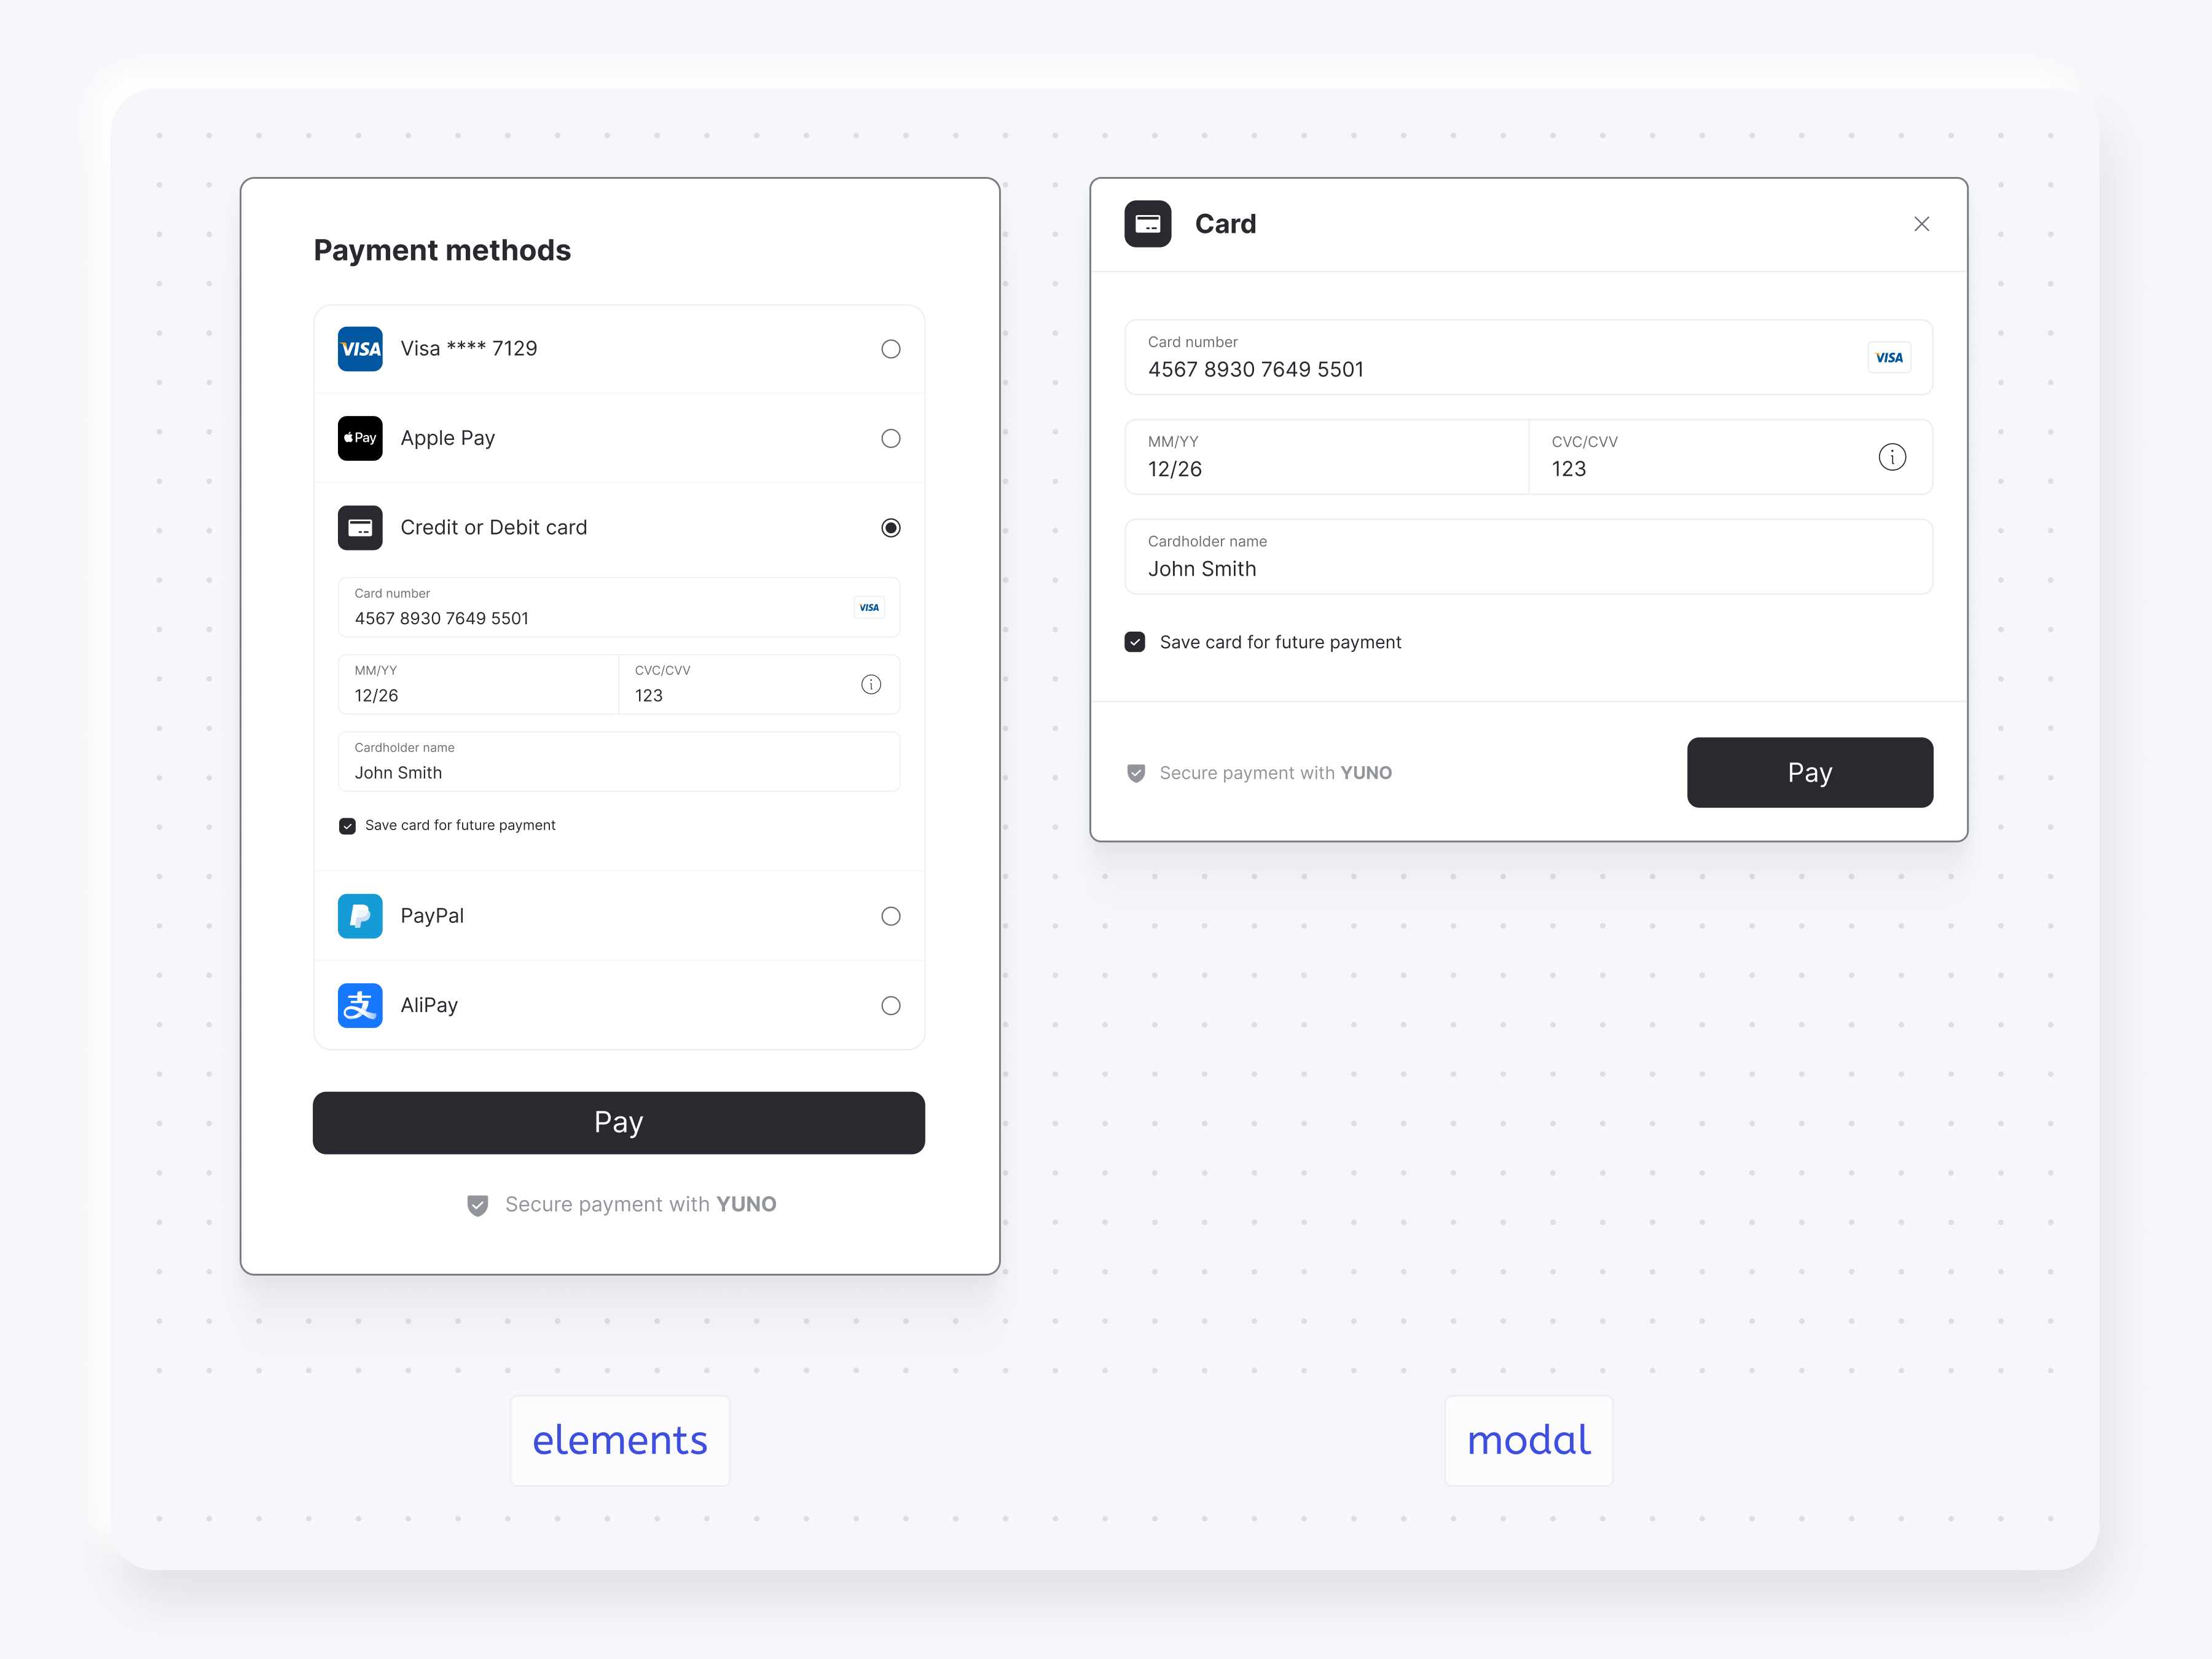
You also can choose one of the render options for the card form, step and extends:
Text payment form buttons
| Parameter | Description |
|---|---|
texts | Provide custom text for payment form buttons to match your application's language or branding. |
yuno.startCheckout({
  texts: {
    customerForm?: {
      submitButton?: string;
    }
    paymentOtp?: {
      sendOtpButton?: string;
    }
  }
})
Persist credit card form to retry payments
If a transaction is rejected, you can use the credit card form to retry a payment after the customer has entered the credit card details. To do that, you will need to:
- Add the following parameter while initializing the SDK to persist the credit card form after the one-time use token is created:
yuno.startCheckout({ automaticallyUnmount: false, }) - In case the transaction is rejected, you will need to:
- Execute the method
yuno.notifyError()to delete the previously entered CVV for the first transaction. - Create a new checkout session and update the SDK with the new one by executing
yuno.updateCheckoutSession(checkoutsession)
- Execute the method
- Continue with the new checkout and one-time use token with the regular payment flow.
Hide Pay button
You can hide the Pay button when presenting the card or customer data form. To control this feature, you'll set showPayButton to false when starting the checkout with the startCheckout function. The code block below presents an example of how to hide the payment button:
yuno.startCheckout({
  showPayButton: false,
})
The following images present examples of the Customer Data Form with and without the Pay button:
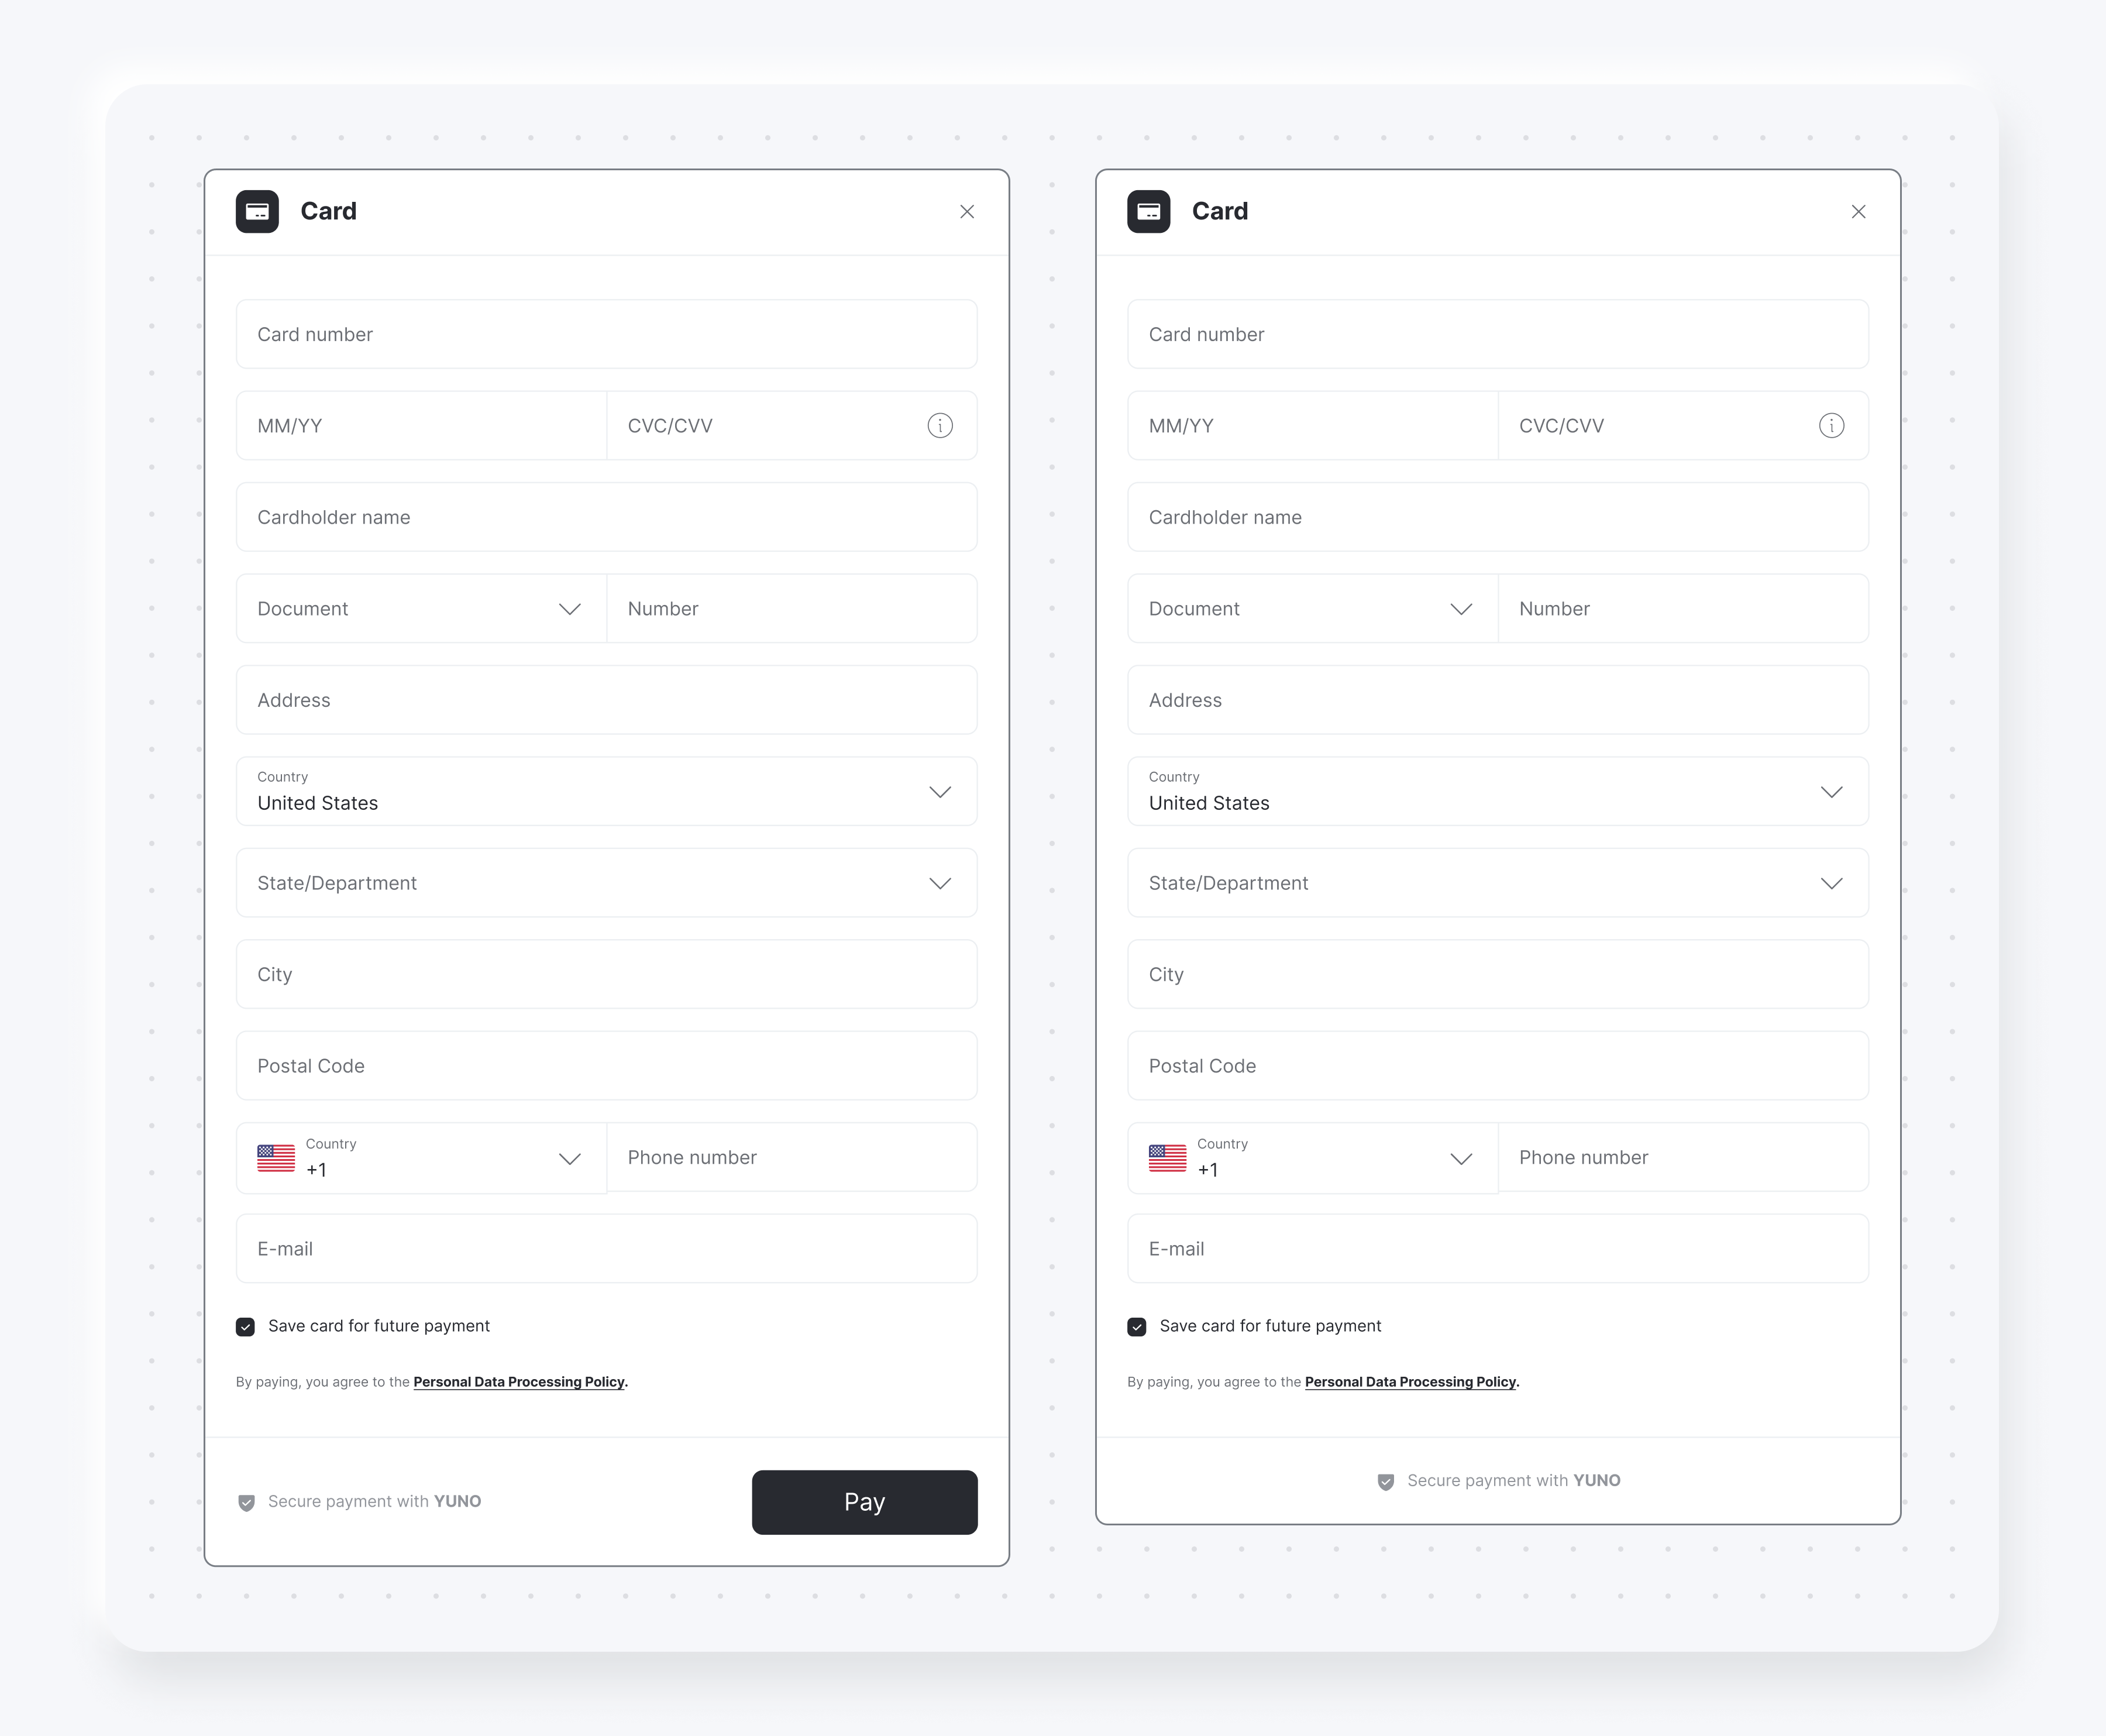
The following images present examples of the Card Form with and without the Pay button:

If you hide the Pay button, you will need to start the OTT creation through your code. To create the OTT and continue the payment in your backend, call the submitOneTimeTokenForm function. The code block below presents how to use the submitOneTimeTokenForm function.
yuno.submitOneTimeTokenForm()Mercado Pago Checkout Pro webview handling
Special ExceptionThis section describes a special exception for handling Mercado Pago Checkout Pro integration in webview environments. This is the only payment method that requires custom redirect handling, and it is documented here to avoid overwhelming merchants with unnecessary implementation details for other payment methods.
For Mercado Pago Checkout Pro integration in webview environments, the await yuno.continuePayment() method will return either an object with redirect information or null. When the method returns an object, it allows you to handle the custom redirect flow required by Mercado Pago Checkout Pro. When it returns null, no additional merchant-side action is needed.
{
  action: 'REDIRECT_URL'
  type: 'MERCADO_PAGO_CHECKOUT_PRO'  // Enum value identifying Mercado Pago Checkout Pro
  redirect: {
    init_url: string    // URL to redirect to for completing the payment
    success_url: string // URL to redirect to after successful payment
    error_url: string   // URL to redirect to after failed payment
  }
} | null
Properties
Property | Description |
|---|---|
|
|
|
|
|
|
|
|
|
|
Optional initialization options parameter
options parameterStarting from Yuno SDK v1.2, the Yuno.initialize function supports a new optional parameter called options. This allows for advanced configuration such as customizing the cookie name used for device identification.
Initialization options
The updated function signature is:
const yuno = await Yuno.initialize(publicApiKey, applicationSession, options);publicApiKey(string): Your public API key.applicationSession(string | undefined): Optional session ID.Recommendation: Leave this as
undefinedso the SDK can generate and manage its own session internally. Only set this if you require a custom session management strategy.options(object | undefined): Optional object for advanced configuration.
Options structure
The options object supports the following shape:
const options = {
  cookies: {
    deviceId: {
      name: "customCookieName" // Overrides the default cookie name used for device ID
    }
  }
};
Note: If
deviceId.nameis not specified, the SDK defaults to"yuno"as the cookie name.
Example Usage
const publicApiKey = 'your-public-api-key';
const options = {
  cookies: {
    deviceId: {
      name: 'custom-device-id'
    }
  }
};

// Recommended: omit the second parameter or set it to undefined
const yuno = await Yuno.initialize(publicApiKey, undefined, options);
This feature is optional and is intended for advanced use cases where you need to customize how device identification is handled via cookies.
Updated about 2 months ago