Lite SDK (Payment)
The Lite SDK provides full control over your payment experience. Unlike the Full SDK, this version allows you to query available payment methods and decide which to display at checkout. After the customer selects a payment method, the payment process follows the same steps as the Full SDK.
Additionally, the Lite SDK supports enrolling payment methods for future use. For more details, see Lite SDK (Enrollment).
Google Pay and Apple Pay in Lite SDKGoogle Pay and Apple Pay are not available as built-in payment options in the Lite SDK. To use these payment methods, you must use the
mountExternalButtonsmethod. See the platform-specific guides for implementation details.
With the Lite SDK, you can:
- Execute the payment process
- Enroll a credit card while making a payment
- Use a vaulted token from an enrolled payment method to complete a transaction
- Perform real-time tax calculations using the BIN (Bank Identification Number) callback
Use the following guides to implement each process:
Payment workflow
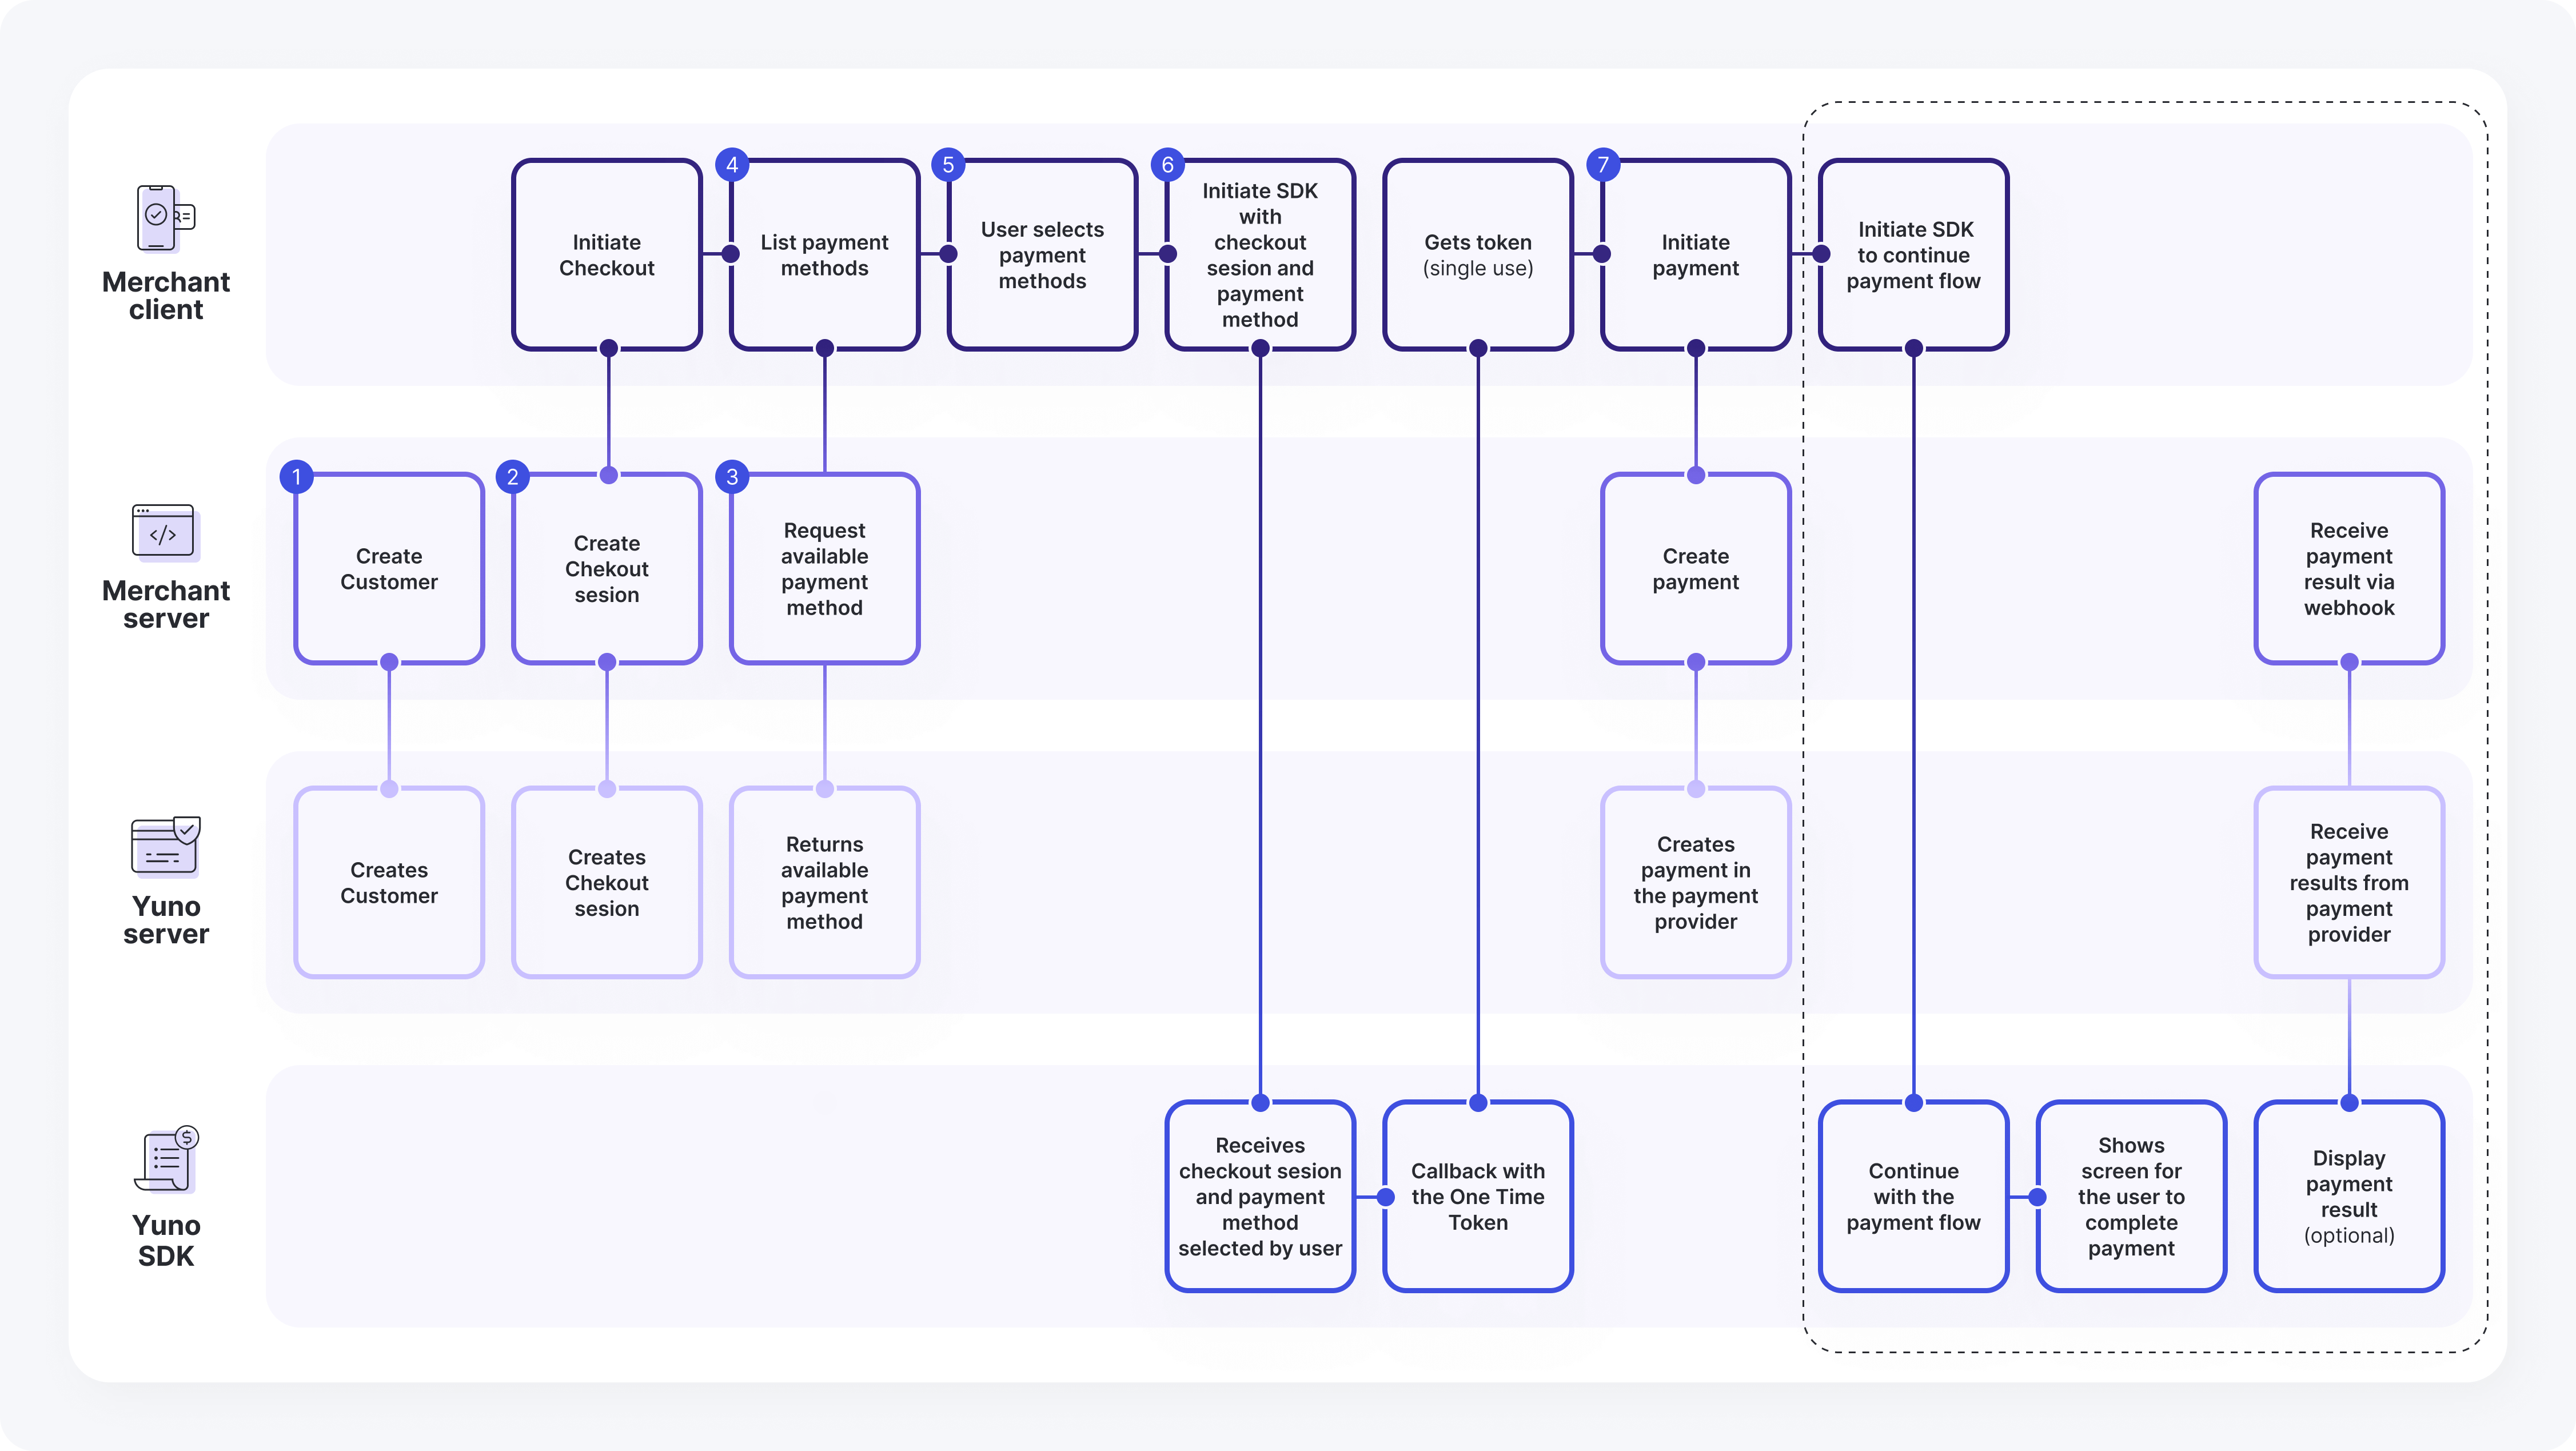
The diagram below illustrates the complete payment workflow:

SDK Lite Payment Flow
This diagram illustrates the payment process using the SDK Lite, detailing the interactions between the Merchant Client, Merchant Server, Yuno Server, and Yuno SDK. It outlines the steps from initiating a checkout and selecting payment methods to creating and completing the payment.
Components overview
The payment workflow involves several key components working together to process payments securely. Here's how each component contributes to the process:
Merchant Client
The Merchant Client represents your frontend application that handles the user interface and payment flow. Its key responsibilities include:
- Initiate Checkout
- List payment methods
- User selects payment methods
- Initiate SDK with checkout session and payment method
- Gets token (single use)
- Initiate payment
- Initiate SDK to continue payment flow
Merchant Server
The Merchant Server represents your backend application that coordinates between your frontend and Yuno's services. Its key responsibilities include:
- Create Customer
- Create Checkout session
- Request available payment method
- Create payment
- Receive payment result via webhook
Yuno Server
The Yuno Server handles all backend operations related to payment processing and provider integration. Its key responsibilities include:
- Creates Customer
- Creates Checkout session
- Returns available payment method
- Creates payment in the payment provider
- Receive payment results from payment provider
Yuno SDK
The Yuno SDK manages the payment flow on the client side, handling user interactions and payment processing. Its key responsibilities include:
- Receives checkout session and payment method selected by user
- Callback with the one-time token
- Continue with the payment flow
- Shows screen for the user to complete payment
- Display payment result (optional)
Complete flow
The following steps outline the complete interaction flow between all components of the SDK Lite Payment integration, detailing how each request and response moves through the system:
- Merchant Server: Create Customer --> Yuno Server: Creates Customer
- Merchant Client: Initiate Checkout --> Merchant Server: Create Checkout session
- Merchant Server: Create Checkout session --> Yuno Server: Creates Checkout session
- Merchant Client: Initiate Checkout --> Merchant Client: List payment methods
- Merchant Client: List payment methods --> Merchant Client: User selects payment methods
- Merchant Client: User selects payment methods --> Merchant Client: Initiate SDK with checkout session and payment method
- Merchant Client: Initiate SDK with checkout session and payment method --> Yuno SDK: Receives checkout session and payment method selected by user
- Yuno SDK: Receives checkout session and payment method selected by user --> Yuno SDK: Callback with the one-time token
- Yuno SDK: Callback with the one-time token --> Merchant Client: Merchant Client: Gets token (single use)
- Merchant Client: Merchant Client: Gets token (single use) --> Merchant Client: Initiate payment
- Merchant Client: Initiate payment --> Merchant Client: Initiate SDK to continue payment flow
- Merchant Client: Initiate SDK to continue payment flow --> Yuno SDK: Continue with the payment flow
- Yuno SDK: Continue with the payment flow --> Yuno SDK: Shows screen for the user to complete payment
- Merchant Client: Initiate Checkout --> Merchant Server: Create Checkout session
- Merchant Client: List payment methods --> Merchant Server: Request available payment method
- Merchant Client: Initiate payment --> Merchant Server: Create payment
- Merchant Server: Create payment --> Yuno Server: Creates payment in the payment provider
- Merchant Server: Receive payment result via webhook --> Yuno Server: Receive payment results from payment provider
- Yuno Server: Receive payment results from payment provider --> Yuno SDK: Display payment result (optional)
Platform-specific SDK setup
To implement the Lite SDK integration, follow the platform-specific guides below:
Payment workflow using a vaulted token
If your customer has enrolled in one of the available payment methods, the payment can be made back-to-back using the Vaulted token from the enrollment process. With this approach, you don't need to request additional information about the payment method.
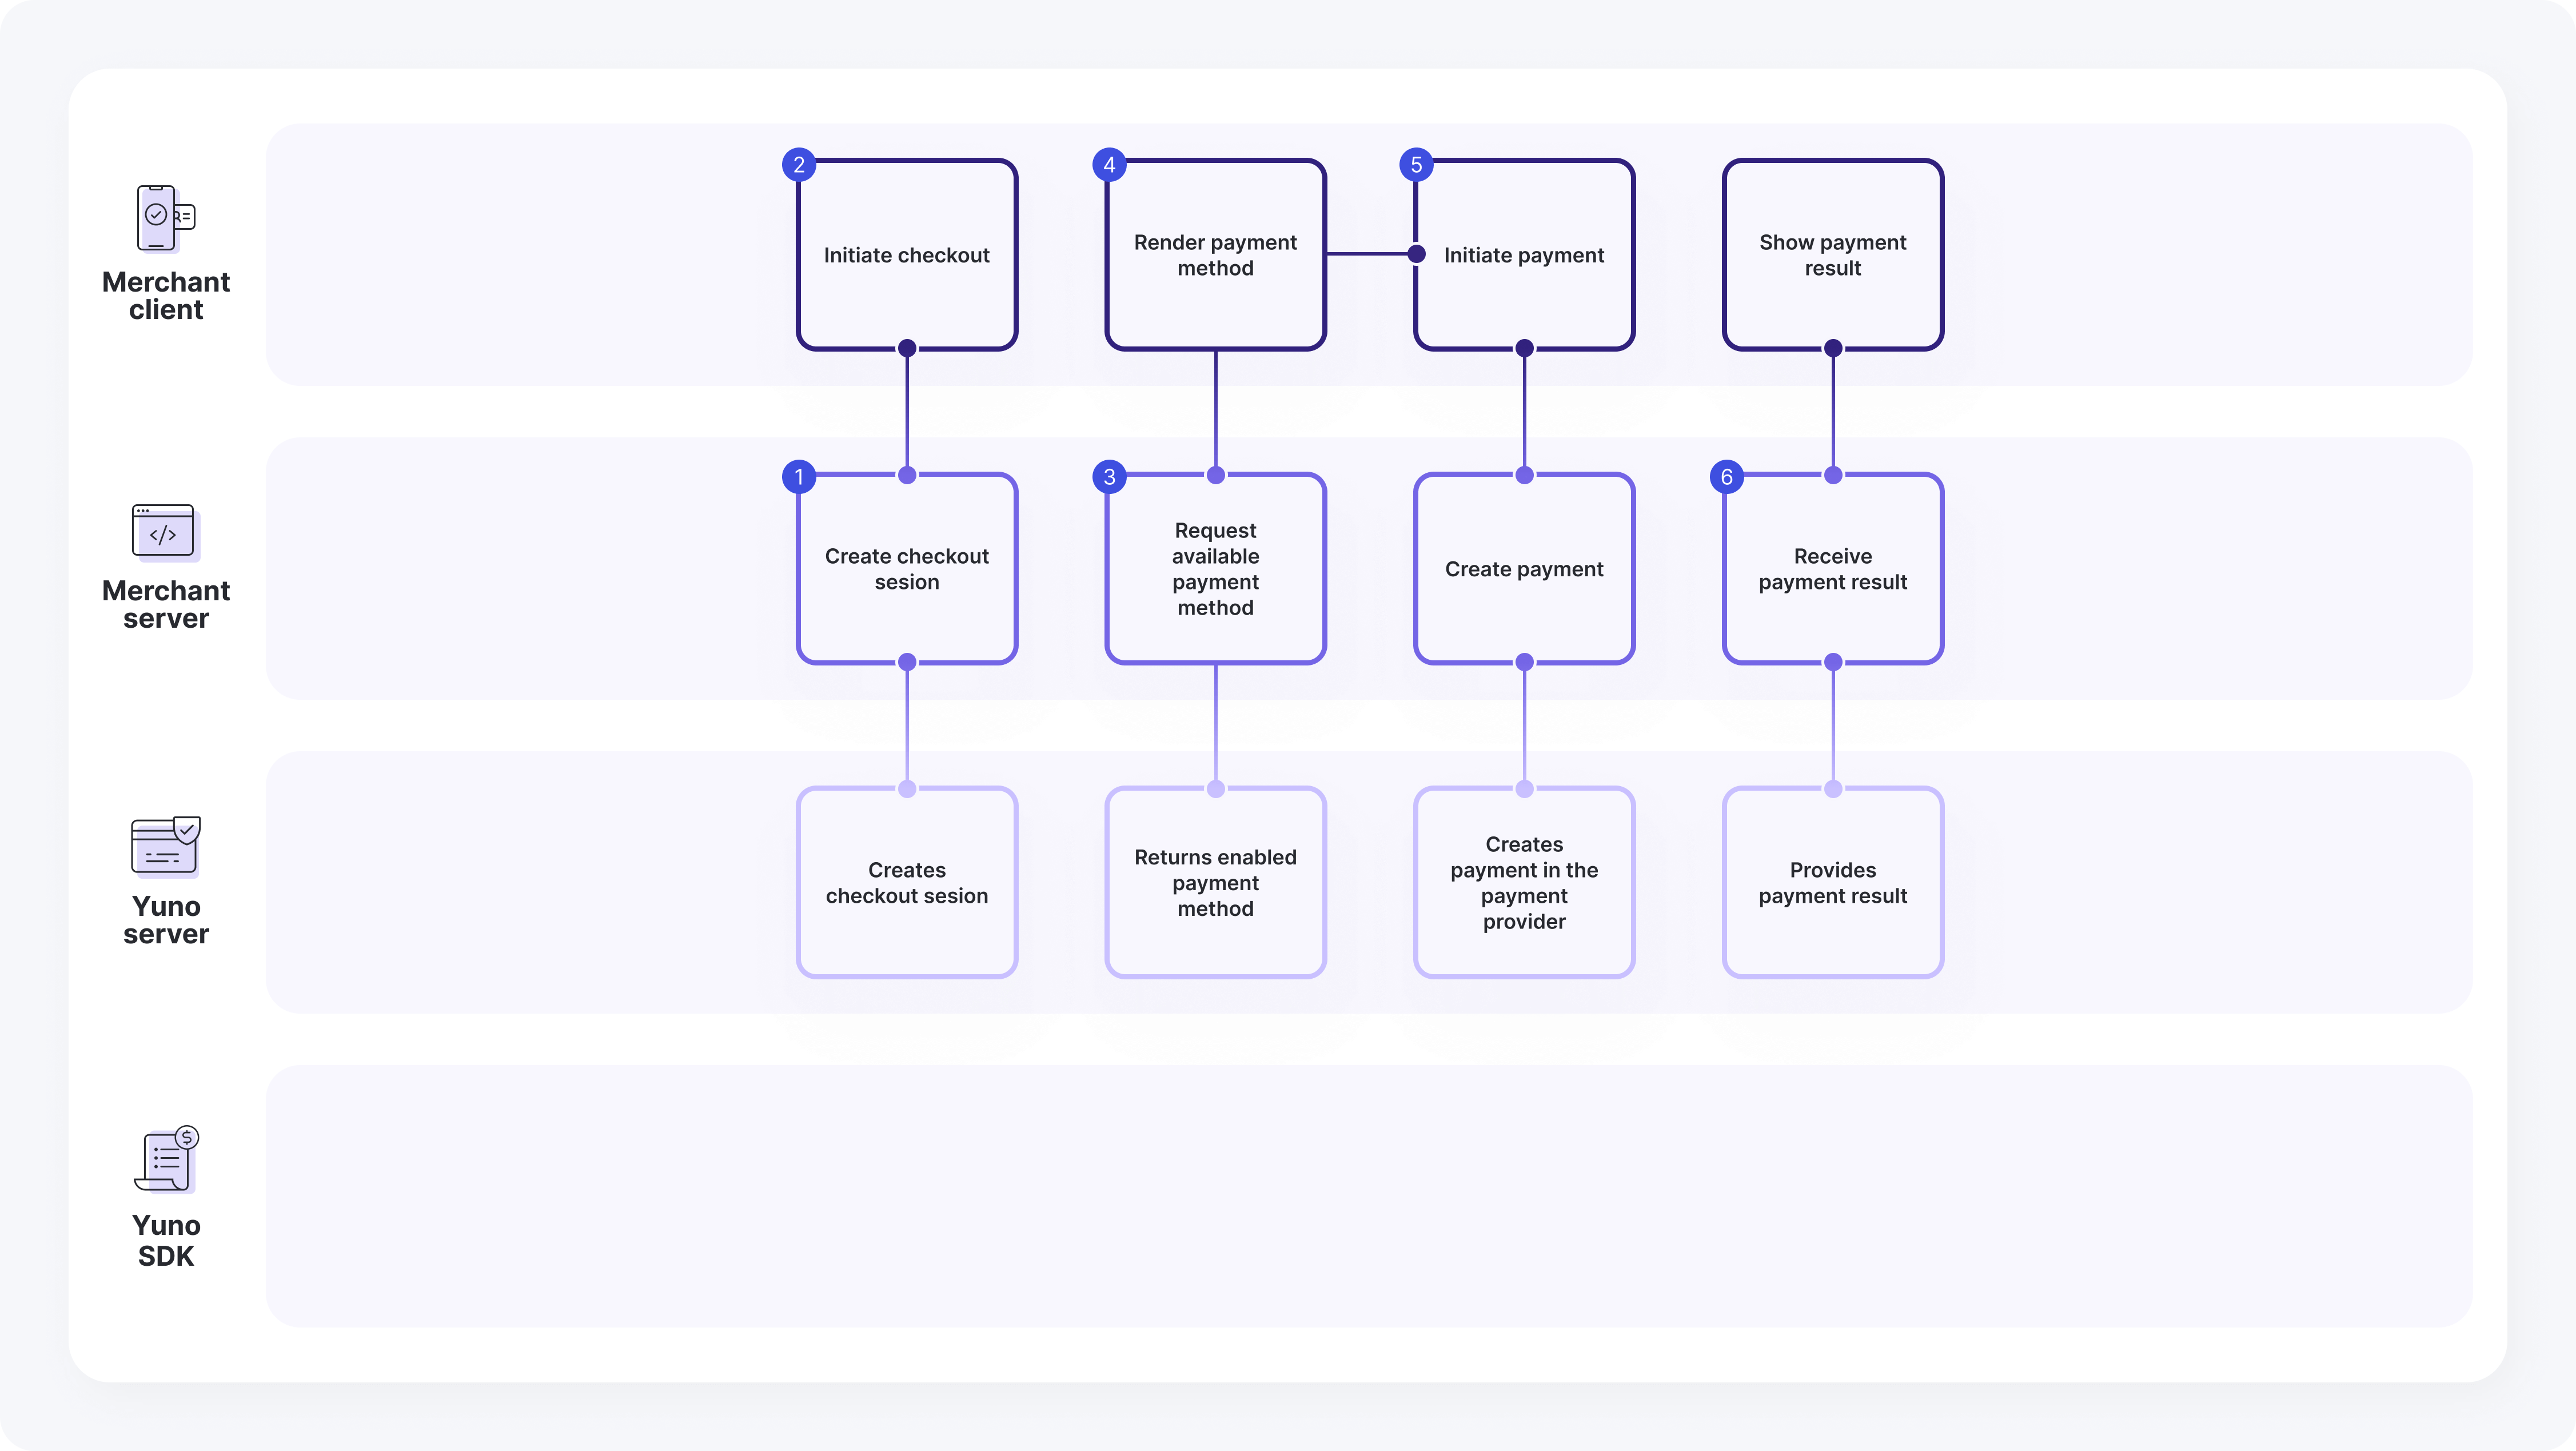
The following image describes the complete workflow:

Vaulted token Lite flow
This diagram illustrates the payment process using a vaulted token with the SDK Lite, detailing the interactions between the Merchant Client, Merchant Server, Yuno Server, and Yuno SDK. It outlines the steps from initiating a checkout and using a pre-stored payment method to creating and completing the payment.
Components overview
The vaulted token payment workflow involves several key components working together to process payments securely. Here's how each component contributes to the process:
Merchant Client
The Merchant Client represents your frontend application that handles the user interface and payment flow. Its key responsibilities include:
- Initiate Checkout
- Render payment methods
- Initiate payment
- Shows payment results
Merchant Server
The Merchant Server represents your backend application that coordinates between your frontend and Yuno's services. Its key responsibilities include:
- Create Checkout session
- Request available payment method
- Create payment
- Receive payment result
Yuno Server
The Yuno Server handles all backend operations related to payment processing and provider integration. Its key responsibilities include:
- Creates Checkout session
- Returns enabled payment method
- Creates payment in the payment provider
- Provides payment results
Complete workflow
The following steps outline the detailed sequence of interactions between the different components in the vaulted token payment workflow:
- Merchant Client: Initiate Checkout --> Merchant Server: Create Checkout session
- Merchant Server: Create Checkout session --> Yuno Server: Creates Checkout session
- Merchant Client: Render payment methods --> Merchant Server: Request available payment method
- Merchant Server: Request available payment method --> Yuno Server: Returns enabled payment method
- Merchant Client: Render payment methods --> Merchant Client: Initiate payment
- Merchant Client: Initiate payment --> Merchant Server: Create payment
- Merchant Server: Create payment --> Yuno Server: Creates payment in the payment provider
- Merchant Client: Shows payment results --> Merchant Server: Receive payment result
- Merchant Server: Receive payment result --> Yuno Server: Provides payment results
Unlike the Payment workflow, for payments using the vaulted token, you'll use information from an existing customer who has previously enrolled in the payment method.
This workflow follows the same steps as the Payment workflow, but instead of collecting new payment details, the SDK retrieves the stored vaulted token. For detailed implementation steps, refer to the platform-specific guides above.
Enroll a credit card while paying
With the Lite SDK, you can save credit or debit cards for future purchases within the same payment request, without additional enrollment integration.
How to obtain a vaulted token
You can retrieve a vaulted token in two ways:
- Via API: Set
vault_on_success = truewhen using the Create payment endpoint. The response will return thevaulted_tokenfor the customer's card. - Via SDK settings: Enable
cardSaveEnable = truein the SDK settings for Web, iOS, or Android. The SDK will display a checkbox allowing users to save their card.
Use only one method to enroll a card. To enroll alternative payment methods, see the Lite SDK (Enrollment) page.
Card Enrollment OptionsYou should only use one option to enroll a card. To enroll alternative payment methods, see the Lite SDK (Enrollment) page.
After enrolling in a payment method, you can use the vaulted token to perform payments. To access information about the payment methods enrolled by each user, use one of the following endpoints:
Best Practices for Using Vaulted TokensEven if the user selects an enrolled payment method, Yuno recommends using the SDK to tokenize the information instead of directly using the vaulted token with Yuno's API. This approach provides several benefits:
- Support 3DS: Enhanced security for online payments.
- Fraud Screening: Better protection against fraudulent transactions.
- Collect Required Information: Gather additional fields required by the provider if necessary.
To implement this, send the
vaultedTokenwhen mounting the SDK. The SDK will handle the rest. If the payment method requires an extra step (such as a 3DS challenge), use theyuno.continuePayment()method. This method handles any required redirections and works for both enrolled and regular payment methods that need additional customer actions.
Updated 17 days ago