To offer more payment methods to your clients using Yuno as the provider, you need to follow the steps below to connect your VTEX account to Yuno and configure the payment methods you want to offer.Documentation Index
Fetch the complete documentation index at: https://docs.y.uno/llms.txt
Use this file to discover all available pages before exploring further.
- Log into your VTEX store account.
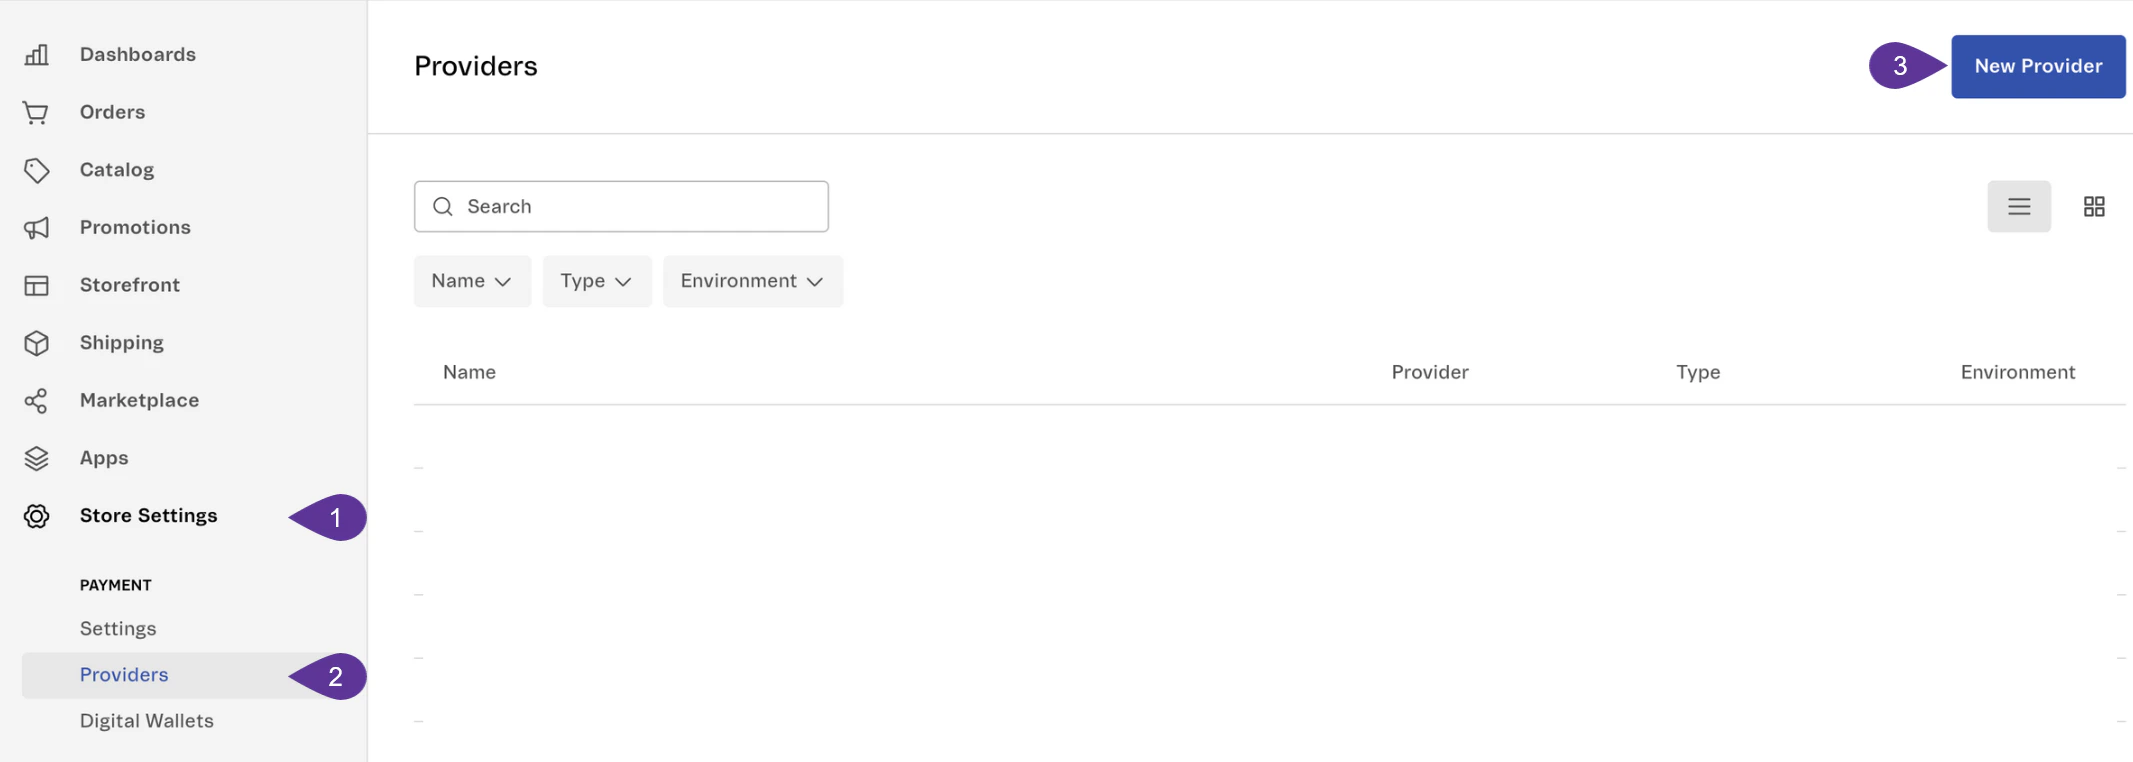
- In the VTEX Admin dashboard, navigate to Store Settings > Providers and click New Provider.
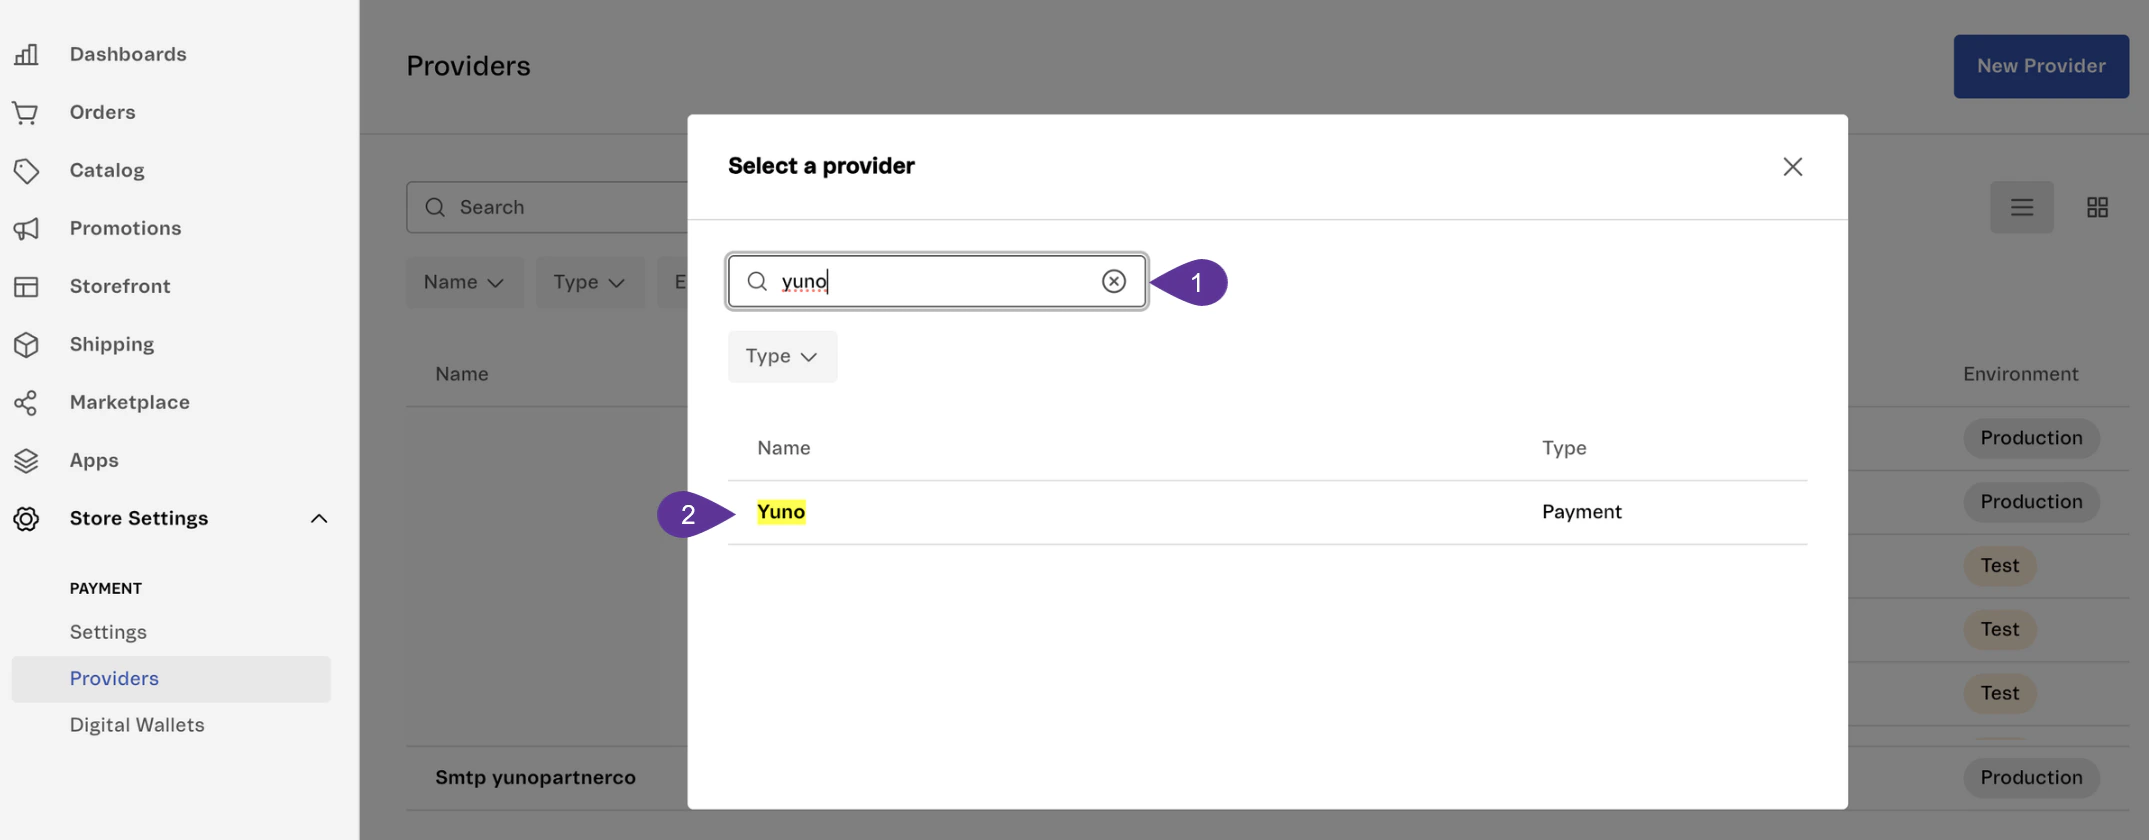
- Search for Yuno on the dialog and select the Yuno option on the results.
- Fill out the form with the required information. Following, you will find a description for each field you need to fill:
Franchise Account FieldsOnly fill the “Main account …” fields if your VTEX environment uses the Franchise model. For Standard or Seller Portal accounts, leave them blank.
| Field | Description |
|---|---|
| App key | VTEX application keys. For additional information on accessing it, see Generating internal application keys. |
| App Token | VTEX application token, which you find when Generating internal application keys. |
| Create customer | This field controls whether a customer is created in Yuno. Select Yes to create the customer, or No to leave it unchanged. The default value is No. |
| VTEX IO orderPlaced page URL | To prevent Known Issue 786685, we recommend setting this field to the ‘Order Placed’ URL (e.g., https://mystore.com/checkout/orderPlaced). |
| Main account app key (Franchise only) | VTEX application key from your main VTEX account. For additional information on accessing it, see Generating internal application keys. |
| Main account app token (Franchise only) | VTEX application token from your main VTEX account, paired with the Main account app key. You can find it when Generating internal application keys. |
| Main account name (Franchise only) | The main VTEX account name (accountName) that owns these credentials. Use the exact account name as it appears in VTEX Admin. |
| Name | Connection name. You can use Yuno. |
| Enable Test Mode | It enables you to decide whether to use the Production or Sandbox environments. While you are testing, Yuno recommends you enable test mode. |
| Automatic Settlement | Select the option Use behavior recommended by payment processor. |
| Affiliation Name | This name should be equal to the previously provided for connection Name. |
| Account_ID | The Yuno account_id. You can find this information in the Yuno dashboard. For additional information, see Developers (Credentials). |
| Public API Key | The Yuno public-api-key. You can find this information in the Yuno dashboard. For additional information, see Developers (Credentials). |
| Private Secret Key | The Yuno private-secret-key. You can find this information in the Yuno dashboard. For additional information, see Developers (Credentials). |
Automatic Settlement WarningThere is a known issue affecting the option Scheduled: Schedules the Automatic Capture. You can find more details here.Before performing the update (
PUT), the affiliation first makes a GET request to retrieve the current configuration.- After filling in all fields, click Save.
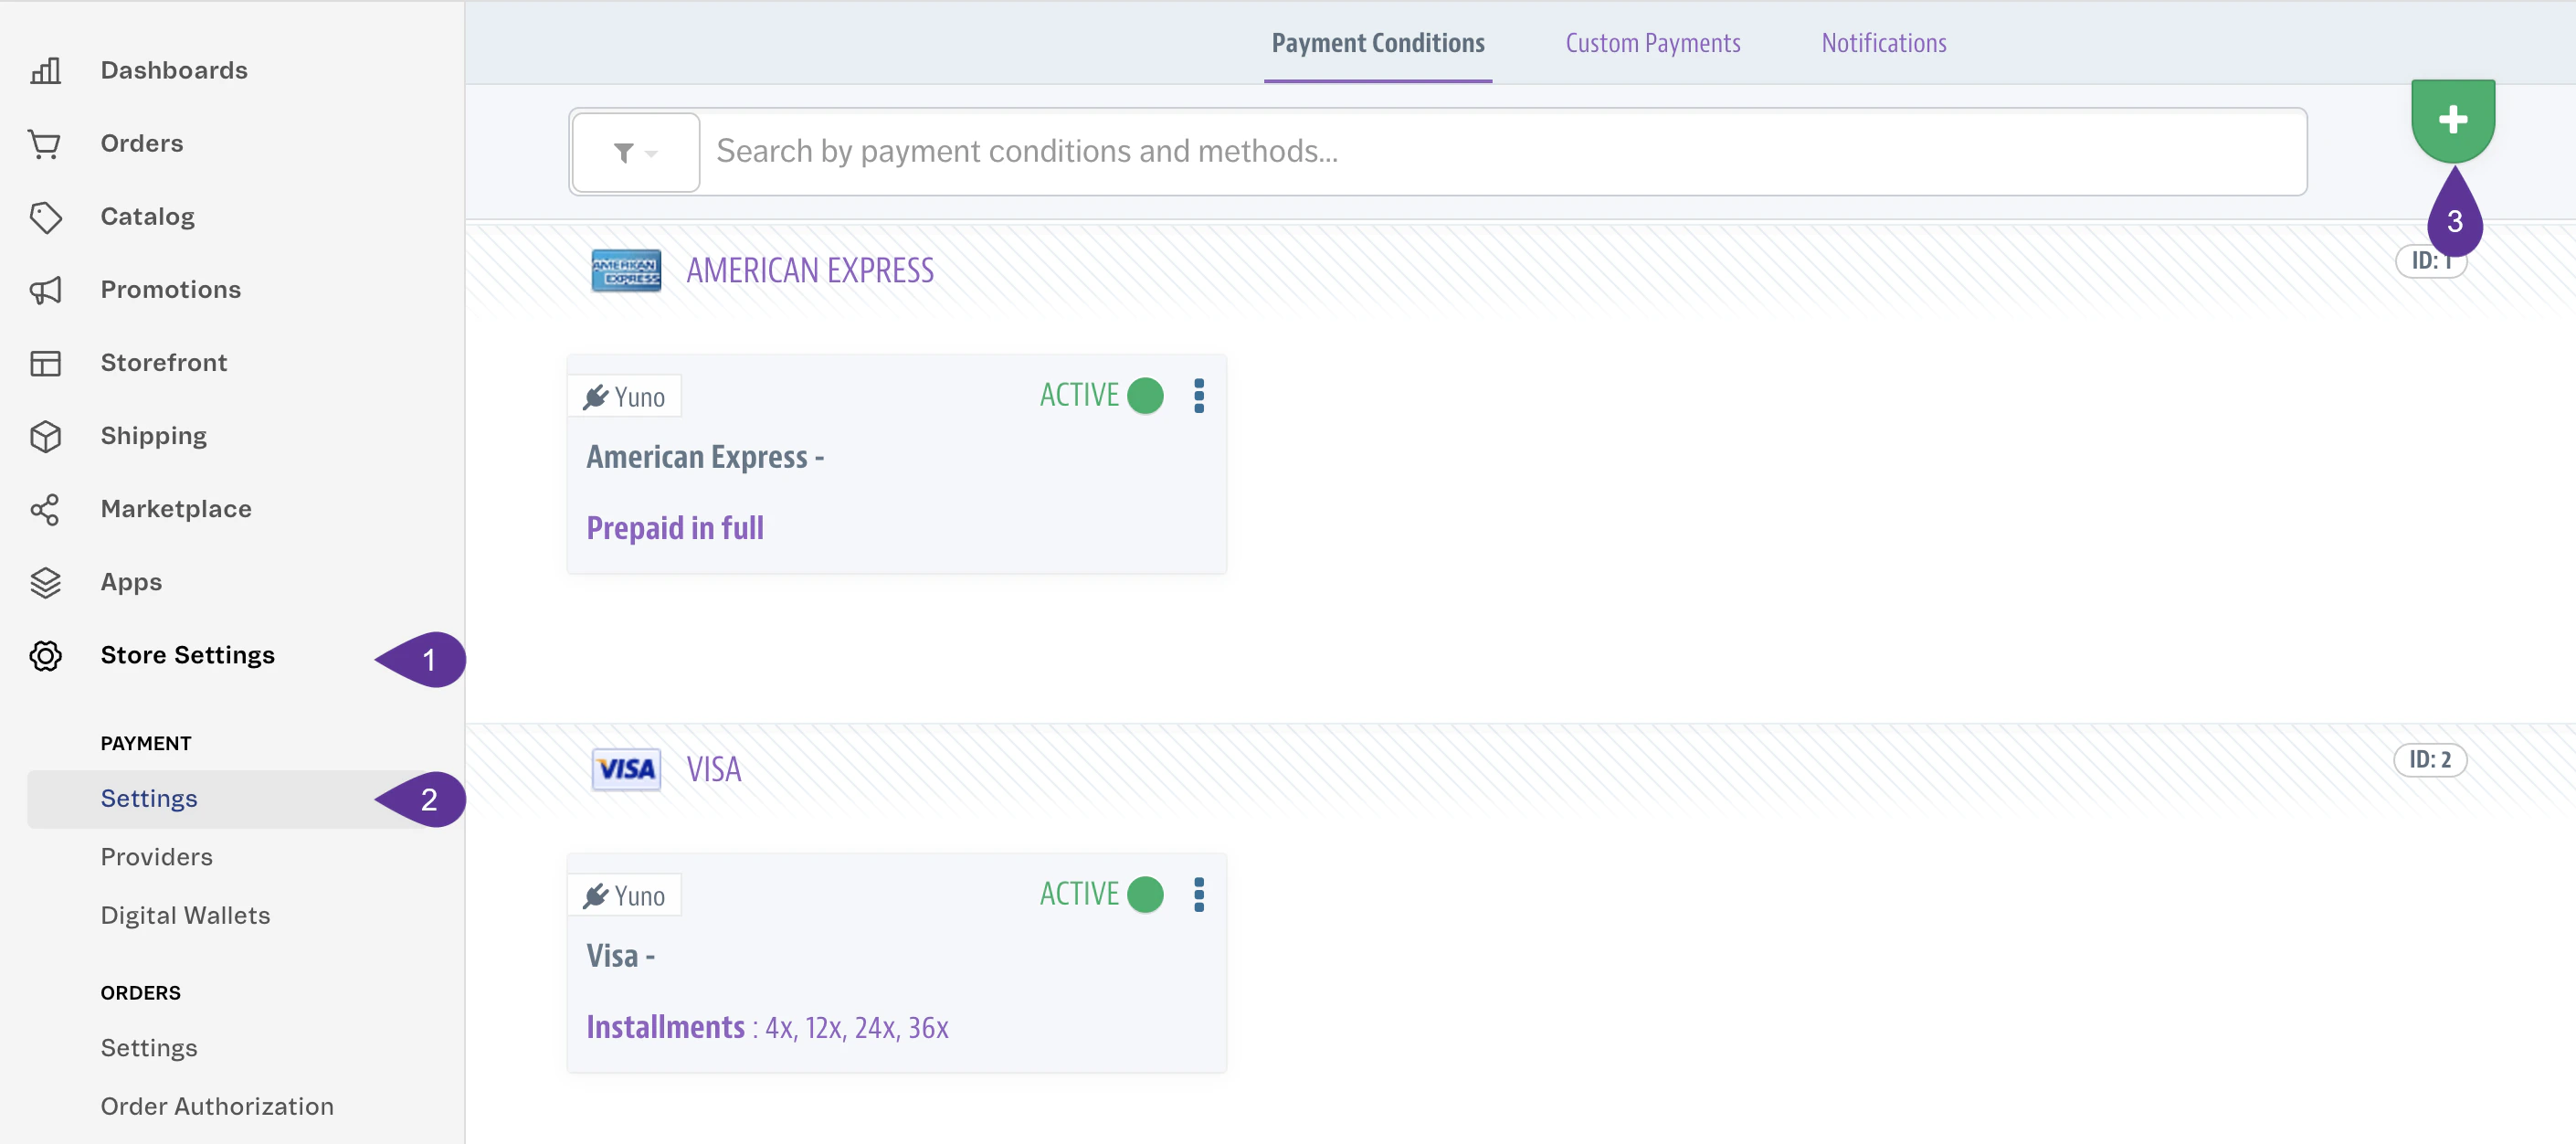
- Navigate to Store Settings > Settings and click the + button (green button at the top right corner) to add a new payment option.
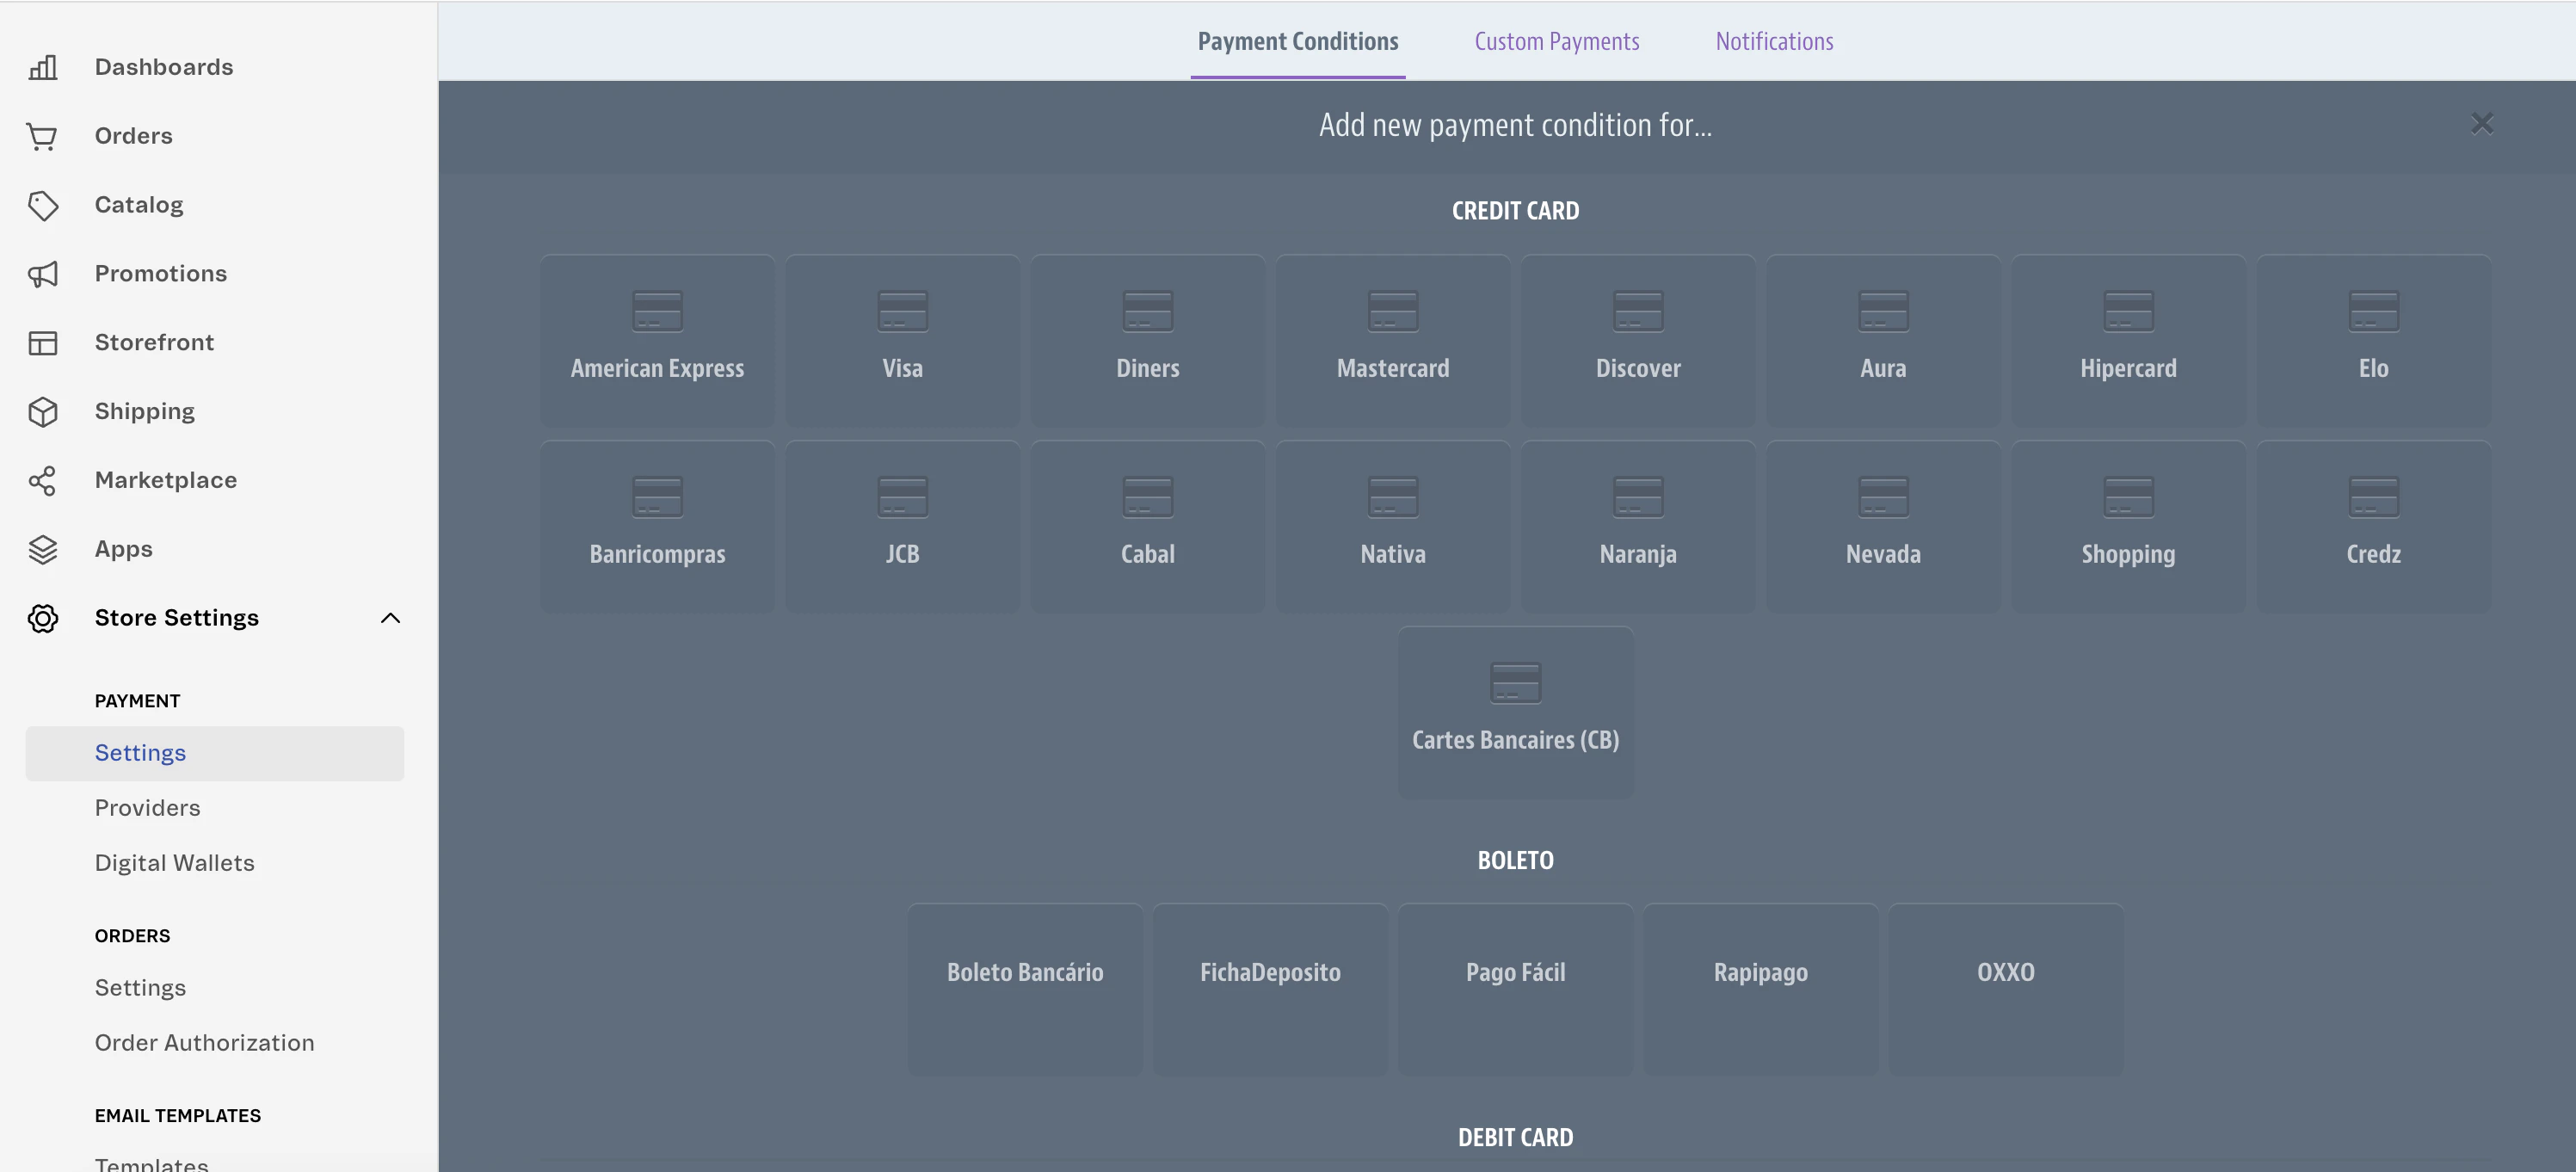
- Select the payment method you want to provide for your customer. You need to configure the provider for each payment method you want to make available, including card brands (Visa, Mastercard, etc.), alternative payment methods (PIX, Boleto, Mercado Pago Wallet, etc.), and other payment types.
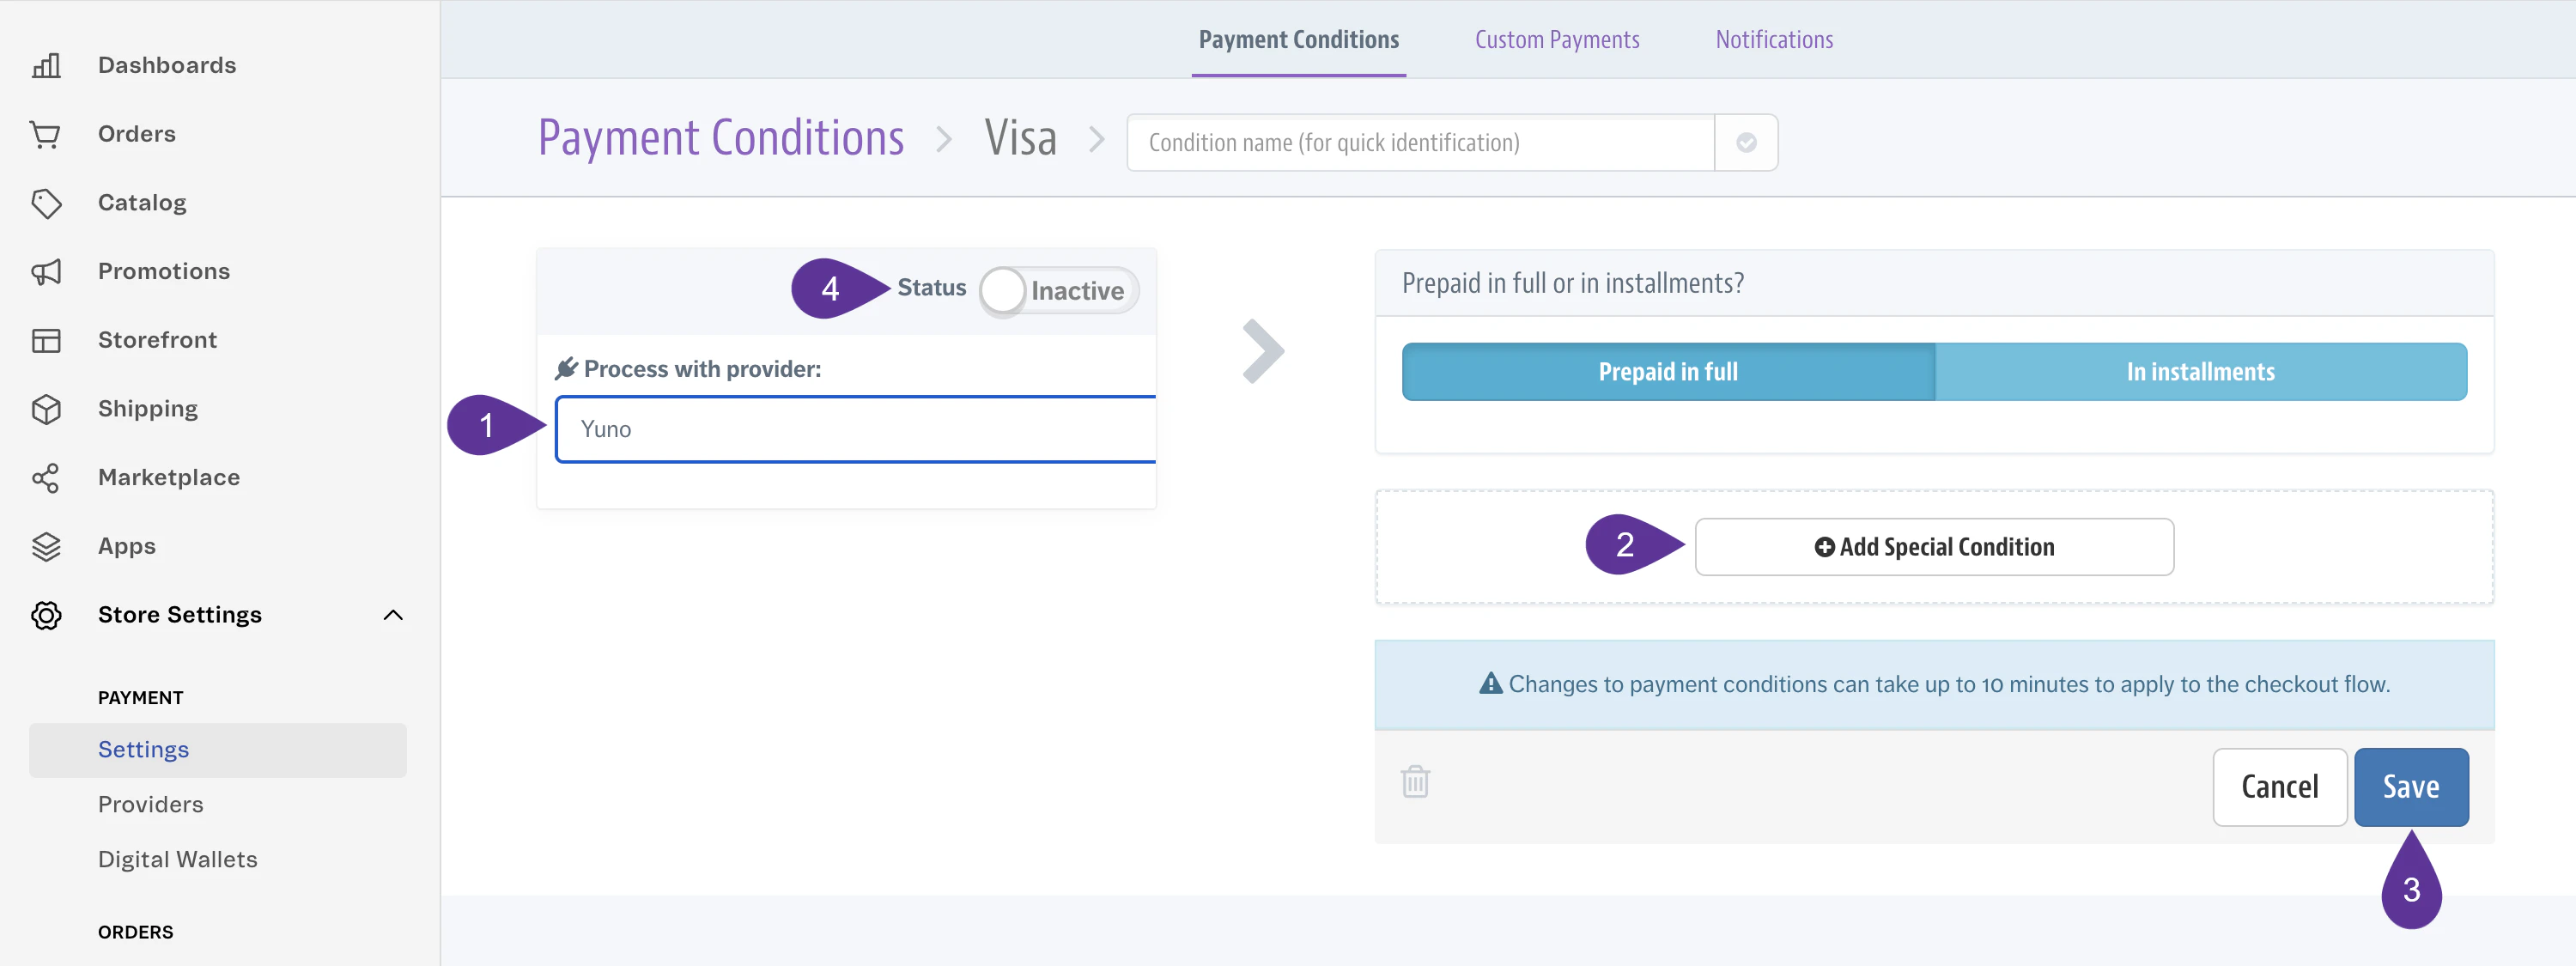
- After you select the payment method, a new dialog is displayed where you need to configure the payment provider:
- At the Process with provider, select Yuno.
- Add special conditions if necessary. For additional information regarding configuring the special conditions, access Configuring payment special conditions. For further information on configuring payment conditions considering installments with or without interest, check the VTEX page.
- Click Save.
- Change the Status to Active.
Adding Multiple Payment MethodsIf you want to add more than one payment method to offer to your clients, you need to repeat steps 7 and 8 for each payment method. For example:
- To offer Visa and Mastercard, repeat steps 7 and 8 two times, one for Visa and the other for Mastercard.
- To offer cards and alternative payment methods like Mercado Pago Wallet or PIX, configure each payment method separately.
- As the last step, you have to configure the Webhook URL to receive the updates from the payments.
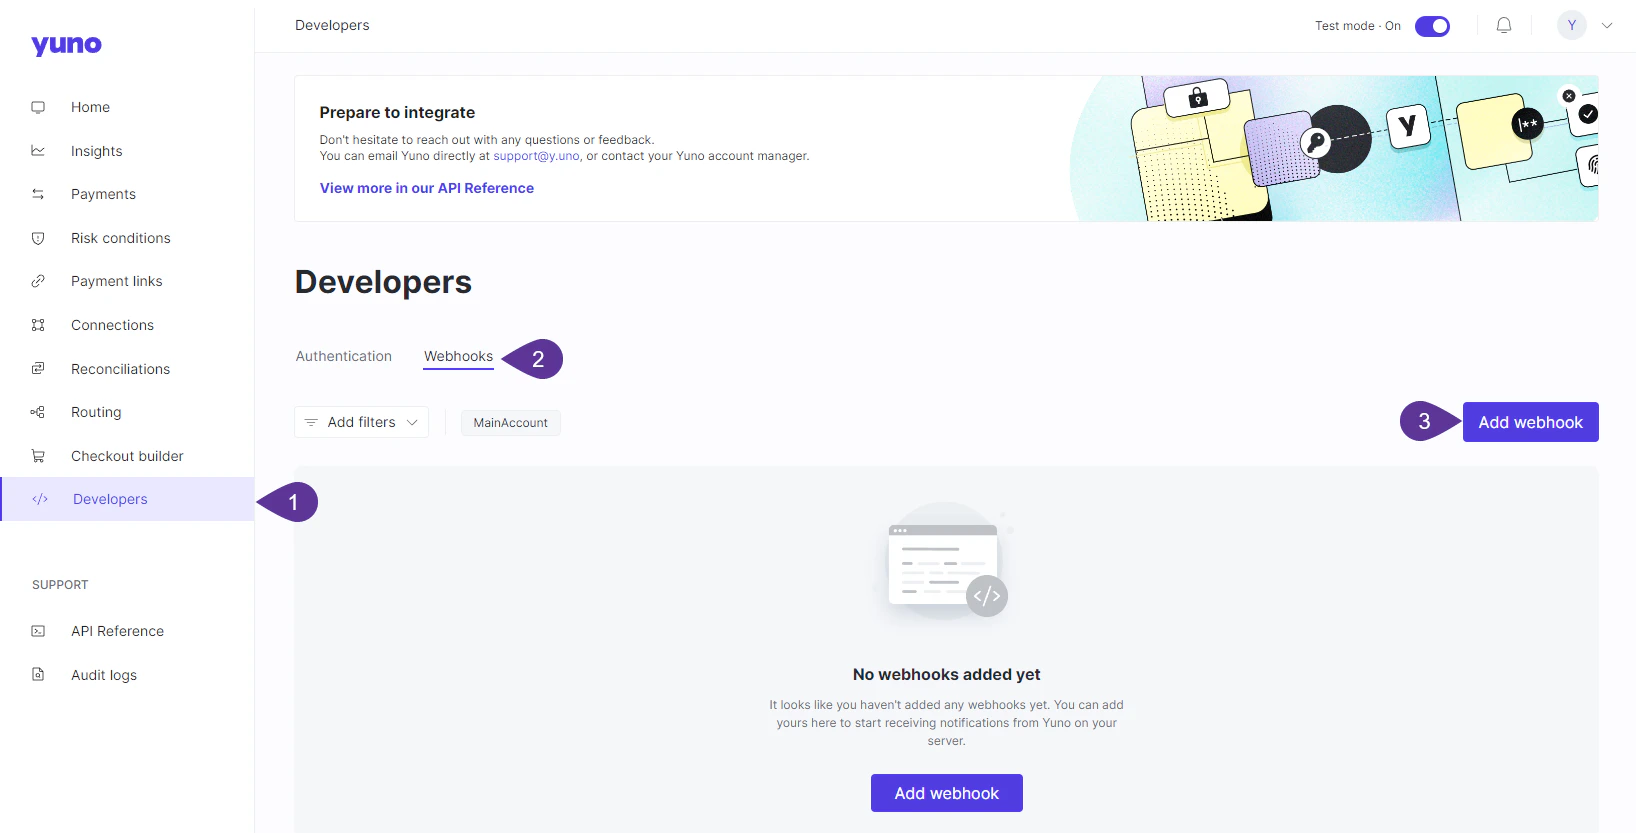
- Access the Yuno Dashboard and select Developers.
- Select the Webhooks tab.
- Click add webhook. The webhook form will show up, where you should provide the following information:
- Name: Define a name for the VTEX webhook.
- Endpoint URL: You should inform the following URL
https://{store_name}.myvtex.com/_v/yunopartnerbr.yuno/v4/webhook(replace{store_name}with your actual store name). - x-api-key and x-secret: You can set any information here. For example, you can add VTEX for both fields.
- For Trigger on, check all events that should notify you through the webhooks. Yuno recommends checking all options.
- Click Add.
PIX payment expiration management
When configuring PIX payments with VTEX, Yuno provides automatic expiration handling to prevent order reconciliation issues:- Custom expiration tracking (connection level): Yuno monitors PIX payment expiration based on the
expiration_datedefined in the VTEX–Yuno connection, without relying solely on provider webhooks - Proactive verification: Before expiration, Yuno makes a request to the provider to confirm whether the payment was completed
- Automatic order cancellation: If a PIX QR code expires unpaid, Yuno marks the payment as expired and immediately notifies VTEX via webhook so the order can be cancelled automatically
- Reconciliation consistency: This ensures payment statuses remain synchronized across VTEX, Yuno, and the payment provider
ImportantFor VTEX integrations, the
expiration_date is configured at the connection level in Yuno. This enhanced expiration handling only applies when a custom expiration time is set in the connection, not when using the default provider expiration.
-
As additional info in the payment detail, particularly inside the metadata struct, you will also be able to identify the VTEX account related to the payment creation.
-
When a customer attempts multiple payments and those payments are declined, VTEX activates Defense Mode. During this period, VTEX does not execute our payment app, which means Yuno’s fraud detection features are disabled. The payment process is delayed by VTEX and forwarded to the Yuno PPF connector. Once received, the Yuno PPF connector will send the payment along with the metadata
defense_mode=true. Yuno recommends configuring a route that bypasses fraud validation whenever thedefense_modemetadata is set totrue. -
The VTEX connector captures the
sellerId(Affiliate Code) from VTEX orders and includes it in the checkout session and payment metadata. This enables marketplace tracking and affiliate mode functionality, allowing merchants to track attribution between their own stores and partner marketplaces.For more information about VTEX Affiliate mode, see the VTEX documentation on configuring affiliates.
Automatic customer creation for Click to Pay
When customers choose to pay via Click to Pay on VTEX merchants, the VTEX connector automatically creates the corresponding VTEX customer record in Yuno during the checkout flow initialization. This ensures a streamlined payment experience by eliminating redundant data entry. How it works:- Automatic creation: When a shopper initiates a Click to Pay transaction, the VTEX customer is automatically created in Yuno if it doesn’t already exist
- Data mapping: All customer data available in the VTEX profile is automatically mapped to Yuno and included in the checkout session
- Pre-filled fields: The SDK automatically pre-fills customer information (CVV, email, address) from the VTEX profile, eliminating the need for customers to re-enter this information
- UX improvement: The Click to Pay flow matches the streamlined experience for non-VTEX merchants, with no unnecessary input steps
ImportantThe automatic customer creation only applies when using Click to Pay as the payment method. For other payment methods, customer creation follows the standard flow based on the “Create customer” configuration setting.
Customizations
If you want to add or change certain UX aspects of the checkout, VTEX lets the merchants modify a few things:- Checkout Page customizations
- Change Payment Method names in Checkout.
Available options
For more information on the custom auto capture feature, refer to the VTEX documentation.ClearSale field mappings
When using ClearSale fraud detection with the VTEX connector, Yuno automatically maps VTEX order data to ClearSale’s required fields. This ensures that all necessary information is correctly passed to ClearSale for fraud analysis.Delivery type mapping
ThedeliveryType field from VTEX orders is automatically extracted and mapped to ClearSale. This field is mandatory for merchants using ClearSale’s Chargeback Guarantee product.
VTEX to ClearSale Mapping:
The VTEX connector extracts the deliveryType value from VTEX order logs (available in AdditionalData.Order.Shipping.Type) and correctly maps it to ClearSale. Common delivery type values include:
Normal→ Mapped asNORMALECONOMY→ Mapped asECONOMY- Other delivery types are mapped according to ClearSale’s field requirements
ClearSale IntegrationFor merchants using ClearSale’s Chargeback Guarantee product, the
deliveryType field is mandatory. The VTEX connector ensures this field is correctly extracted from VTEX orders and properly formatted for ClearSale.