Full SDK (Con flujo unificado)
Overview
Using our Full SDK, you can integrate Yuno, minimizing integration, maintenance, and operational efforts without any need for compliance.
With the Full SDK, Yuno handles the user experience and allows you to customize the checkout and payment methods you are showing to your users from our dashboard. This gives you a lot of flexibility and reduces the need to write more code in the future when you add new payment methods and features to your payment stack.
One of the main advantages of the full SDK integration is that we take care of every scenario for your customer regardless of the payment method chosen. You can handle all of them with a single integration.
Payment Workflow
Render all the available payment methods with a single integration
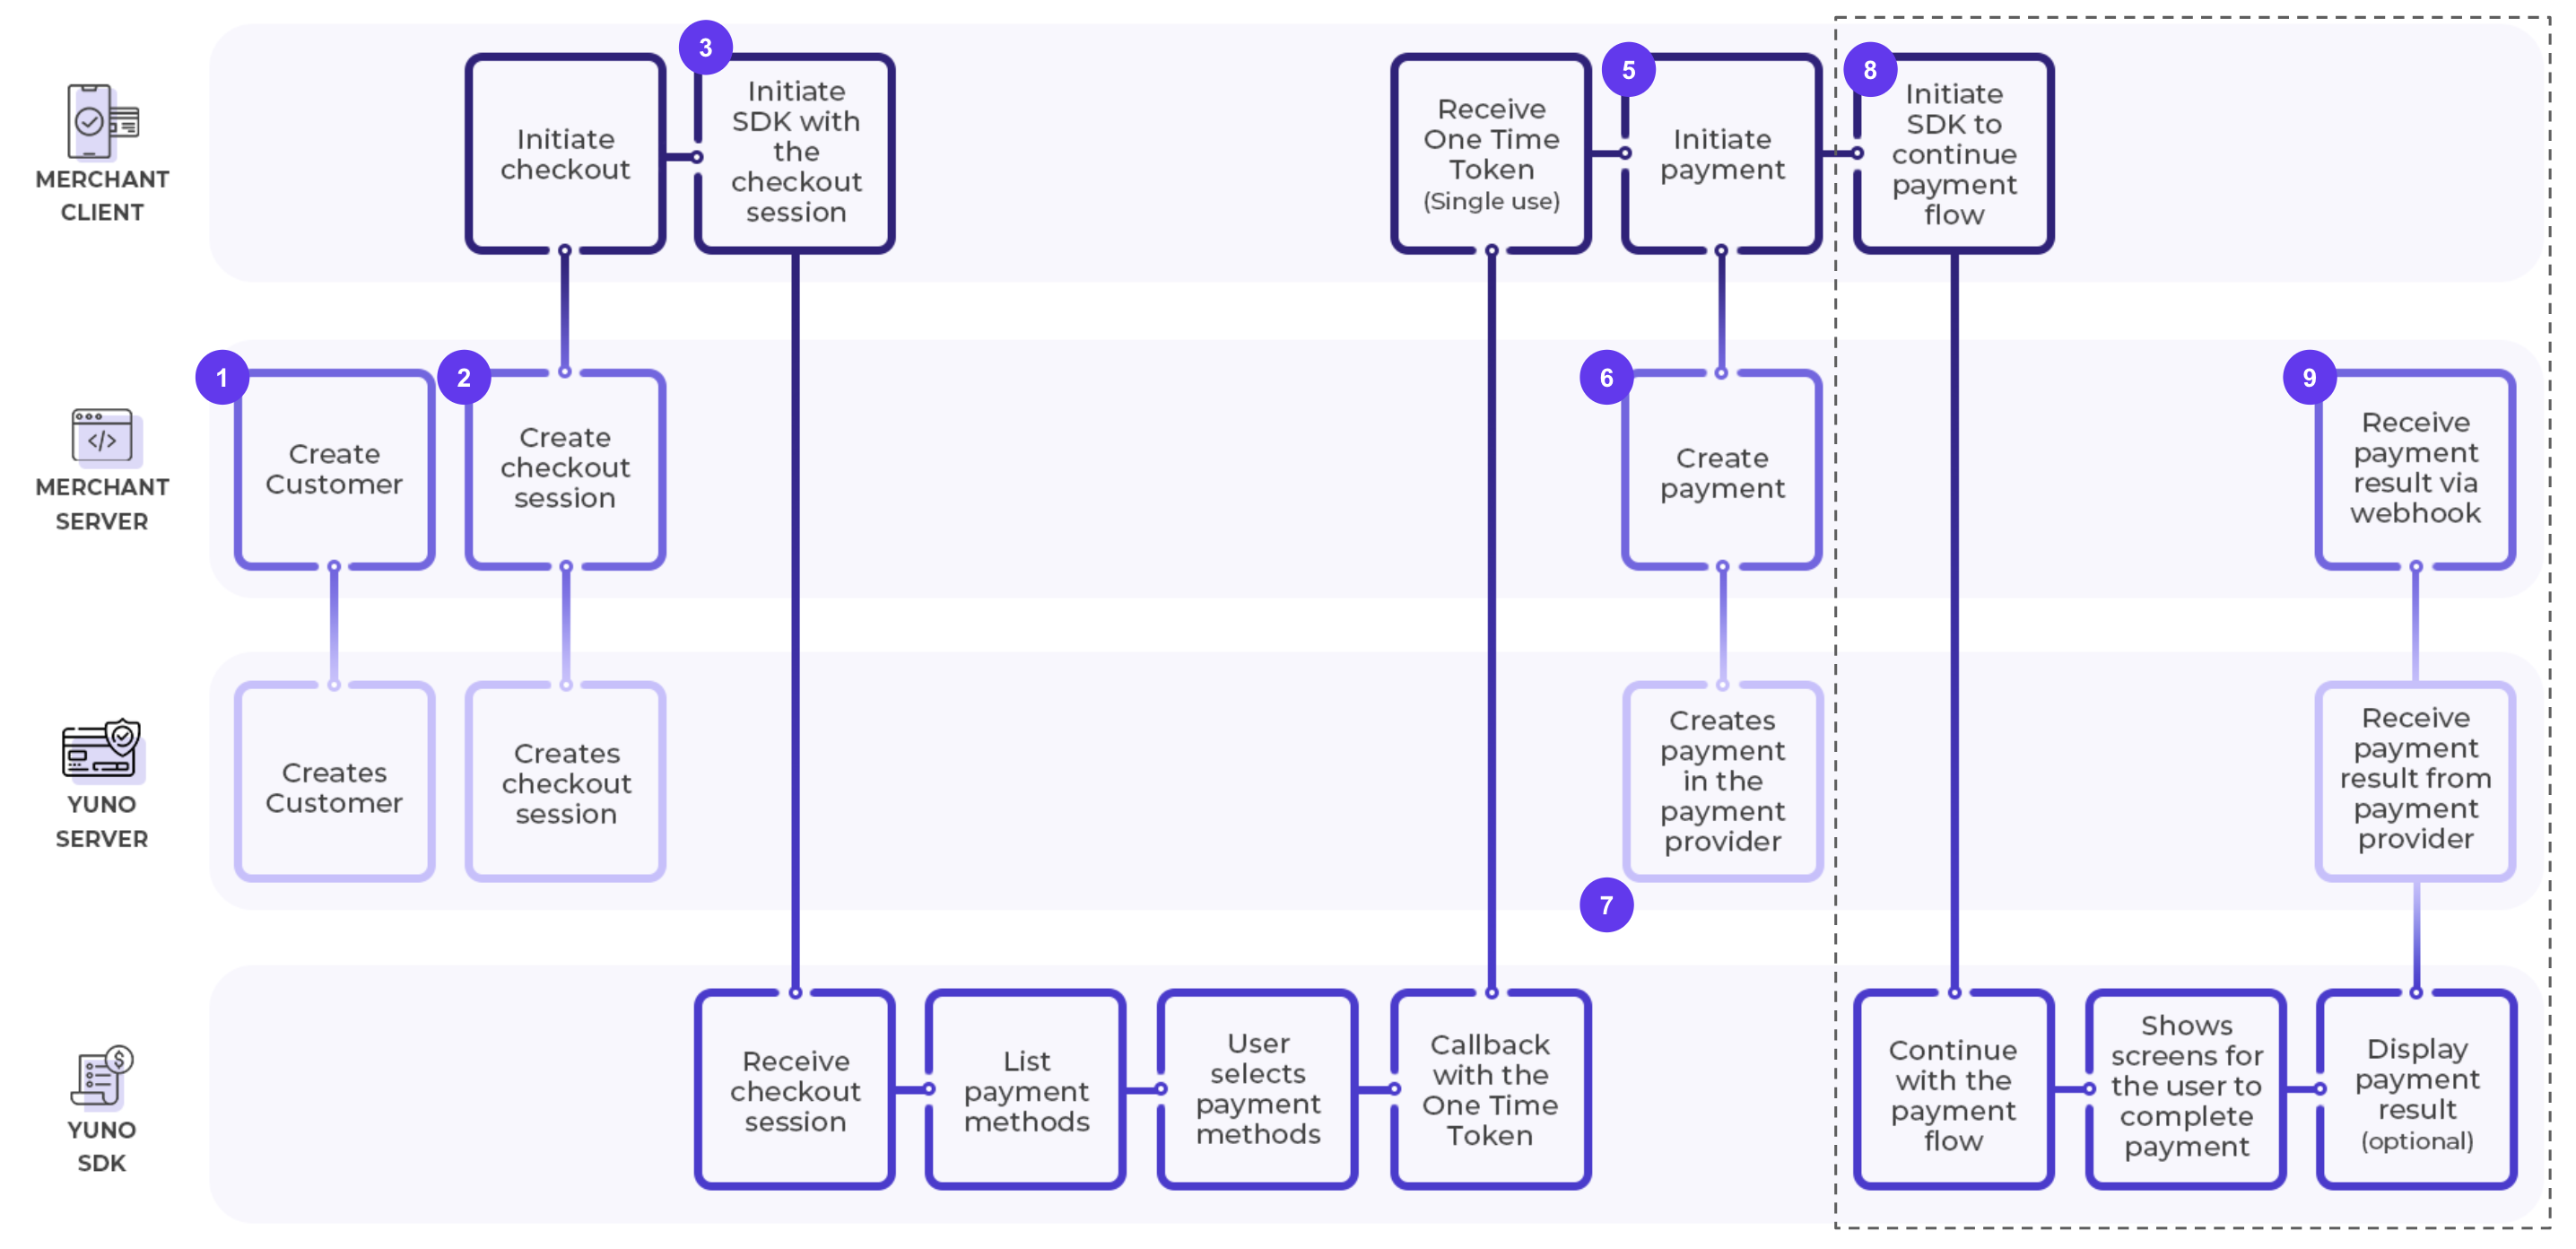
Step 1: Create a customer
The first step of the payment flow is to create a customer. A customer will have payment methods associated, this is why it is important. You can create a customer using the Create Customer Endpoint. As a result, you will receive the id of the customer that was created in the Yuno DB.
If you have created a customer that is going to pay previously you can skip this step.
Step 2: Create a checkout session
You use checkout sessions to create payments. You will create a new checkout session every time you make a payment. With a checkout session, you will have access to all payment methods available for that customer (both previously enrolled or not) to make a purchase, which you can then offer to your customers.
You can create it using Checkout Session Endpoint. To create a new checkout session, you will need the customer id, generated when you created the customer on the Yuno system. This endpoint will provide the checkout session id that you can use for your payment.
Once you have performed the first two steps, you will need to implement one of our SDKs to continue the payment flow.
Step 3: Implement the SDK and obtain the One Time Token
By using the Full SDK, we will show the customer all the payment methods they have available (including previously enrolled payment methods) and ask for any additional information necessary to make the payment so you do not have to worry about it.
In this step, you will have to initialize Yuno's SDK with your API credentials and the checkout session previously created in step two. Below you will find a checklist to initialize the Yuno SDK:
Checklist
- Include the library in your project.
- Initialize SDK with the public key.
- Start the checkout process. Configure SDK by calling the function
yuno.startCheckout()with the desired configuration. - Mount the SDK in Web or add the view in Mobile to display the checkout to your user. Once your user selects a payment method, proceed with step 5.
- You must create a payment button on your front end. When the user clicks the payment button, begin the payment process by calling the function
yuno.startPayment().
- If needed the SDK will collect the additional payment information. This can include, card information or the customer payer information, required by the provider. (email, phone number, document, etc).
- Once this process is completed, the SDK will provide a One-Time Token in the callback function
yunoCreatePayment(). This function must be defined when you configure the SDK in the functionyuno.startCheckout().
For more detailed information on how to initiate Yuno's SDK please refer to one of the following sections according to the corresponding platform:
Step 4: Create the payment
Once you have completed the first three steps, you can create a payment. A payment gathers all crucial details regarding the order, customer specifics, total amount, currency, products, shipping details, and more. You can create it using Create Payment endpoint, please consider that you will have to send the one_time_token obtained in the previous step in order for the payment to work.
Note:
The response of the payment endpoint will provide an important parameter called sdk_action_required.
-
When the selected payment method is synchronous, the API response will provide the final payment status. In this scenario, the field
sdk_action_requiredin the API response will befalse. The payment process concludes at this step. -
For asynchronous payment methods, additional action via the SDK will be necessary. This will be indicated by the API through the field
sdk_action_requiredin the response, which will be set totrue.
Status
During integration, we advise using the payment
statusandsub_statusas your primary reference for the payment's state. Since a payment might have multiple associated transactions, concentrating on the paymentstatus/sub_statusensures you're informed of the most recent state. This provides a clear basis for decision-making regardless of the number of transactions involved.
Step 5: Continue Payment
If in the response of the create payment you receive the parameter sdk_action_required set to true, you will need to invoke the Full SDK again, you can do this using the function continuePayment. Calling this function will display the additional screens or steps the customer needs to perform in order to complete the payment.
We recommend incorporating the method continuePayment from the SDK after creating the payment. This is because certain asynchronous payment methods demand additional action from the customer for completion.
Step 6: Get Payment Status
Call the yunoPaymentResult() function to obtain the payment status. Once you have this status you can use it to show your user the corresponding screen depending on the final result of the payment.
Step 7: Receive the payment result through a webhook
We also recommend configuring Webhooks in your Yuno dashboard. Webhooks are the best way to ensure your system is up-to-date with payment progress and status. Since the event notifications trigger automatically, your system won't need to perform recurrent requests to Yuno.
Enroll a credit card with a payment
Yuno enables you to save a credit/debit card for future purchases with the same payment request without having to integrate the enrollment integration. There are several ways to obtain a vaulted token:
- Set the parameter
vault_on_sucess = truein the Create Payment Endpoint. In the response of the payment, you will receive thevaulted_tokenthat corresponds to the card used by the customer payer. - You can also set the function
cardSaveEnable = truein the SDK to display a checkbox for the user to select if he wants to save the card for future purchases. If the user checks the box in the response of the payment you will receive thevaulted_tokenthat corresponds to the card used by the customer payer.
After the payment is made, the user will have the credit card available for future purchases and you can see the detailed information by using one of the following services:
Using a vaulted token
Even though the user selects an enrolled payment method to create the payment, we recommend using the SDK to tokenize the information and continue with the payment instead of just using the vaulted token directly to Yuno's API. This allows us to:
- Support 3DS
- Support fraud screening
- Ask for missing information for the enrolled payment method in case the selected provider in the CARD route needs some additional fields.
You just need to send the vaultedToken in the mountCheckoutLite method and we'll take care of the rest. Remember that if the payment method you are using requires an additional step for the user to complete (such as a 3DS challenge), you can use the yuno.continuePayment() method so we can take care of the corresponding redirection. The continue method not only works for enrolled payment methods, but it is necessary for regular payment methods that require an action from the customer in general, such as PSE for example.
Updated over 1 year ago