Lite SDK (Payment Android)
Recommended SDKWe recommend using the Android Seamless SDK for a smooth integration experience. This option provides a flexible payment solution with pre-built UI components and customization options.
This page provides a guide to the Yuno Lite SDK for Android payments. This SDK offers a streamlined integration process with essential payment functionality, making it ideal for merchants who:
- Need a quick implementation with minimal customization requirements
- Want to focus primarily on card payment processing
- Prefer a ready-to-use UI that handles the payment flow
The Lite SDK includes core features like:
- Pre-built payment UI components
- Card payment processing
- Basic payment status handling
- Essential error management
For merchants requiring more advanced features like multiple payment methods, custom UI, or advanced fraud prevention, consider using our Full SDK instead.
Requirements
Before starting the Yuno Android SDK integration, ensure your project meets the technical requirements. Also, ensure the following prerequisites are in place:
- You must have an active Yuno account.
- You need your Yuno API credentials (
account_id,public-api-key, andprivate-secret-key), which you can obtain from the Developers credentials section of the Yuno dashboard. These credentials are required to authenticate requests to the Yuno API. The API is used to:- Create a
customer, which is required before initiating payments - Create a
checkout_session, which initializes the payment flow - Create the payment associated with the session
- Create a
SDK VersionSee the Release notes or the Yuno Android SDK repository to verify the current SDK version available.
Step 1: Create a customer
Create a customer using the Create customer endpoint before initiating payments. This step is required to:
- Identify the person making the payment
- Enable saved card functionality (if enabled)
- Track payment history
The customer ID returned from this endpoint will be used when creating the checkout_session.
Step 2: Create a checkout session
Create a new checkout_session using the Create checkout session endpoint to initialize the payment flow. Make sure to:
- Include the customer ID obtained from the previous step
- Store the returned
checkout_sessionID for use in Step 5 of the integration - The
checkout_sessionis unique for each payment attempt and cannot be reused
External Browser Return HandlingIf your payment flow sends users to an external browser (for example, for 3DS authentication or bank redirects), make sure to set the
callback_urlwhen creating your checkout session. For a step-by-step guide on handling the return to your app, see Handle external browser return (callback_url).
Step 3: Include the library in your project
Include the Yuno SDK file in your project through Gradle. Add the repository source:
maven { url "https://yunopayments.jfrog.io/artifactory/snapshots-libs-release" }Include the following code in the build.gradle file to add the Yuno SDK dependency to the application:
dependencies {
    implementation 'com.yuno.payments:android-sdk:{last_version}'
}
Permissions
The Yuno SDK includes the INTERNET permission by default, which is required to make network requests.
<uses-permission android:name="android.permission.INTERNET" />Step 4: Initialize SDK with the public key
Initialize the SDK:
- Get your public API keys from the Yuno dashboard
- Create a custom application class if you don't have one
- Initialize the SDK by calling
Yuno.initialize()in your application'sonCreate()method, passing your API key and configuration:
class CustomApplication : Application() {
  override fun onCreate() {
    super.onCreate()
    Yuno.initialize(
      this,
      PUBLIC_API_KEY,
      config: YunoConfig,
    )
  }
}
Use the data class YunoConfig to customize the SDK's behavior. Include this configuration when calling Yuno.initialize(). The available options are:
data class YunoConfig(
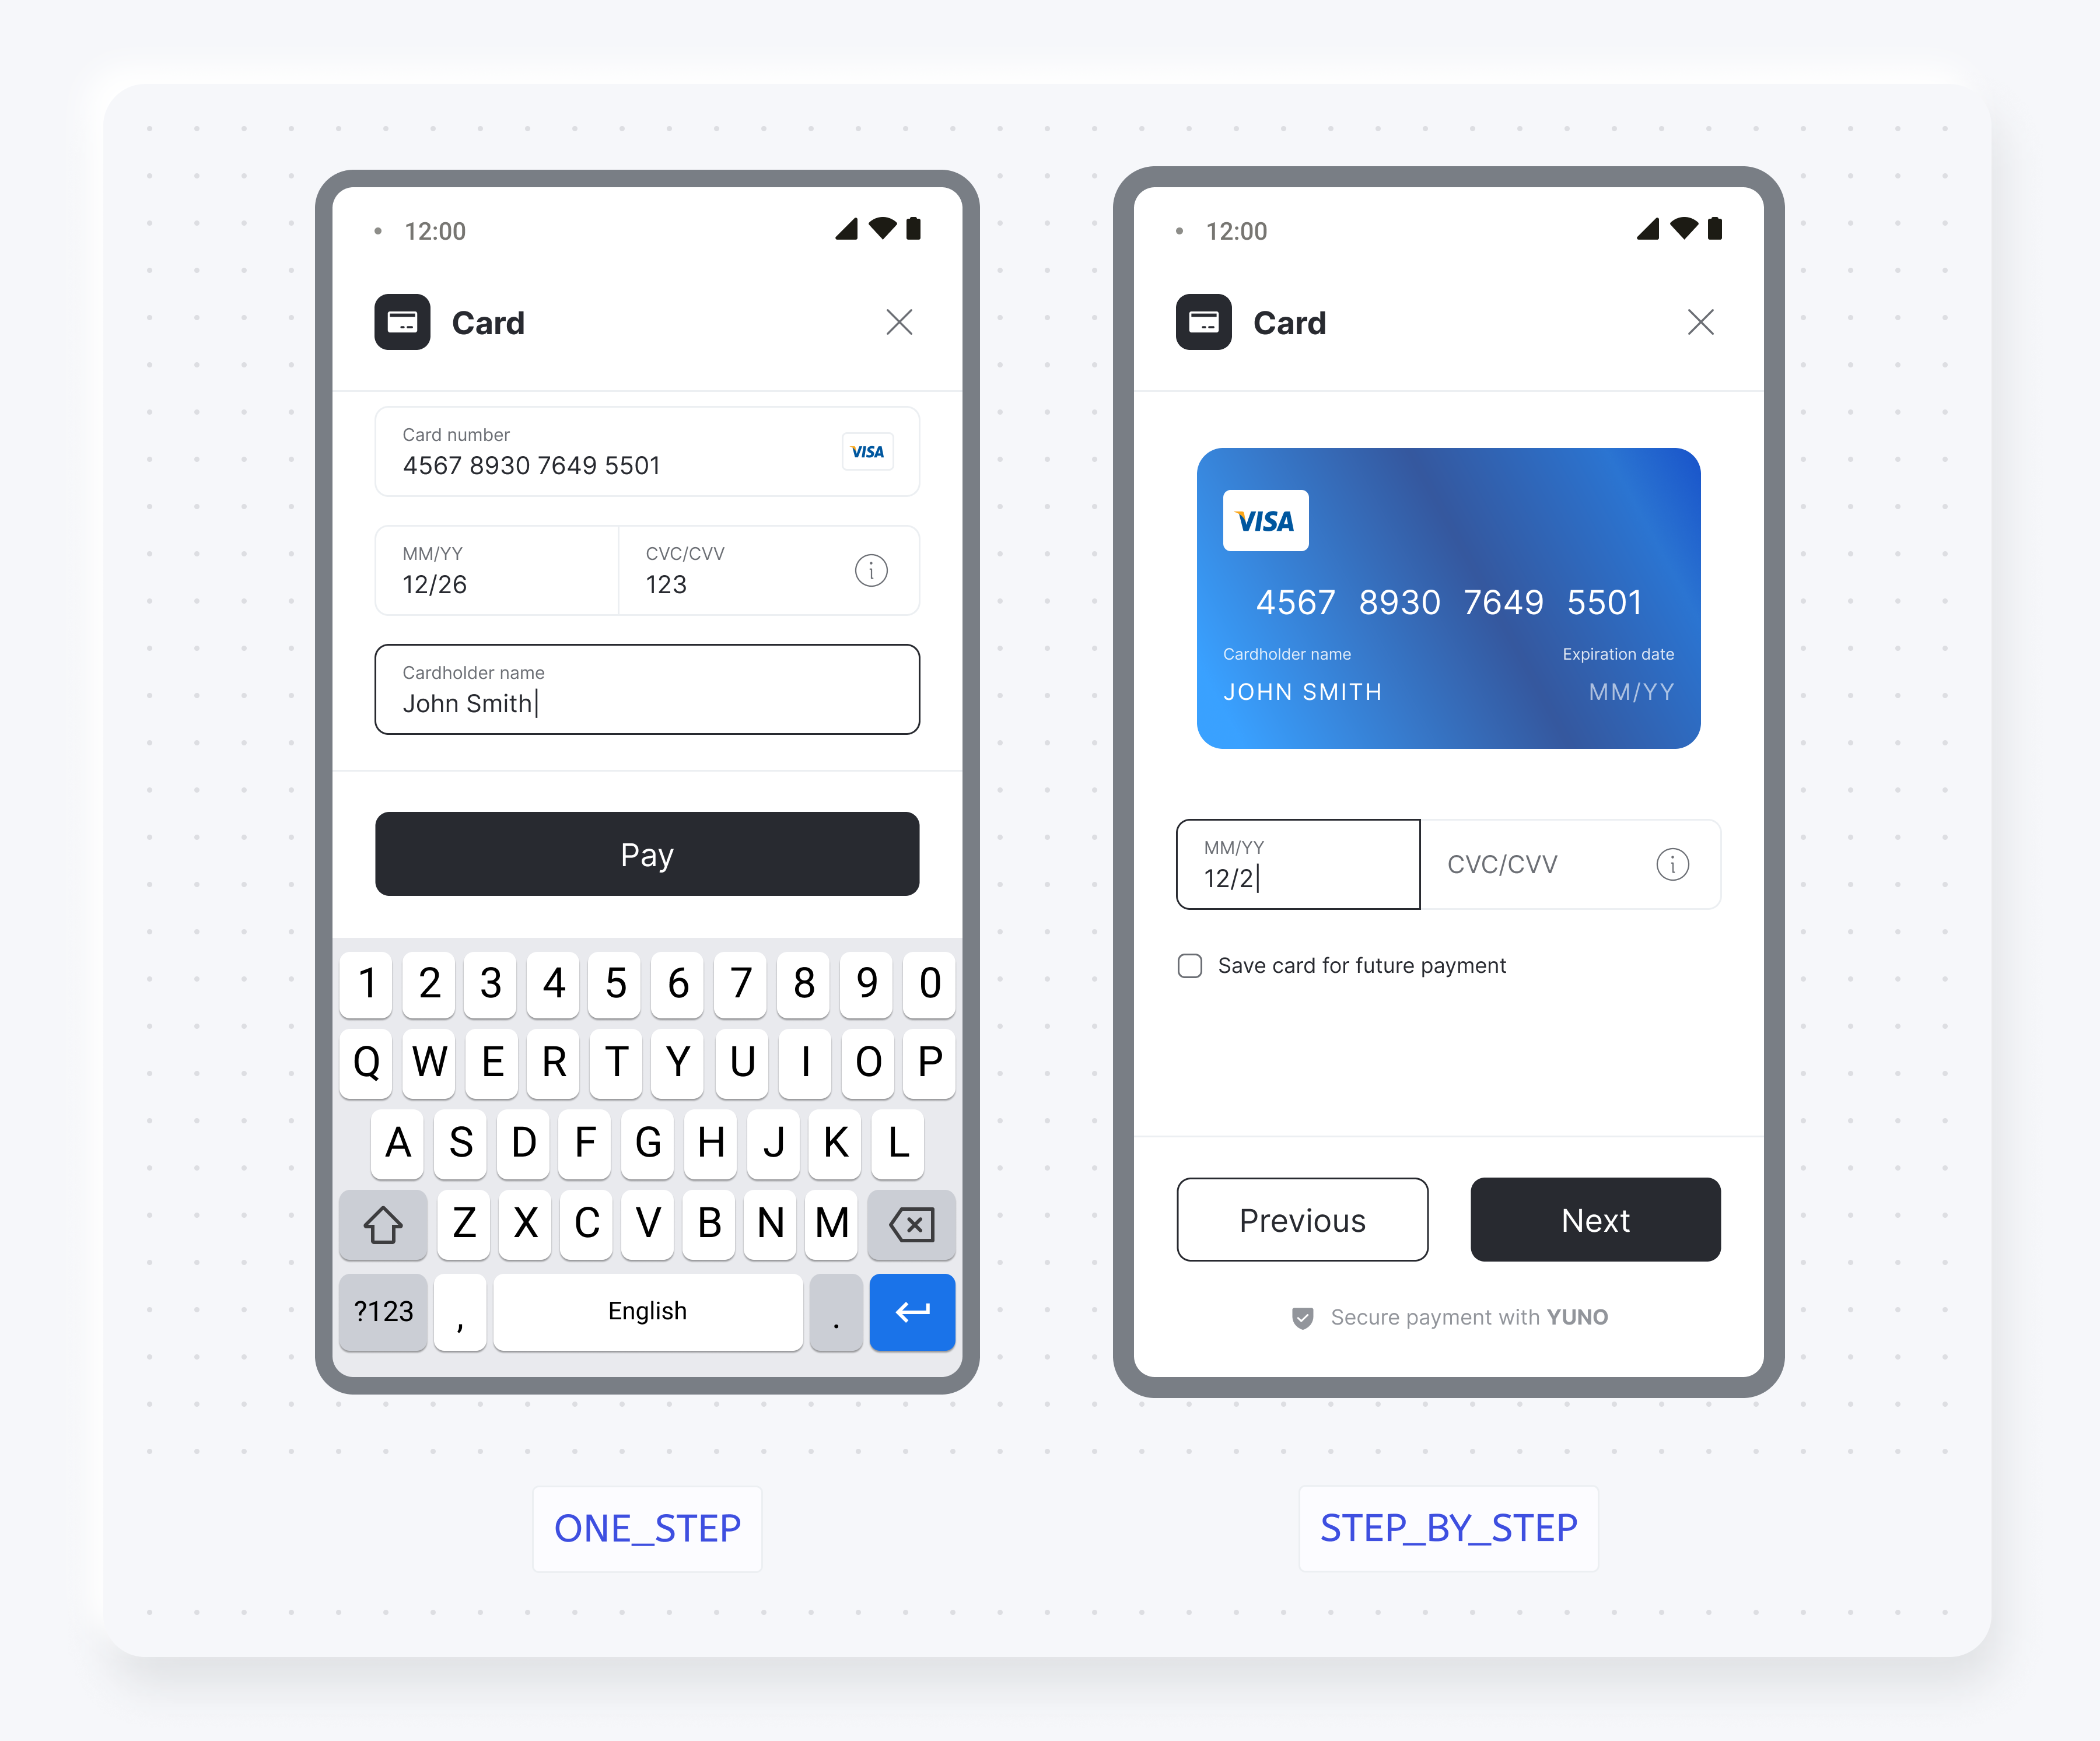
val cardFlow: CardFormType = CardFormType.ONE_STEP,
val saveCardEnabled: Boolean = false,
val cardFormDeployed: Boolean = false,
val language: YunoLanguage? = null,
val styles: YunoStyles? = null,
val cardNumberPlaceholder: String? = null, // Optional: Custom placeholder text for card number field
val hideCardholderName: Boolean? = null // Optional: Set to true to hide cardholder name field
)The following table describes each customization option:
| Customization option | Description |
|---|---|
| cardFlow | This optional configuration defines Payment and Enrollment Card flow. By default, the CardFormType.ONE_STEP option is used. See the Render options section for more information. |
| saveCardEnabled | Enables the Save card checkbox on card flows. See the Save card section for more information. |
| language | Defines the language to be used in the payment forms. You can set it to one of the available language options:
|
| styles | Enables SDK-wide UI customization. Use it to define global visual styles like font family and button appearance (color, padding, radius, typography) through a YunoStyles object. For more information, see the styles section. |
| cardNumberPlaceholder | This optional field allows you to customize the placeholder text for the card number field. Supports alphanumeric characters, spaces, and UTF-8 characters for localization. If not provided, the SDK uses the default placeholder ("Card number"). This customization does not affect card formatting, masking, BIN logic, or validation. |
| hideCardholderName | This optional field allows you to hide the cardholder name field in the card form. When set to true, the cardholder name field is not rendered. When not specified or set to false, the cardholder name field is displayed (default behavior). Hiding the field does not affect PAN, expiry, CVV collection, BIN logic, or 3DS/provider validations. The merchant is responsible for ensuring cardholder name is provided when required by their payment provider. |
You also need to update your manifest to use your application:
<application android:name=".CustomApplication"></application>Step 5: Start the checkout process
Call the startCheckout method in the onCreate() function of the activity that integrates the SDK to initiate a new payment process with the Lite SDK:
startCheckout(
  checkoutSession: "checkout_session",
  countryCode: "US",
  callbackPaymentState: ((String?) -> Unit)?,
  merchantSessionId: String? = null
)
The following table describes the required parameters to start the checkout:
| Parameter | Description |
|---|---|
checkoutSession | A unique identifier for the checkout session associated with the payment. It is required to initialize the payment process and grants access to the customer's available payment methods. |
countryCode | Country code where the payment is performed. See Country coverage for a complete list of supported countries and their codes. |
callbackPaymentState | It's a function that returns the current payment process. Sending this function is not mandatory if you do not need the result. |
merchantSessionId | An identifier used by the merchant to track the payment. |
Callback Payment State
The callbackPaymentState parameter is a function that returns the current payment process. Sending this function is not mandatory if you do not need the result. The following code block shows the possible states:
const val PAYMENT_STATE_SUCCEEDED = "SUCCEEDED"
const val PAYMENT_STATE_FAIL = "FAIL"
const val PAYMENT_STATE_PROCESSING = "PROCESSING"
const val PAYMENT_STATE_REJECT = "REJECT"
const val PAYMENT_STATE_INTERNAL_ERROR = "INTERNAL_ERROR"
const val PAYMENT_STATE_STATE_CANCELED_BY_USER = "CANCELED"
The following table provides additional information about the possible states:
| State | Description | Additional action required |
|---|---|---|
SUCCEEDED | The transaction or payment process was successfully completed without any errors. | No. |
FAIL | The transaction failed due to errors such as data validation issues, server connection failures, or technical/network problems. | Yes. Investigate the cause of failure (validation, network, server) and take corrective measures. |
PROCESSING | The transaction is currently in progress, awaiting approval or verification. | No. |
REJECT | The transaction was rejected due to reasons like insufficient funds or suspected fraudulent activity. | Yes. Inform the user of the rejection, provide the reason if possible, and suggest actions. |
INTERNAL_ERROR | An unexpected internal error occurred within the system handling the payment process. | Yes. Requires technical intervention to review the system, fix internal issues, and retry or inform the user. |
CANCELED | The user voluntarily canceled the transaction or abandoned the payment process. | No. |
Payment status validation
This section explains how the SDK handles payment status when users cancel or leave payment flows, and how the SDK status relates to the backend payment status in these scenarios.
Sync payment methods (Google Pay)
For synchronous payment methods like Google Pay, when a user cancels or closes the wallet UI before a payment service provider (PSP) response is received:
- SDK Status: Returns
CANCELED(CANCELLED_BY_USER) - Backend payment status: Remains
PENDINGuntil PSP timeout or merchant cancellation - Important: The SDK will not return
REJECTorPROCESSINGin this scenario
This ensures that the backend payment remains in a pending state and can be properly handled by the merchant's system.
Async payment methods (PIX and QR-based methods)
For asynchronous payment methods like PIX, when a user closes the QR code window (clicks X) before completing the payment:
- SDK Status: Returns
PROCESSING, optionally with a sub-status such asCLOSED_BY_USER - Backend payment status: Remains
PENDINGand the QR code remains valid until expiry - Checkout session reuse: Re-opening the same checkout session can display the same valid QR code
- No Automatic Cancellation: The PIX payment is not automatically cancelled when the user closes the QR window
This behavior allows users to return to the payment flow and complete the transaction using the same QR code before it expires.
Expired async payments
If a PIX QR code expires naturally:
- Backend Status: Updated to
EXPIRED - SDK Status: SDK callbacks and polling endpoints return
EXPIREDconsistently
This ensures merchants receive accurate status information when a payment method has expired.
Step 6: Initiate the payment process
Call the method startPaymentLite to start a payment process:
startPaymentLite(
    paymentSelected: PaymentSelected,
    callbackOTT:(String?) -> Unit,
    callBackTokenWithInformation:(OneTimeTokenModel?) -> Unit,
    showPaymentStatus: Boolean,
)
The following table describes the required parameters to start the payment:
| Parameter | Description |
|---|---|
paymentSelected | Inform the payment method selected by the buyer. |
showStatusYuno | A boolean that specifies whether the payment status should be displayed within the Yuno interface. |
callbackOTT | A required function that returns the updated one-time token needed to complete the payment process. |
callBackTokenWithInformation | A function that supplies detailed information about the one-time token, wrapped in a OneTimeTokenModel object, allowing for comprehensive handling of token details. |
Send an additional parameter, which is the vaulted token and/or the payment type that the user selected to make the payment:
PaymentSelected(
  vaultedToken : String "payment_vaulted_token",
  paymentMethodType : String "payment_type",
)
Step 7: Get the OTT (one-time token)
The one-time token is a unique identifier that represents a payment session. This token is required to create a payment.
Callback one-time token
The one-time token callback returns the following parameters:
| Parameter | Type | Description |
|---|---|---|
| oneTimeToken | String | one-time token generated for the payment session |
Loader HandlingThe merchant is responsible for handling the loader. Yuno offers an option to use our loader; however, the merchant can use their own loader and must make the corresponding configurations.
Step 8: Create the payment
After completing the previous steps, create a payment by calling the Create Payment endpoint from your backend. This endpoint requires:
- The one-time token obtained in Step 7
- The
checkout_sessionobtained in Step 2
Continue Payment Method IntegrationYuno requires you integrate the
continuePaymentmethod of the SDK after the payment is created because certain asynchronous payment methods require additional action from the customer to complete it. The API will inform you of this scenario via thesdk_action_requiredfield of the response, which will be returned as true. Theyuno.continuePayment()function will display the additional screens to the customers, where they can carry out the necessary actions to complete the payment without needing you to handle every scenario.
For payment methods that require additional customer actions (such as 3DS authentication challenges) or asynchronous processing (like bank transfers), you'll need to integrate the SDK's continuePayment method after creating the payment. The Create Payment API response includes a sdk_action_required field that indicates whether this step is needed:
- If
TRUE: Callyuno.continuePayment()to display additional screens for customer actions (e.g., 3DS authentication, bank redirect pages) - If
FALSE: Skip this step as no additional customer interaction is required
The following code block shows how to implement the payment continuation flow:
continuePayment(
    showPaymentStatus: Boolean = true,
    checkoutSession: String? = null,
    countryCode: String? = null,
    callbackPaymentState: ((String?) -> Unit)? = null
)
Send FALSE in the showPaymentStatus parameter to show your payment status screens. Then, get the payment state by callback.
Render mode (advanced integration)
For developers requiring advanced UI control, the Lite SDK also supports render mode integration. This mode provides fragment-based UI components that you can integrate into custom layouts, offering more flexibility while maintaining the streamlined Lite SDK functionality.
Basic render mode setup
Use startPaymentRender for advanced UI integration:
fun Activity.startPaymentRender(
    checkoutSession: String? = null,
    countryCode: String? = null,
    coroutineScope: CoroutineScope,
    paymentSelected: PaymentSelected,
    listener: YunoPaymentRenderListener,
): YunoPaymentFragmentController
Implementation example
class PaymentActivity : Activity() {

    private lateinit var fragmentController: YunoPaymentFragmentController

    private fun initializeRenderMode() {
        fragmentController = startPaymentRender(
            checkoutSession = checkoutSessionId,
            countryCode = "US",
            coroutineScope = lifecycleScope,
            paymentSelected = PaymentSelected.CARD,
            listener = object : YunoPaymentRenderListener {
                override fun showView(fragment: Fragment) {
                    supportFragmentManager.beginTransaction()
                        .replace(R.id.payment_container, fragment)
                        .commit()
                }

                override fun returnOneTimeToken(oneTimeToken: String, additionalData: OneTimeTokenModel?) {
                    processPayment(oneTimeToken) {
                        fragmentController.continuePayment()
                    }
                }

                override fun returnStatus(resultCode: Int, paymentStatus: String) {
                    handlePaymentResult(paymentStatus)
                }

                override fun loadingListener(isLoading: Boolean) {
                    updateLoadingUI(isLoading)
                }
            }
        )
    }
}
Key benefits
- Custom UI Integration: Embed payment components in your existing layouts
- Fragment Compatibility: Works with both XML and Jetpack Compose
- Flow Control: Manage form submission and payment continuation manually
Advanced FeatureRender mode is designed for developers who need custom UI integration. For simpler implementations, use the standard Lite SDK methods described in the previous steps.
Complementary features
Yuno Android SDK provides additional services and configurations you can use to improve customers' experience. Use the SDK customization to change the SDK appearance to match your brand or to configure the loader.
styles
stylesWith the styles customization option, you can define global visual styles through a YunoStyles object. It lets you apply consistent branding across the SDK by customizing button appearance and typography.
data class YunoStyles(
    val buttonStyles: YunoButtonStyles? = null,
    val fontFamily: FontFamily? = null
)| Parameter | Description |
|---|---|
buttonStyles | Customizes the primary buttons displayed in the SDK. |
fontFamily | Sets the font family used across all SDK text elements. |
The YunoButtonStyles object lets you define specific settings for button appearance:
data class YunoButtonStyles(
    val backgroundColor: Color? = null,
    val contentColor: Color? = null,
    val cornerRadius: Dp? = null,
    val elevation: Dp? = null,
    val padding: Dp? = null,
    val fontFamily: FontFamily? = null,
    val fontSize: TextUnit? = null,
    val fontStyle: FontStyle? = null
)
Use the YunoConfig data class, described in Step 4, to use the styles customization option.
Loader
The loader functionality is controlled through the keepLoader parameter in the YunoConfig data class, which is documented inline in the SDK configuration section above.
Save card for future payments
You can also display a checkbox to save or enroll cards using cardSaveEnable: true. The following examples show the checkbox for both card form renders:

Render options
You can choose between two card form render options. The following screenshots show the difference between cardFormType ONE_STEP and STEP_BY_STEP:
SDK customization
You can change the SDK appearance to match your brand. For more information, see the SDK customization page.
Demo AppIn addition to the code examples provided, you can see the Yuno repository to complete Yuno Android SDKs implementation.
Updated 1 day ago