

Default experience (with intermediate screen)

Enhanced experience (direct native sheet)
What it is
By default, when a shopper selects a wallet payment (Apple Pay, Google Pay, or Samsung Pay), the Yuno Payment App opens an intermediate screen inside the VTEX checkout before the device’s native confirmation sheet (Face ID, fingerprint, or PIN) appears. The enhanced experience removes that intermediate screen: the wallet buttons appear directly inside the VTEX checkout payment step, and tapping a button opens the device’s native sheet immediately. This integration also unlocks optional installments for Apple Pay, Google Pay, and Samsung Pay.How it works
When a shopper reaches the checkout, the Yuno SDK quietly prepares a payment session in the background. By the time they reach the payment step, the wallet buttons appear instantly.- Fast confirmation: Tapping a button opens the native wallet sheet immediately.
- Auto-recalculation: If the shopper changes their cart (adds an item, applies a coupon, changes shipping), the SDK recalculates the session automatically.
- Error handling: If a payment fails, the shopper can try again without reloading the page.
Integration guide
Setting up the enhanced experience involves adding a small JavaScript snippet to your VTEX checkout and finding the values to fill into it.1
Add the snippet to your VTEX checkout
The snippet is added to your store’s 


checkout6-custom.js file from the VTEX dashboard.- In the VTEX dashboard, search for Checkout in the top bar.
- Select the website your store uses (usually Default).
- Open the Code tab and select
checkout6-custom.jsfrom the file list on the right.
- Add the snippet below at the end of the file, then click Save.
Replace
YOUR_AFFILIATION_NAME with the affiliation name from your Yuno provider configuration. In paymentMethods, list the wallets you want to enable: 'Apple Pay', 'Google Pay', 'Samsung Pay', or any combination.2
Find the affiliation name
The 


affiliationName value is the same one you set when configuring Yuno as a payment provider.- In the VTEX dashboard search bar, type
providersand select the Providers result.
- Find the Yuno provider configured for this store and open it.
- In the provider’s detail view, copy the value from the Affiliation Name field and use it in the snippet.
Apple Pay installments
Apple Pay installments is an optional feature within the enhanced experience that lets shoppers split their purchase into installments.What shoppers see
Once enabled, an Installments selector appears above the Apple Pay button. Tapping it opens a panel listing every installment option.
Installment selector

Installment options panel

How to enable
Apple Pay installments are enabled from the Yuno dashboard, by creating installment plans for the Apple Pay payment method. The snippet doesn’t change: a store running the enhanced experience with'Apple Pay' in paymentMethods already asks Yuno for the available plans on every order.
1
Create an Apple Pay installment plan
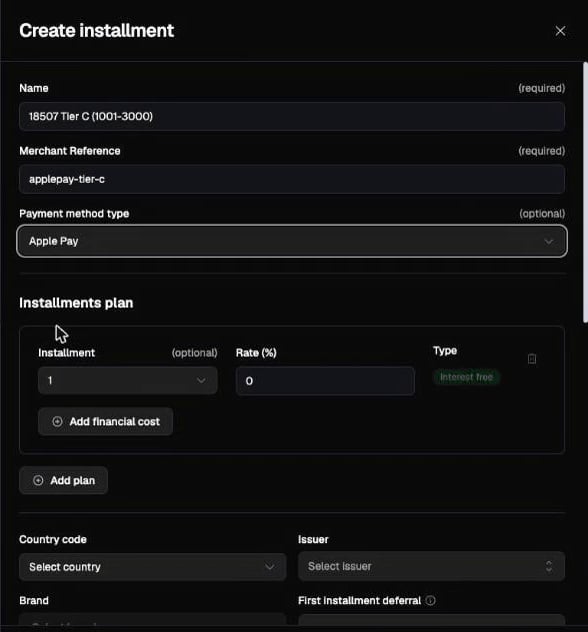
- In the Yuno dashboard, go to Installments and click Create installment.
- In Payment method type, select Apple Pay.
- Set the number of installments, the rate, the amount range, and the availability window.
2
Check the plan in the list
The plan appears with Apple Pay in the Payment method column. Create one plan per amount
band if you want different options for different cart sizes.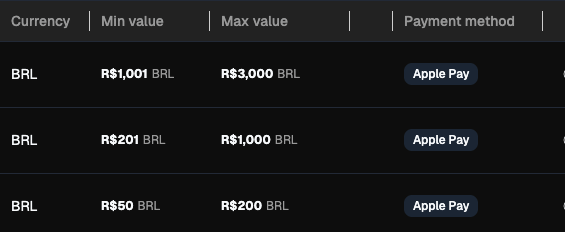
3
Confirm it in your checkout
Open the payment step with a cart inside the plan’s amount range and select Apple Pay. The
Installments selector appears above the button.
payment_method_type: APPLE_PAY.
Eligibility rules
Yuno resolves the plan for each order from the cart total, so the shopper always sees the options that apply to what’s in their cart. If the cart changes, the options are recalculated. Each plan you create defines:- Payment method type: must be Apple Pay.
- Currency and country: must match the order.
- Amount range: minimum and maximum order total the plan covers.
- Availability window: start and end date for the plan.
Google Pay installments
Google Pay installments work the same way as Apple Pay installments: shoppers split their purchase into installments directly from the Google Pay payment option. Each wallet resolves its own plans, so you can offer installments on one wallet, the other, or both.What shoppers see
Once enabled, an Installments selector appears above the Google Pay button. Tapping it opens a panel listing every installment option.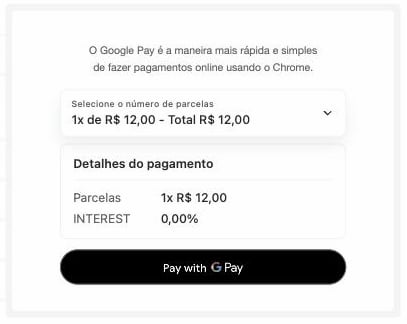
Installment selector
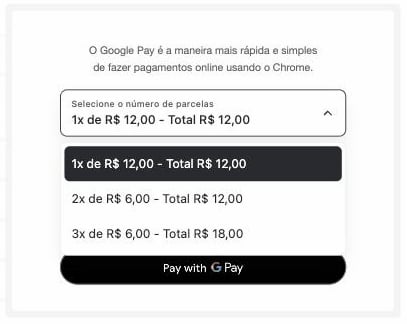
Installment options panel
How to enable
Google Pay installments are enabled from the Yuno dashboard, by creating installment plans for the Google Pay payment method. The snippet doesn’t change: a store running the enhanced experience with'Google Pay' in paymentMethods already asks Yuno for the available plans on every order.
1
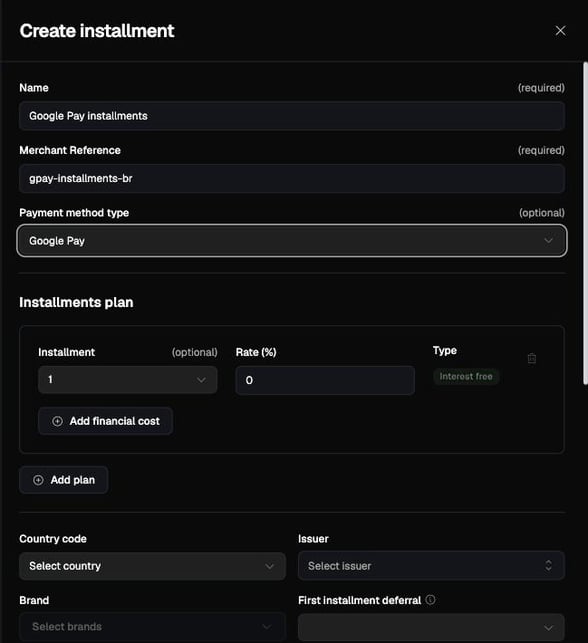
Create a Google Pay installment plan
- In the Yuno dashboard, go to Installments and click Create installment.
- In Payment method type, select Google Pay.
- Set the number of installments, the rate, the amount range, and the availability window.
2
Check the plan in the list
The plan appears with Google Pay in the Payment method column. Create one plan per amount
band if you want different options for different cart sizes.
3
Confirm it in your checkout
Open the payment step with a cart inside the plan’s amount range and select Google Pay. The
Installments selector appears above the button.
payment_method_type: GOOGLE_PAY.
Eligibility rules
Google Pay follows the same eligibility rules as Apple Pay: Yuno resolves the plan for each order from the cart total, recalculates when the cart changes, and matches plans on currency, country, amount range, and availability window. The only difference is the payment method type — a plan only applies to Google Pay when its Payment method type is Google Pay. If no plan covers the order, the selector is hidden and Google Pay renders as a plain button — the payment still goes through, at one installment.Samsung Pay installments
Samsung Pay installments work the same way as Apple Pay and Google Pay installments: shoppers split their purchase into installments directly from the Samsung Pay payment option.What shoppers see
Once enabled, an Installments selector appears above the Samsung Pay button. Tapping it opens a panel listing every installment option, with a full financing breakdown below.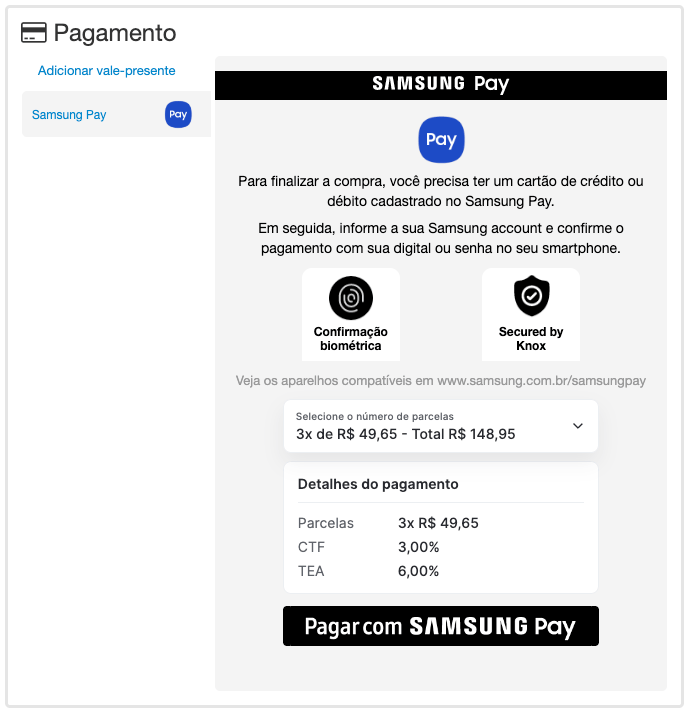
Samsung Pay checkout with installments
How to enable
Samsung Pay installments are enabled from the Yuno dashboard, by creating installment plans for the Samsung Pay payment method. The snippet doesn’t change: a store running the enhanced experience with'Samsung Pay' in paymentMethods already asks Yuno for the available plans on every order.
1
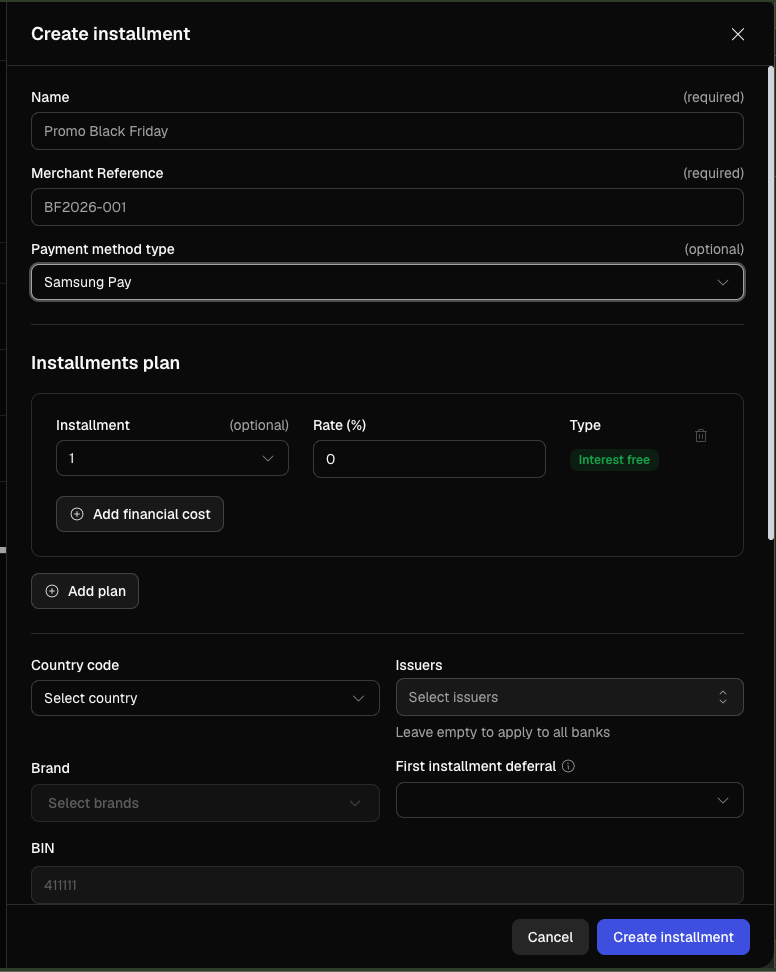
Create a Samsung Pay installment plan
- In the Yuno dashboard, go to Installments and click Create installment.
- In Payment method type, select Samsung Pay.
- Set the number of installments, the rate, the amount range, and the availability window.
2
Check the plan in the list
The plan appears with Samsung Pay in the Payment method column. Create one plan per amount
band if you want different options for different cart sizes.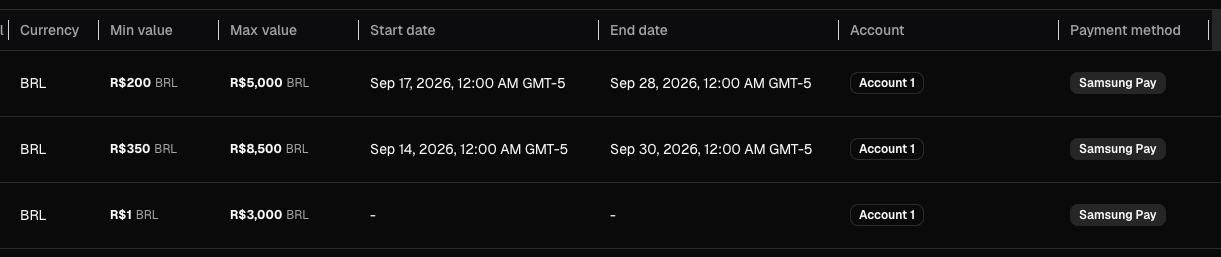
3
Confirm it in your checkout
Open the payment step with a cart inside the plan’s amount range and select Samsung Pay. The
Installments selector appears above the button.
payment_method_type: SAMSUNG_PAY.