
Documentation Index

Fetch the complete documentation index at: https://docs.y.uno/llms.txt

Use this file to discover all available pages before exploring further.

Click to Pay (C2P) is a unified checkout solution supporting Visa, Mastercard, Amex, and Discover. It’s based on the EMVCo secure payment standard, eliminating manual card entry by storing tokenized cards in a network-level profile accessible across participating merchants.
The C2P profiles of users are based on their phone number or email address (or both). Hence, Click to Pay works best for merchants with guest checkout flows. When combined with Passkeys, authentication becomes biometric (Face ID, Touch ID, PIN), replacing passwords and OTPs entirely. Each card brand independently decides which countries they enable Click to Pay in. The brand availability limits which card brands a new user can add during their first enrollment.

Mastercard — 45 countries

RegionCountries
North AmericaCanada, United States
EuropeAustria, Belgium, Czech Republic, Denmark, Finland, France, Germany, Ireland, Italy, Netherlands, Norway, Poland, Portugal, Slovakia, Spain, Sweden, Switzerland, Ukraine, United Kingdom
Latin AmericaArgentina, Brazil, Chile, Colombia, Mexico, Peru
Asia PacificAustralia, Hong Kong, Malaysia, New Zealand, Pakistan, Philippines, Singapore, Thailand
Middle East & AfricaBahrain, Egypt, Kuwait, Nigeria, Qatar, Saudi Arabia, South Africa, Tanzania, UAE

Visa — ~50 countries

RegionCountries
North AmericaCanada, United States
EuropeAustria, Belgium, Bulgaria, Croatia, Cyprus, Czech Republic, Denmark, Estonia, Finland, France, Germany, Greece, Hungary, Ireland, Italy, Latvia, Lithuania, Luxembourg, Malta, Netherlands, Norway, Poland, Portugal, Romania, Serbia, Slovakia, Slovenia, Spain, Sweden, Switzerland, Ukraine, United Kingdom
Latin AmericaArgentina, Brazil, Chile, Colombia, Mexico, Peru
Asia PacificHong Kong, India, Malaysia, New Zealand, Pakistan, Singapore, South Korea
Middle East & AfricaBahrain, Kuwait, Oman, Qatar, South Africa, UAE

Quick Reference: Brands Available by Key Market

MarketVisaMastercardAmexDiscover
United StatesYesYesYesYes
CanadaYesYesYesNo
United KingdomYesYesYesNo
FranceYesYesNoNo
GermanyYesYesNoNo
ItalyYesYesNoNo
MexicoYesYesYesNo
BrazilYesYesNoNo
AustraliaNoYesYesNo
SingaporeYesYesYesNo
Hong KongYesYesYesNo
Regional Reach
  • American Express: 8 countries (US, CA, UK, AU, NZ, HK, SG, MX).
  • Discover: United States only.

Visa Issuer Mandates

Issuers in specific regions are required to support Click to Pay according to the following schedule:
  • Phase 1 (Apr 2024): Austria, Netherlands, Switzerland.
  • Phase 2 (Oct 2024): UK, Bulgaria, Croatia, Cyprus, Czech Republic, France, Greece, Hungary, Italy, Malta, Romania, Slovenia.
  • Phase 3 (Apr 2025): Bahrain, Kuwait, Oman, Qatar, Ukraine, UAE.
  • Phase 4 (Oct 2026): South Africa.

Key features and benefits

  • Ease of Use: It enables consumers to make online purchases with a single click, eliminating the need to enter credit card details for each purchase manually.
  • Enhanced Security: Utilizes modern authentication standards to minimize fraud risk. This includes network-level tokenization and biometric authentication.
  • Consistent Experience: Offers a similar payment experience across all websites that support this technology.
  • Conversion Uplift: 4-5% conversion uplift when used with passkeys and up to 2.5x fraud reduction vs. OTP authentication.
  • Liability Shift: Available when combining tokenization with passkeys.
Network Tokens RequirementNetwork tokens support is required for Click to Pay in all flows (Golden Flow and APM, both with and without passkeys). Merchants must configure network tokens in their Routing rules to ensure successful processing.

Integration

To integrate and start offering Click to Pay to your customers, follow these 4 simple steps:
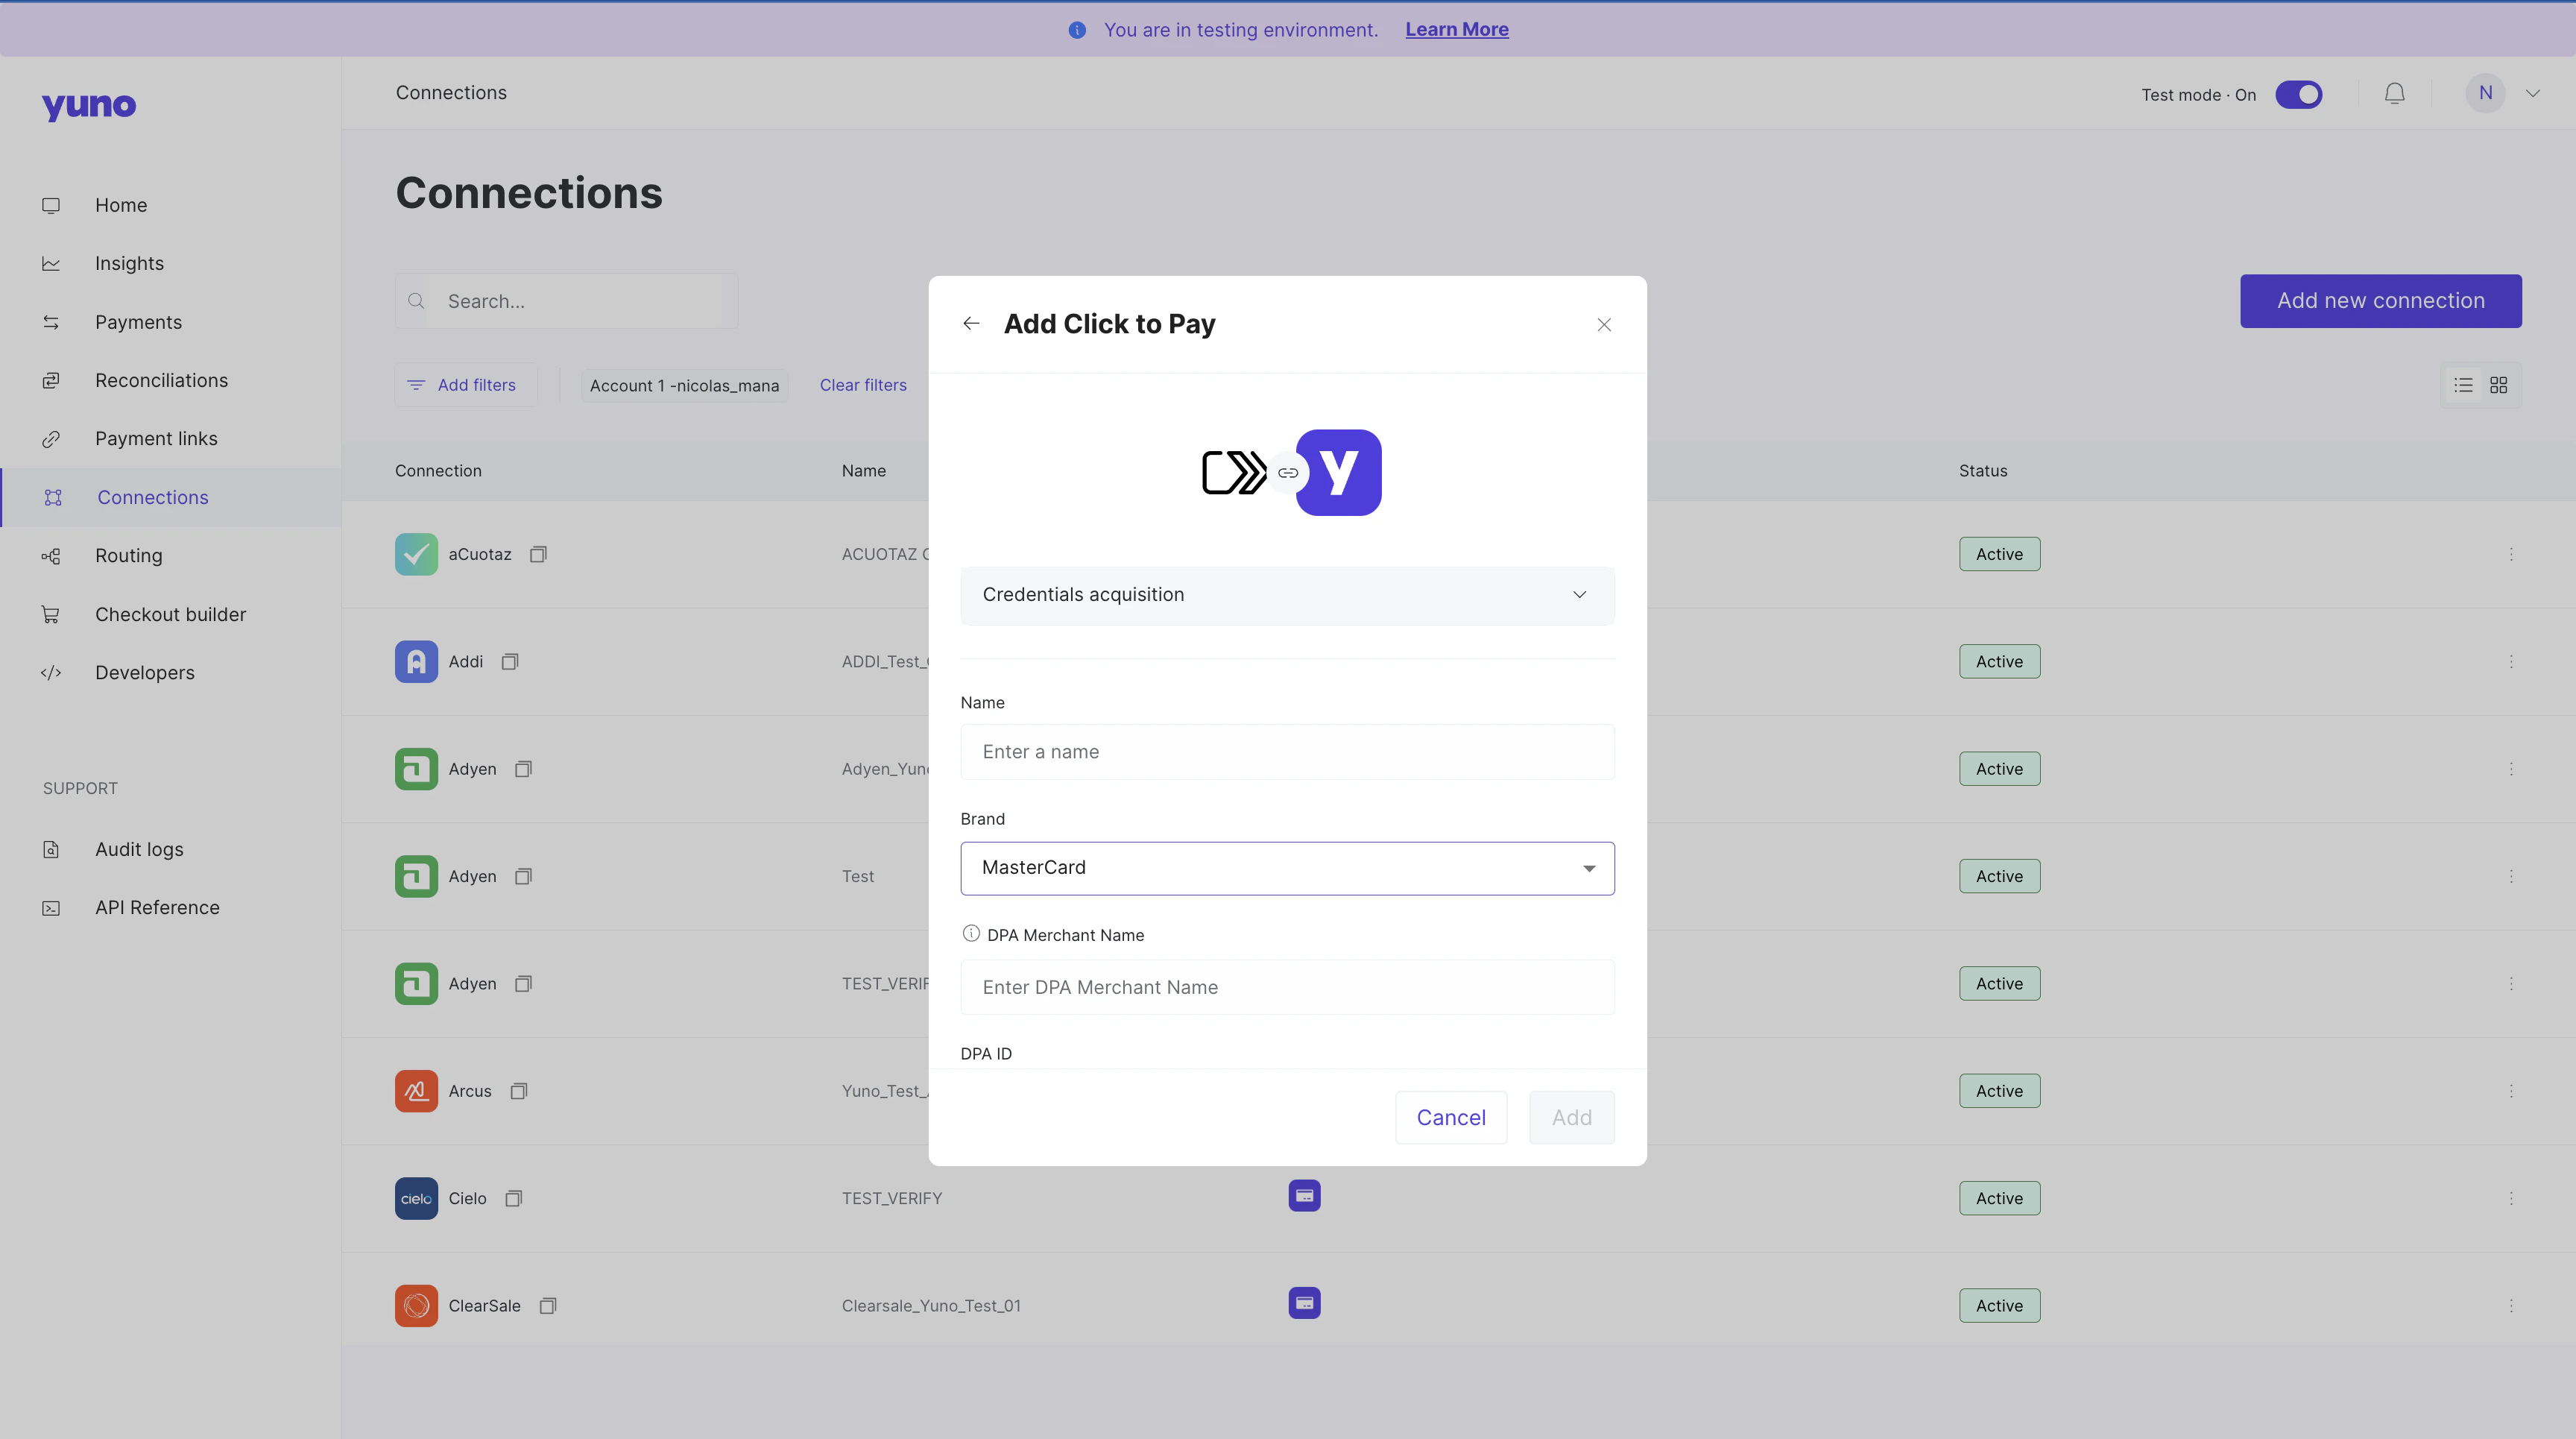
  1. Create a connection in the Yuno dashboard using your Click to Pay credentials.
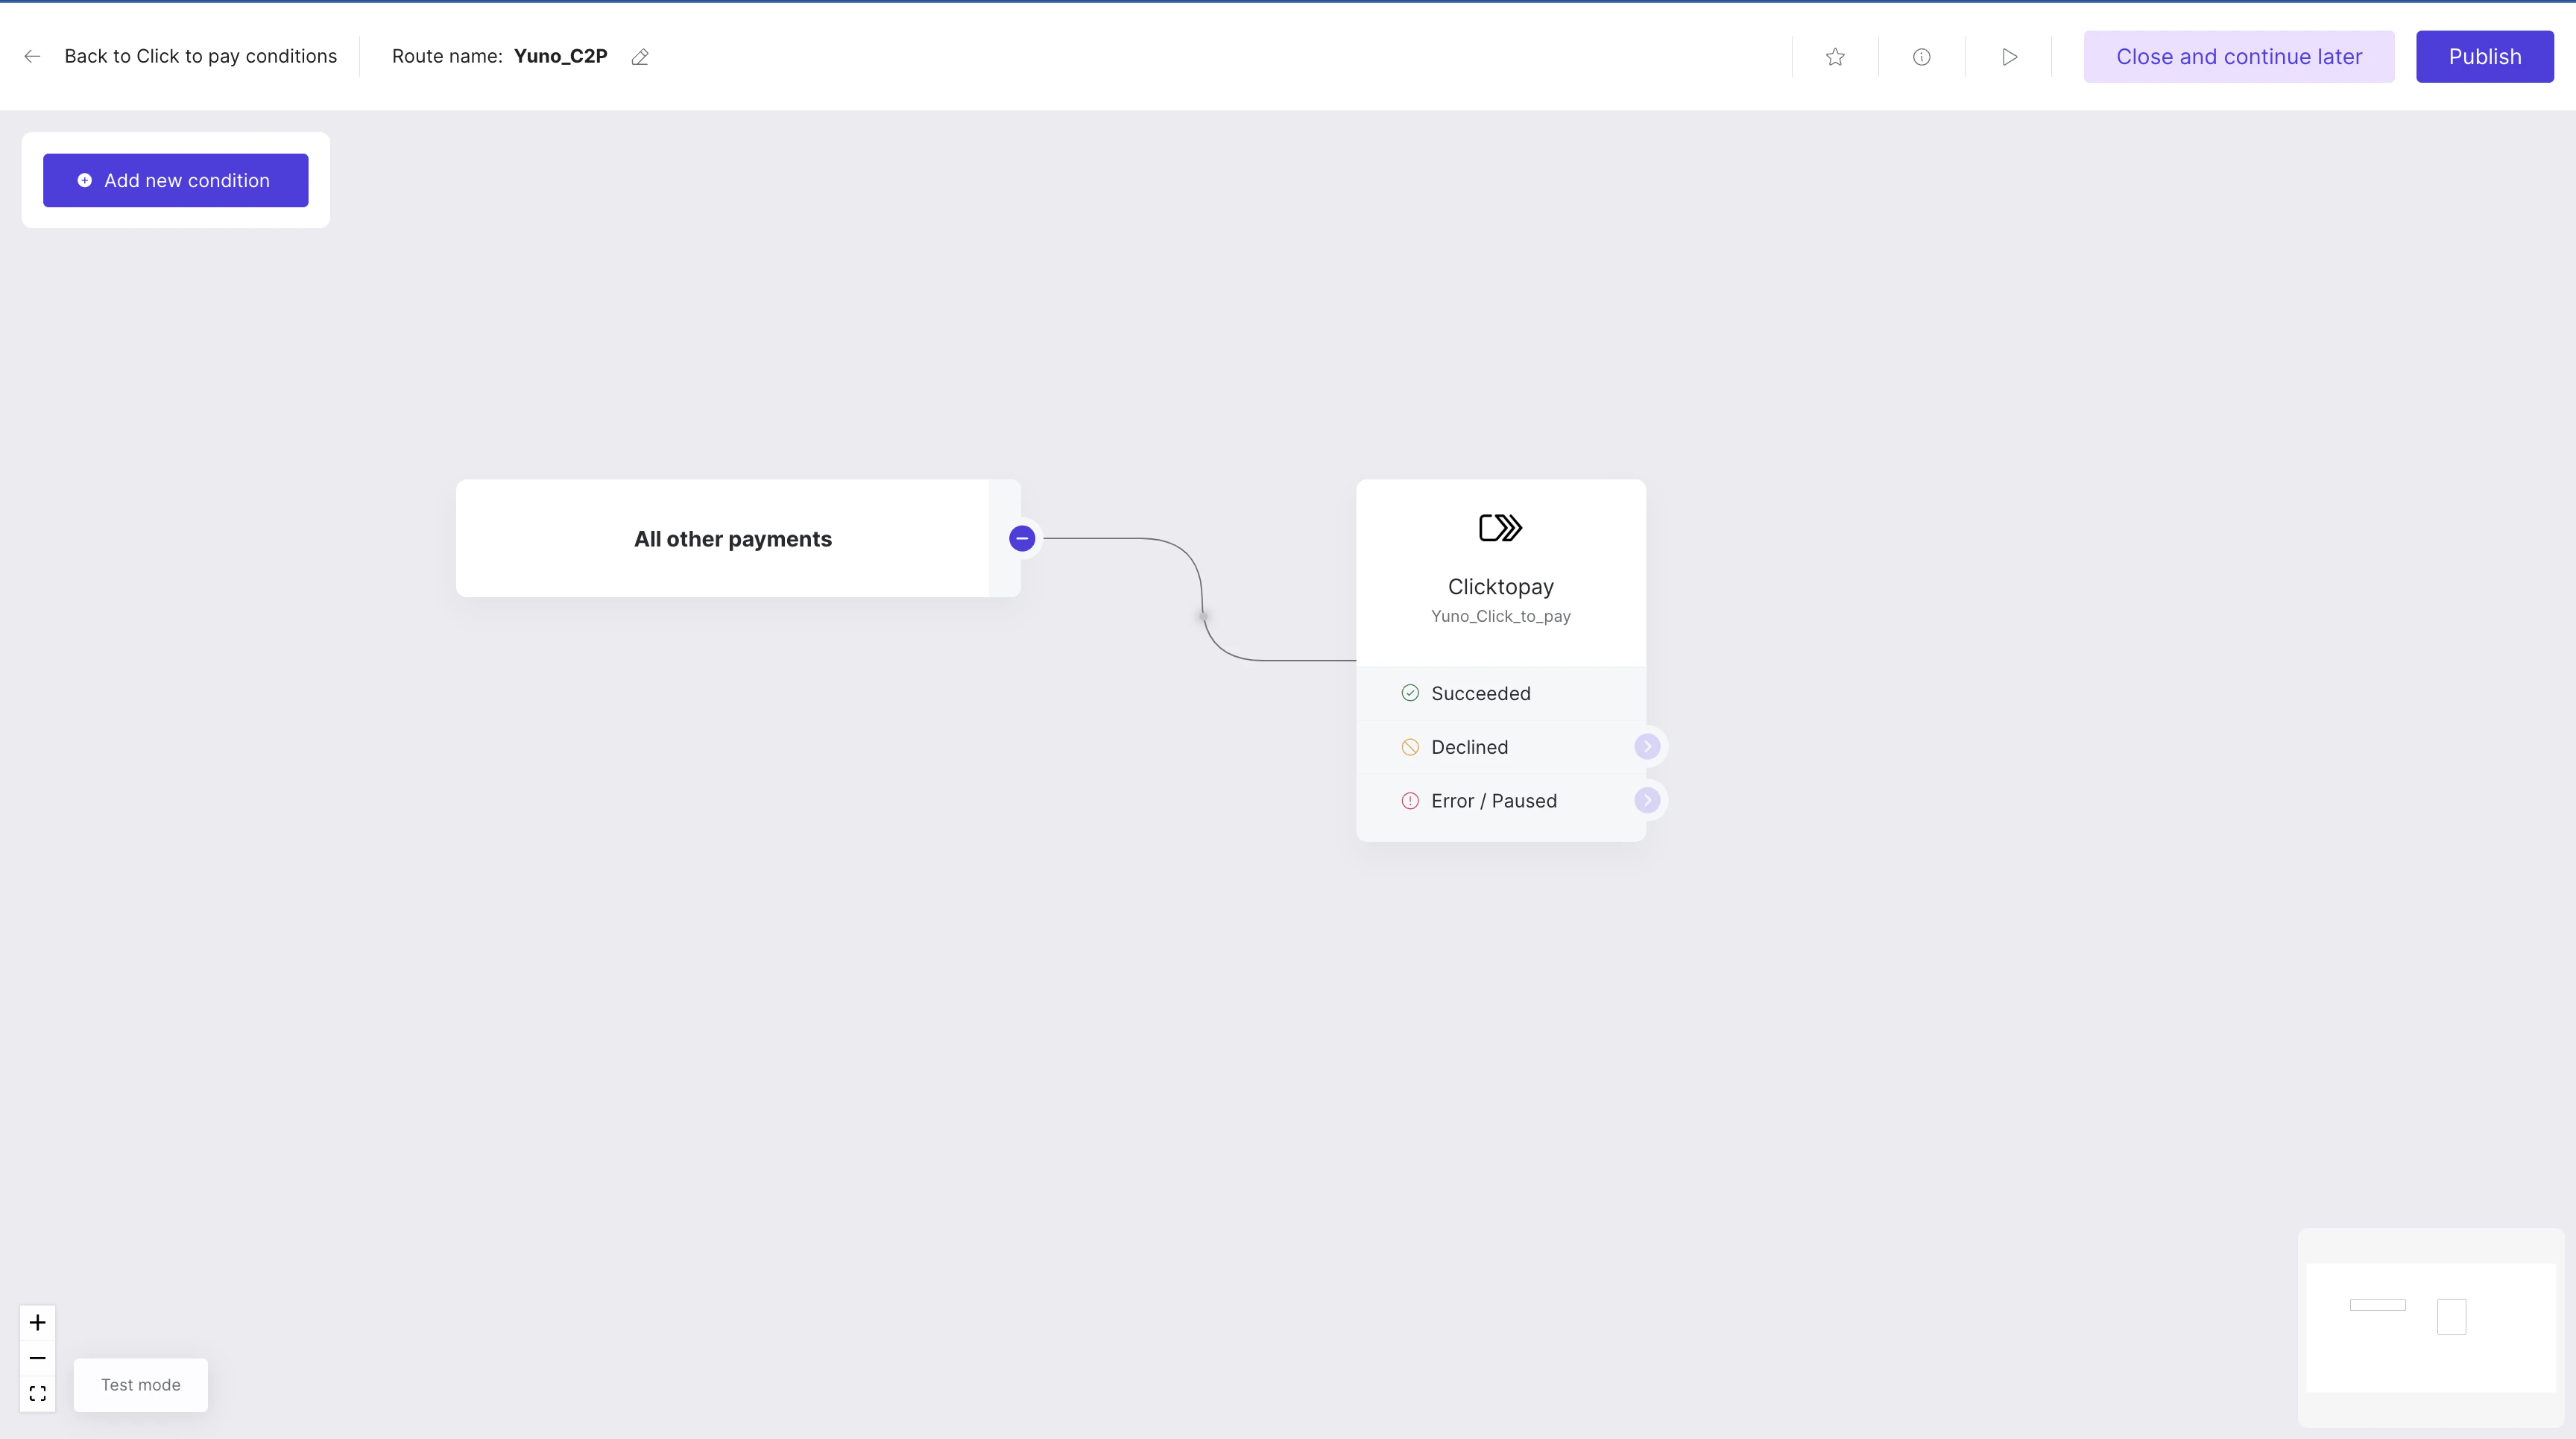
  2. Define the payment method route in the Routing section in order to be able to enable it in the Checkout Builder.
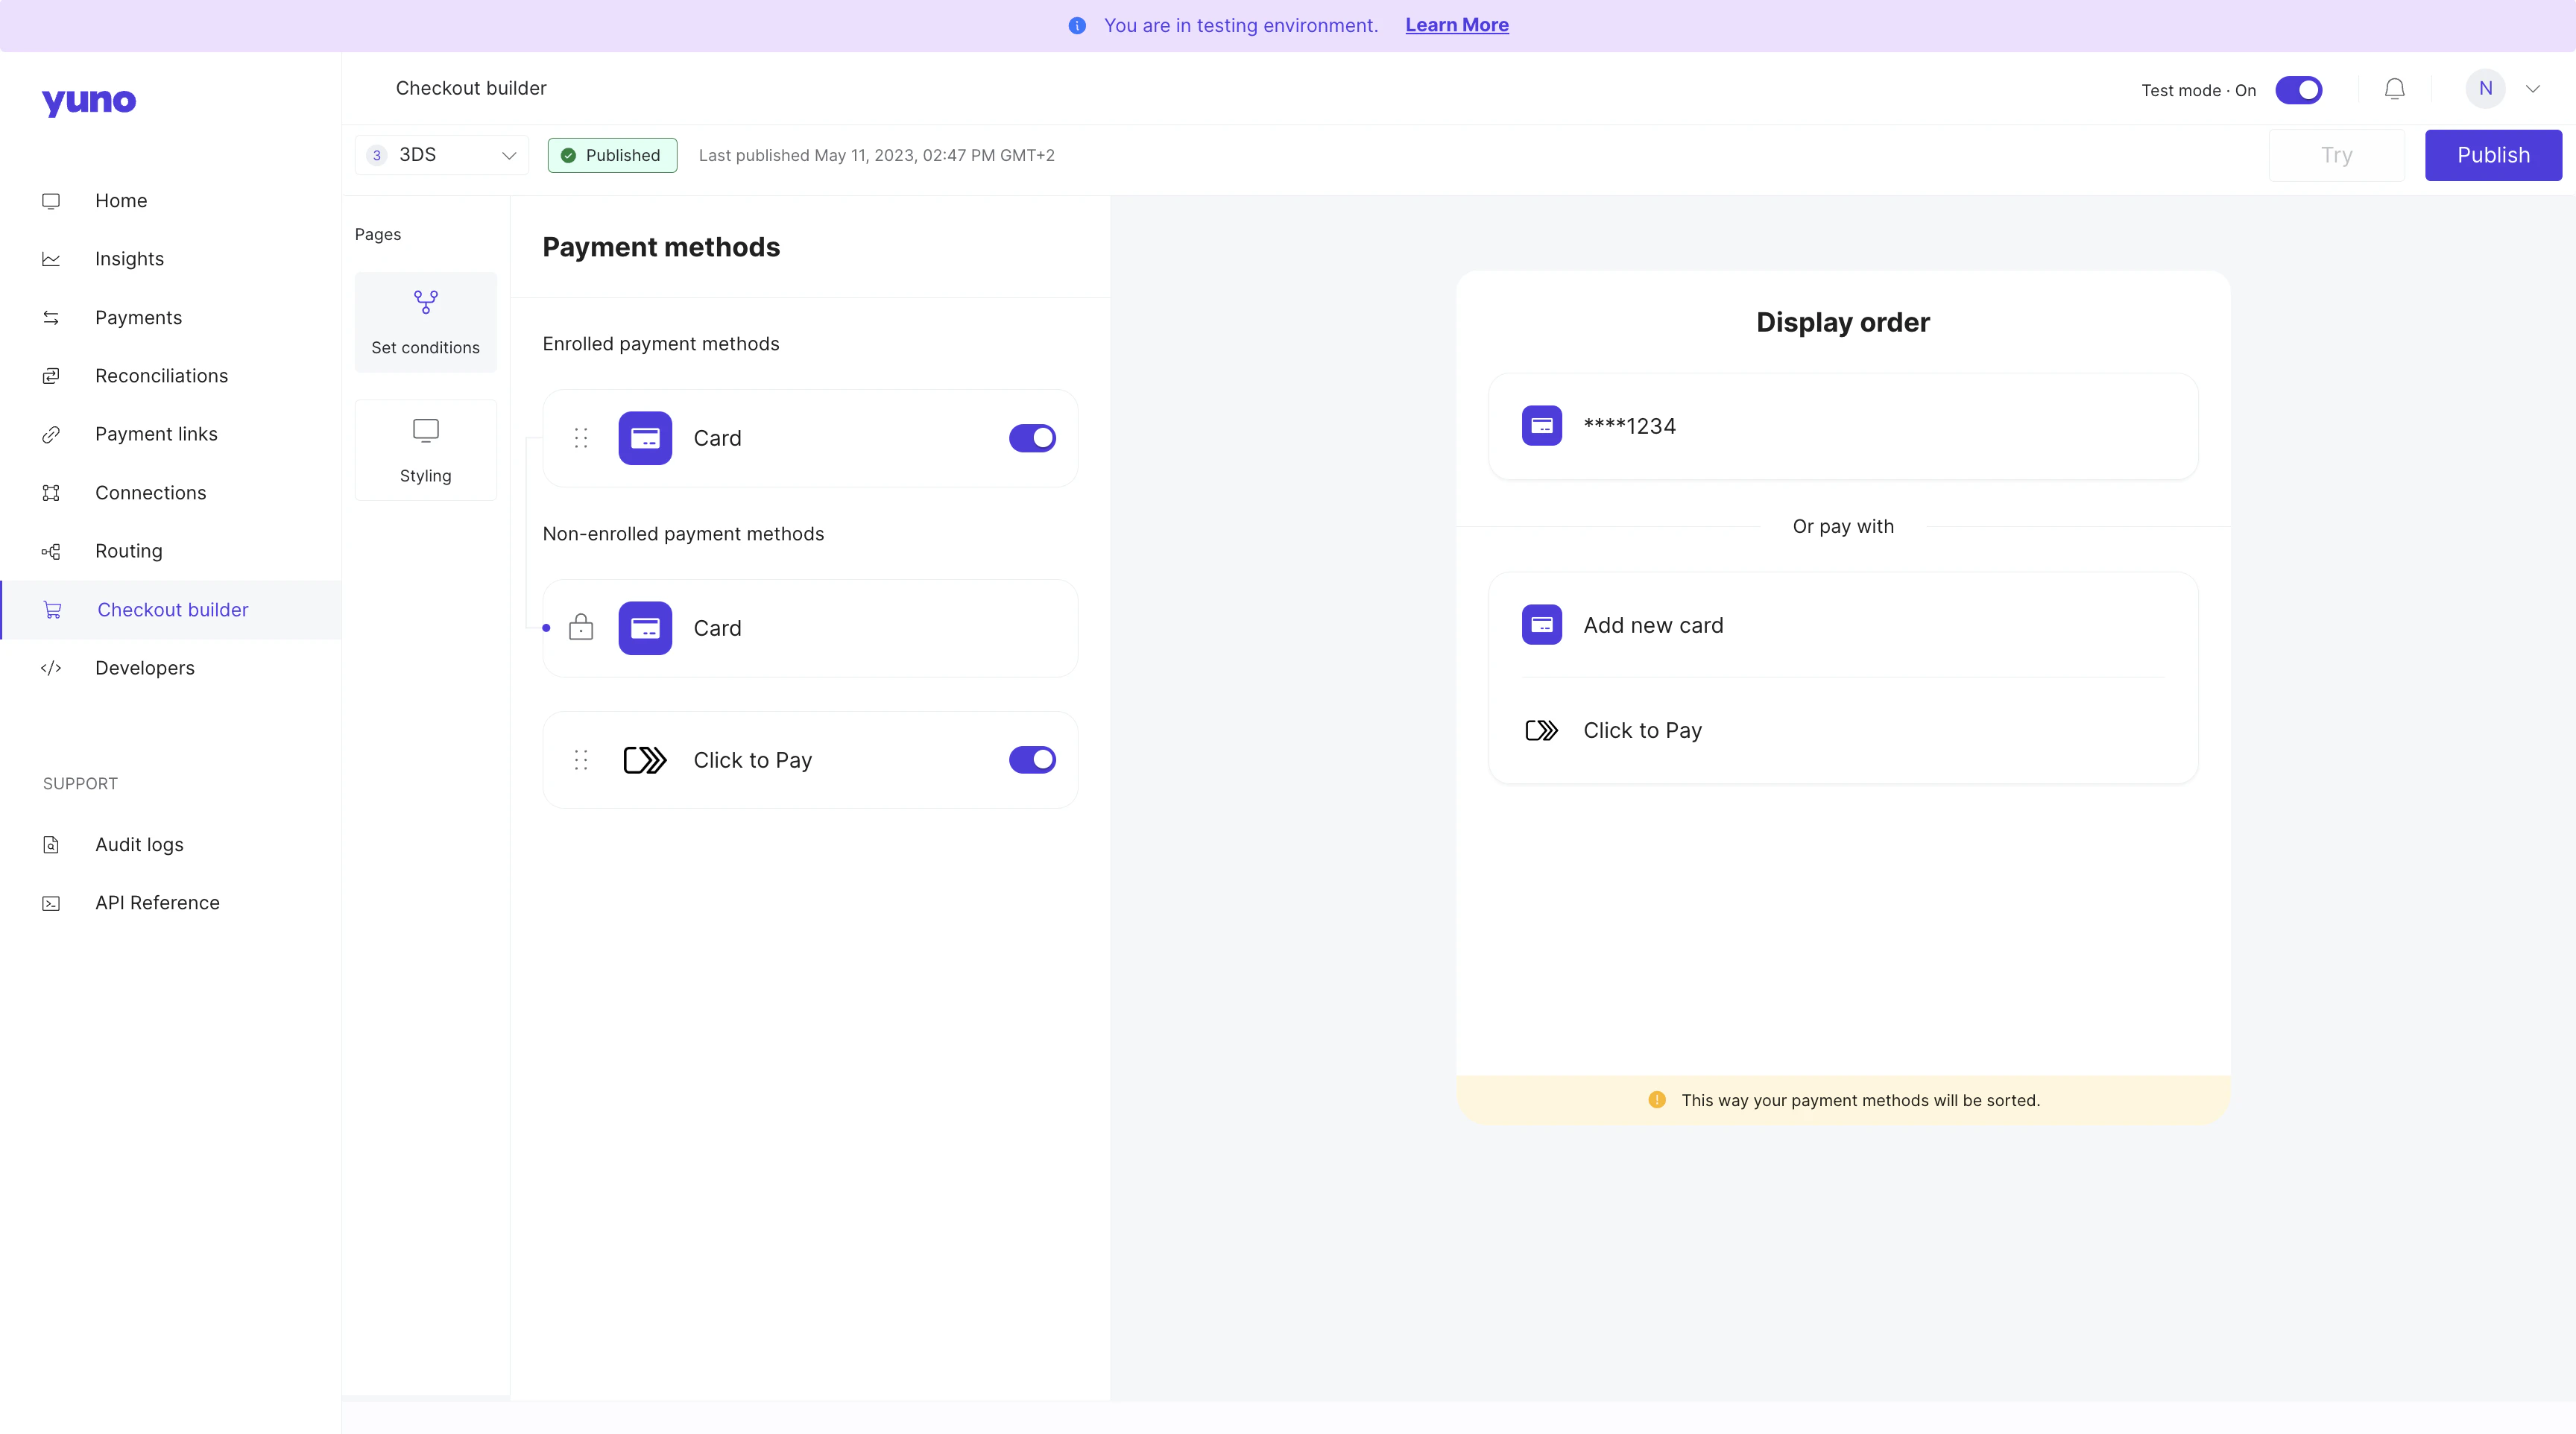
  3. Enable Click to Pay in the Checkout builder.
  4. Define the Card route: Taking in consideration that Click to Pay is a wallet that stores credit card information, the route where you will need to define the providers for each scenario is the same as the ‘Card’ payment method.

Checkout Flows

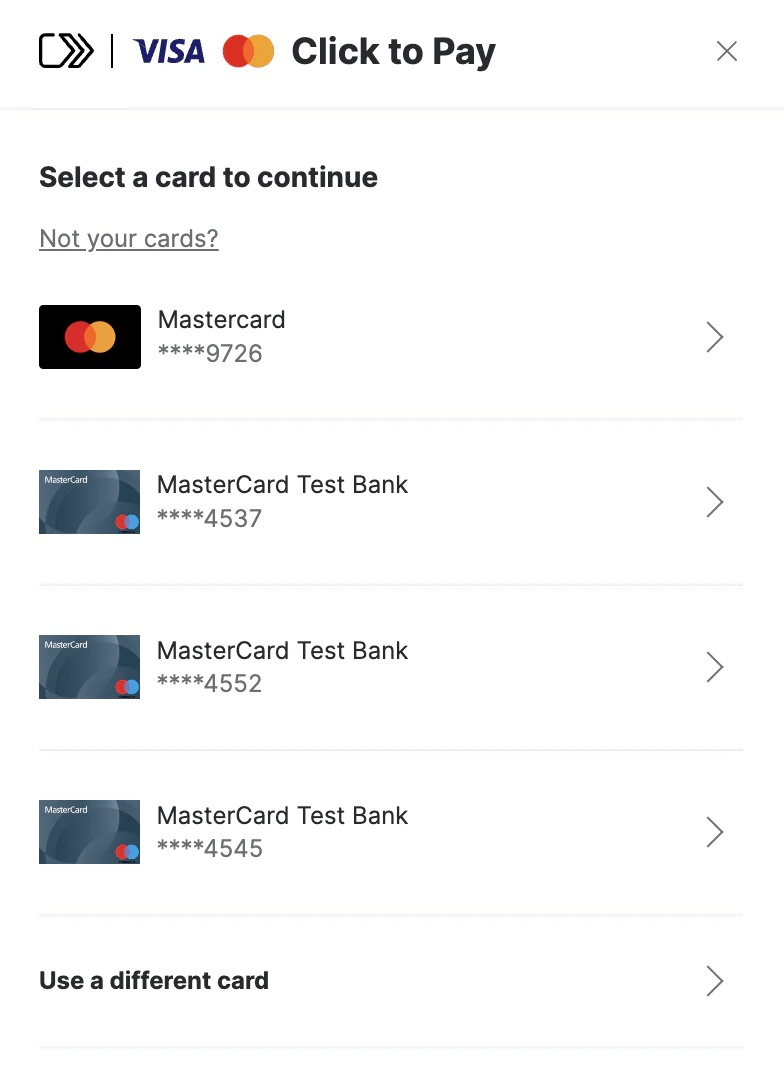
Merchants can choose how Click to Pay appears at checkout. Both experiences support passkeys across web and mobile platforms.

1. Standalone Payment Method (APM Flow)

Click to Pay appears as a separate payment button alongside cards and other methods.
  • Mandatory Enrollment: Account creation is mandatory for all users.
  • Payload Requirement: Requires a C2P-specific payload.
  • Visibility: Best for merchants who want Click to Pay prominently featured.

2. Embedded in Card (Golden Flow)

Click to Pay is embedded within the card payment method and is invisible until the user selects “Card.”
  • Optional Enrollment: Enrollment is via a checkbox. If declined, the user proceeds with manual card entry (the transaction still shows CLICK_TO_PAY in the one-time token (OTT)).
  • Visibility: Best for low-friction UX where enrollment feels optional.
Certification Note The golden flow with passkeys in Mobile is currently in certification.
There are three different C2P UX Flow scenarios depending on user recognition:
ScenarioStateUX Experience
Scenario A: First-Time User (New)No C2P account existsUser enters card details + email/phone. APM Flow: Mandatory account creation. Golden Flow: Optional enrollment via checkbox.
Scenario B: Recognized User (Cookies/Device)Account exists + valid cookie (< 6 months)Instant recognition - no email entry needed. Saved cards appear immediately. Fastest possible checkout (2-3 seconds).
Scenario C: Recognized User (Email/Phone Only)Account exists but no valid cookieUser enters email address -> C2P finds account -> Sends OTP (email or SMS). After verification, saved cards appear.

Activation Guide

Follow the steps below based on your desired configuration:

Option 1: Click to Pay Only (APM)

  1. Request the DPA ID from the card network (e.g., Mastercard).
  2. Add the Click to Pay connection in the Yuno dashboard using the DPA ID.
  3. Add the card connection that will process these cards.
  4. Define the payment method route in Routing and enable Click to Pay in the Checkout Builder.

Option 2: Click to Pay + Passkey

Supported on web browsers only (not supported in WebView).
  1. Request the DPA ID.
  2. Add the Click to Pay connection using the DPA ID.
  3. Add the card connection and configure the Acquirer BIN.
  4. Request the Yuno backend team to enable the Passkey and Dual Payload flags.
  5. Create checkout sessions with a price for Passkey to work correctly.

Option 3: Click to Pay + Golden Flow

  1. Request the DPA ID.
  2. Add the Click to Pay connection using the DPA ID.
  3. Add the card connection that will process these cards.
  4. Request the Yuno backend team to enable the Golden Flow flag.

Option 4: Click to Pay + Golden Flow + Passkey

Supported on web browsers only (not supported in WebView).
  1. Request the DPA ID.
  2. Add the Click to Pay connection.
  3. Add the card connection and configure the Acquirer BIN.
  4. Request the Yuno backend team to enable Passkey, Dual Payload, and Golden Flow flags.
  5. Create checkout sessions with a price for Passkey to work correctly.

Verification Methods

We map the authentication method used during the transaction to the authentication_method field:
SRC CodeMapped ValueDescription
013DS_ACS3DS Access Control Server (= transaction was authenticated with 3DS).
02APP_BASED_AUTHApp-based authentication.
03FEDERATED_LOGINFederated login.
04OTP/SHARED_SECRETOTP or shared secret.
05NO_AUTHENTICATIONNo authentication performed.
06PROPRIETARYProprietary method.
07FIDO2FIDO2 / Passkey authentication (= transaction authenticated with a passkey).
08SPCSecure Payment Confirmation.
21VTS_DEVICE_BINDINGVTS device binding.
22VTS_CARDHOLDER_VERIFICATIONVTS cardholder verification.

VTEX integration

For VTEX merchants using Click to Pay, the integration provides automatic customer creation and data mapping to streamline the checkout experience. Automatic customer creation: When customers choose Click to Pay on VTEX stores:
  • The VTEX customer is automatically created in Yuno during payment initialization (if not already existing)
  • All customer data from the VTEX profile is automatically mapped to Yuno and included in the checkout session
  • Customer information (CVV, email, address) is pre-filled in the SDK, eliminating redundant data entry
  • The checkout flow matches the streamlined experience available for non-VTEX merchants
This feature requires the Create customer field to be set to Yes in the VTEX provider configuration. For more details, see Set up Yuno on VTEX in the VTEX integration documentation.

SDK integration (Click to Pay Passkey)

ImportantStandard Click to Pay card flows use the existing SDK callbacks, but Passkey users must include a callback_url that matches the app’s deeplink scheme so the shopper returns to the app after authentication (on Android this must match the scheme configured in AndroidManifest.xml). For example:
{
  "callback_url": "myapp://pay/ctp"
}
For Passkey transactions, the one-time token (OTT) never reaches the usual SDK callbacks (including callbackOTT on Android). Always read it from the deeplink parameters before continuing the flow.
The Yuno iOS and Android SDKs currently support Click to Pay via the Passkey flow. In both cases, the one-time token (OTT) is returned through a deeplink URL instead of the standard SDK callbacks, so your app must parse the deeplink parameters before continuing the payment.

iOS Passkey flow

The Yuno iOS SDK supports Click to Pay with Passkey. The flow differs from standard card payments because the SDK returns the result by deeplink instead of via the usual delegate callbacks. When a shopper completes the Click to Pay Passkey flow, the SDK sends the result through the deeplink URL instead of the yunoCreatePayment(with token: String) delegate method.

1. Close the external browser

When your app receives the deeplink callback, immediately call Yuno.receiveDeeplink to let the SDK dismiss the external browser that was used for Passkey authentication.
func application(_ app: UIApplication,
                 open url: URL,
                 options: [UIApplication.OpenURLOptionsKey : Any] = [:]) -> Bool {
    Yuno.receiveDeeplink(url: url)

    // Parse the URL to extract parameters

    return true
}
The deeplink query string includes the information you need to continue:
  • has_error: Indicates an error occurred during the transaction. Handle this scenario in your app.
  • one_time_token: Present when the transaction succeeds. Use it to create the payment.

3. Create the payment

If the deeplink contains a one_time_token:
  1. Extract the one_time_token.
  2. Use it to create the payment with the Create Payment endpoint.
  3. After creating the payment, call continuePayment in the SDK to finalize the flow.
ImportantThe OTT never reaches yunoCreatePayment(with token: String) for Click to Pay Passkey. Always read the token from the deeplink URL.

Android Passkey flow

For Android, include a callback_url that matches your app’s deeplink scheme when creating the checkout session, add the corresponding intent-filter in AndroidManifest.xml, and handle the deeplink in both onCreate and onNewIntent. When the deeplink arrives:
  1. Check has_error to manage cancellations or failures.
  2. Extract one_time_token (and the optional checkout_session) from the URI.
  3. Send the OTT to your backend to call the Create Payment endpoint, then invoke continuePayment in the SDK to resume the flow.
See the full SDK guides for detailed samples: Android Full Checkout and iOS Full Checkout.