> ## Documentation Index
> Fetch the complete documentation index at: https://docs.y.uno/llms.txt
> Use this file to discover all available pages before exploring further.

# Payment Methods List

> Render pre-built views for payment methods, including express buttons.

`getPaymentMethodsViews` returns pre-built views for the payment methods you want to show. Use it to display the SDK's full payment methods list, a wallet button (Apple Pay or Google Pay), or any combination available on your platform.

This feature applies to payment flows only. It is not available for enrollment.

## This is what the list looks like

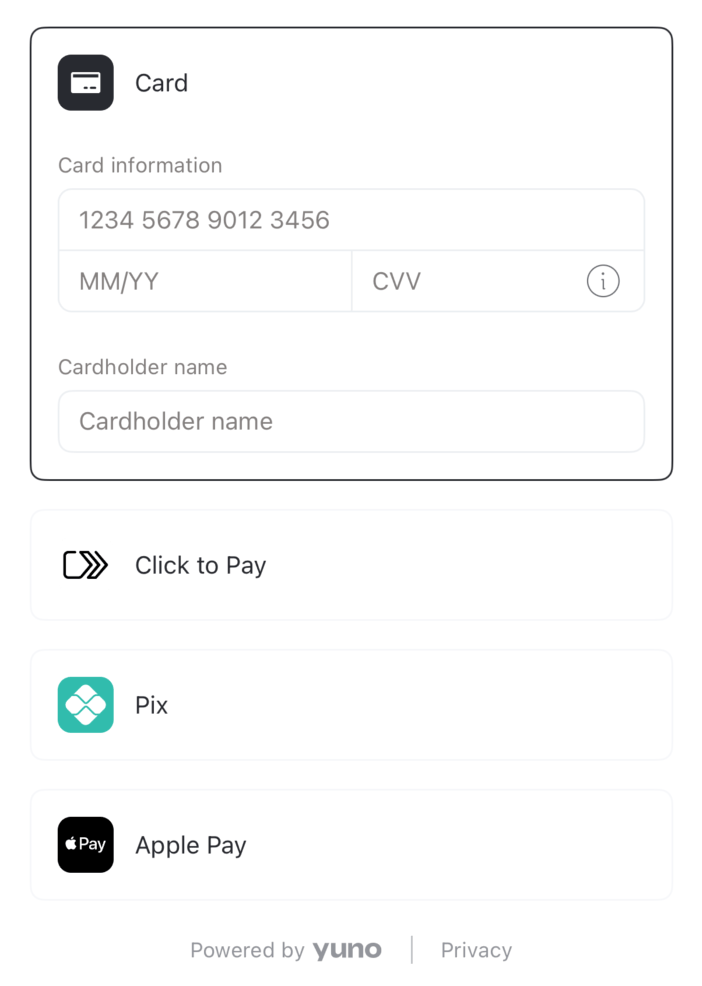
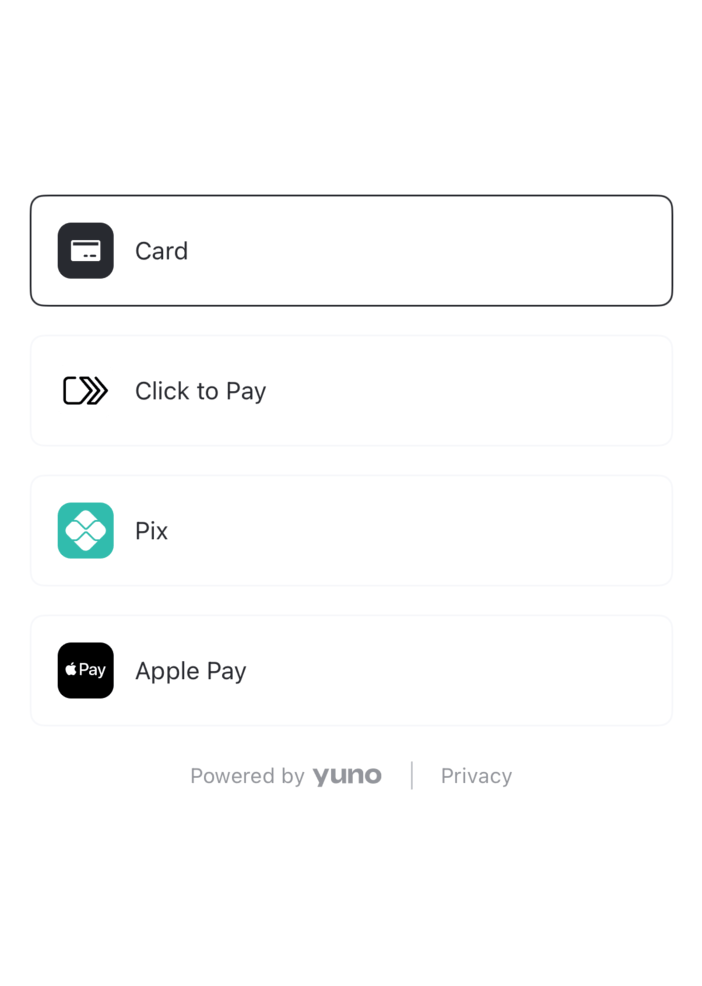
The SDK renders the full list of payment methods enabled in your dashboard: logos, names, and the shopper's saved methods included. And if you prefer fewer taps, you can choose to show each method's form expanded right inside the list, so shoppers enter their details without leaving it, for a faster checkout. You enable the expanded layout from the **Checkout Builder** in your [Yuno Dashboard](https://dashboard.y.uno/), no code needed.

<Columns cols={2}>
  <div className="media-showcase">
    <img src="https://mintcdn.com/yuno-3979e326/wcaoTPfNIXrvnpRG/images/yuno-sdk/payment-methods-list/list.png?fit=max&auto=format&n=wcaoTPfNIXrvnpRG&q=85&s=d225d6cc8e16379470bdc028fec4169e" alt="The payment methods list" width="702" height="986" data-path="images/yuno-sdk/payment-methods-list/list.png" />

    <p>The list as-is: the shopper picks a method, you start the payment.</p>
  </div>

  <div className="media-showcase">
    <img src="https://mintcdn.com/yuno-3979e326/wcaoTPfNIXrvnpRG/images/yuno-sdk/payment-methods-list/list-expanded-forms.png?fit=max&auto=format&n=wcaoTPfNIXrvnpRG&q=85&s=2dc558a2fc52473b30f15b374beafa2f" alt="The list with forms expanded inline" width="702" height="986" data-path="images/yuno-sdk/payment-methods-list/list-expanded-forms.png" />

    <p>Prefer it expanded? Each form opens inline for a faster checkout.</p>
  </div>
</Columns>

## Before you start

Your backend must have created a `checkoutSession` and the `Transaction` must be constructed with that session. See [Get Started](/docs/yuno-sdk/get-started).

## Implementation

Call `getPaymentMethodsViews` with the types you want and a controller. The SDK returns a map of `PaymentMethodType` to view. Embed each view in your layout. When the user picks a method, your controller receives a `PaymentMethodSelected` that you pass to `Transaction.start()`.

<Tabs>
  <Tab title="Web">
    ```typescript theme={"theme":{"light":"github-dark","dark":"github-dark-dimmed"}}
    let selectedPaymentMethod: PaymentMethodSelected | null = null

    const views = transaction.getPaymentMethodsViews({
        types: ['applePay', 'googlePay', 'paymentMethodList'],
        onPaymentSelected: (paymentMethod) => {
            selectedPaymentMethod = paymentMethod
        },
    })

    views.applePay?.mount({ elementSelector: '#apple-pay', buttonType: 'buy', buttonStyle: 'black' })
    views.googlePay?.mount({ elementSelector: '#google-pay', buttonColor: 'black' })
    views.paymentMethodList?.mount({ elementSelector: '#payment-list' })

    // Later, when the user confirms (e.g. your Pay button):
    if (selectedPaymentMethod) {
        transaction.start({ paymentMethod: selectedPaymentMethod })
    }
    ```

    Each view in the returned object exposes a `.mount({ elementSelector, ...config })` method. Per-view styling (Apple Pay button type, Google Pay color, etc.) lives on `.mount()`. Options you pass to a wallet's `mount()` override the same keys in the transaction config's `externalButtons`. `paymentMethodList.mount()` also takes `scrollContainerSelector`, `visibleTriggerOffsetPx`, and `bottomOffsetPx` for a list inside a scrolling container. They override the same keys in the transaction config's `paymentListConfig`.

    What `start()` does after a selection depends on the Checkout Builder. With forms unfolded inside the list, `start({ paymentMethod })` submits the form the shopper already filled in, so it is your Pay action. With folded forms, `start()` mounts the selected method's form into the `elementSelector` of your transaction config and resolves. The shopper then pays from that form's button. If you set `showPayButton: false`, call `transaction.submit()` from your own button instead. Pass `elementSelector` on the transaction config so the folded form has somewhere to render.
  </Tab>

  <Tab title="iOS">
    ```swift theme={"theme":{"light":"github-dark","dark":"github-dark-dimmed"}}
    var selectedPayment: SdkPayments.PaymentMethodSelected?

    let views = transaction.getPaymentMethodsViews(
        types: [.APPLE_PAY(), .PAYMENT_METHOD_LIST],
        controller: self
    )

    // In your SdkPayments.PaymentListController:
    func onPaymentSelected(paymentSelected: SdkPayments.PaymentMethodSelected) {
        selectedPayment = paymentSelected
    }

    // Later, when the user confirms (e.g. your Pay button):
    if let selectedPayment {
        transaction.start(paymentSelected: selectedPayment)
    }
    ```

    The views are SwiftUI `AnyView`s. For a UIKit layout, call `getPaymentMethodsViewsUIKit(types:controller:)` instead: same arguments, and it returns `[PaymentMethodType: UIView]`, ready to add as subviews.
  </Tab>

  <Tab title="Android">
    ```kotlin theme={"theme":{"light":"github-dark","dark":"github-dark-dimmed"}}
    var selectedPayment: PaymentMethodSelected? = null

    val views = transaction.getPaymentMethodsViews(
        host = this,
        types = listOf(PaymentMethodType.GooglePay(), PaymentMethodType.PaymentMethodList),
        controller = this
    )

    // In your PaymentListController:
    override fun onPaymentSelected(paymentSelected: PaymentMethodSelected) {
        selectedPayment = paymentSelected
    }

    // Later, when the user confirms (e.g. your Pay button):
    selectedPayment?.let { transaction.start(activity = this, paymentSelected = it) }
    ```
  </Tab>
</Tabs>

## PaymentMethodType

| Value | Available on | What you get |
| - | - | - |
| `APPLE_PAY` | iOS, Web | The native Apple Pay button, wired to start the payment flow. On iOS this is an enum case with associated values — write it as `.APPLE_PAY()`, or pass `type:` / `style:` to customize the button. |
| `GOOGLE_PAY` | Android, Web | The native Google Pay button, wired to start the payment flow. |
| `PAYPAL` | Web | The native PayPal button, wired to start the payment flow. |
| `PAYPAL_BRAINTREE` | Web | The PayPal button for accounts that process PayPal through Braintree. |
| `SAMSUNG_PAY` | Web | The Samsung Pay button, wired to start the payment flow. |
| `REVOLUT_PAY` | Web | The Revolut Pay button, wired to start the payment flow. |
| `PAYMENT_METHOD_LIST` | iOS, Android, Web | Full list of payment methods enabled in your Yuno dashboard. |

On Web, pass the values as camelCase strings in `types`: `'applePay'`, `'googlePay'`, `'paypal'`, `'paypalBraintree'`, `'samsungPay'`, `'revolutPay'`, and `'paymentMethodList'`.

On Android, a type that does not apply to the platform or configuration comes back as `null`. On iOS every requested type comes back with a view. On Web every requested type is returned and the check happens in `mount()`. When the wallet is not enabled for the checkout session, the SDK logs `There are not valid payment methods`, reports the failure through `onStatus`, and the promise that `mount()` returns rejects. `mount()` is typed `void`, so `await` it to catch that rejection, and mount only the wallets enabled for the session.

<Note>
  On Android, `PaymentMethodType` is a sealed interface rather than a set of string constants: `GOOGLE_PAY` corresponds to `PaymentMethodType.GooglePay(...)`, which also carries the button customization (`cta`, `theme`, `cornerRadius`), and `PAYMENT_METHOD_LIST` corresponds to `PaymentMethodType.PaymentMethodList`. `APPLE_PAY` does not exist on Android.

  On iOS, `APPLE_PAY` is an enum case with associated values, both optional: `.APPLE_PAY(type: .buy, style: .black)` takes a `PKPaymentButtonType` and a `PKPaymentButtonStyle` (defaults `.plain` and `.automatic`), which carry the Apple Pay button customization. The bare spelling `.APPLE_PAY` does not compile — always write `.APPLE_PAY()`.
</Note>

### Express buttons

`APPLE_PAY`, `GOOGLE_PAY`, and `PAYPAL` return the native express buttons, ready to use. You style them through the standard view modifiers of each platform (size, padding, corner radius, etc.). The SDK only adds a loader on top while the payment flow is initializing. On Web, `PAYPAL_BRAINTREE`, `SAMSUNG_PAY`, and `REVOLUT_PAY` are express buttons too, and you style all of them through the options of `mount()`.

<div className="media-showcase-light">
  <img src="https://mintcdn.com/yuno-3979e326/wcaoTPfNIXrvnpRG/images/yuno-sdk/payment-methods-list/apple-pay.png?fit=max&auto=format&n=wcaoTPfNIXrvnpRG&q=85&s=2d7a96371207b1e7f02405e5c478bfdb" alt="Apple Pay button" width="802" height="110" data-path="images/yuno-sdk/payment-methods-list/apple-pay.png" />

  <img src="https://mintcdn.com/yuno-3979e326/wcaoTPfNIXrvnpRG/images/yuno-sdk/payment-methods-list/google-pay.png?fit=max&auto=format&n=wcaoTPfNIXrvnpRG&q=85&s=fefc3c6e6f90a3c0c95e779e0c4ecfac" alt="Google Pay button" width="802" height="110" data-path="images/yuno-sdk/payment-methods-list/google-pay.png" />

  <img src="https://mintcdn.com/yuno-3979e326/wcaoTPfNIXrvnpRG/images/yuno-sdk/payment-methods-list/paypal.png?fit=max&auto=format&n=wcaoTPfNIXrvnpRG&q=85&s=13c44949b9ef410e5830b80398290069" alt="PayPal button" width="802" height="112" data-path="images/yuno-sdk/payment-methods-list/paypal.png" />
</div>

<Note>
  You do not need to call `Transaction.start()` for express buttons. Tapping the button is the user's confirmation, so the SDK starts the transaction internally and reports the result through `onStatus`.

  This also holds inside the list on Web. When the shopper selects an express wallet row, its button renders inside the row and is the pay control. `start()` for that selection returns without doing anything, so hide your own Pay button while `onPaymentSelected` reports an express type (`APPLE_PAY`, `GOOGLE_PAY`, `PAYPAL`, `PAYPAL_BRAINTREE`, `SAMSUNG_PAY`, or `REVOLUT_PAY`).
</Note>

## PaymentListController

The controller you pass to `getPaymentMethodsViews`. On iOS and Android only `onPaymentSelected` is required. On Web `onPaymentSelected` is optional, but without it the list cannot tell you what the shopper picked, so pass it whenever you request `'paymentMethodList'`.

| Method | Required | Platforms | Behavior |
| - | - | - | - |
| `onPaymentSelected(paymentSelected)` | Yes (Web: optional) | iOS, Android, Web | Invoked when the user picks a payment method. Pass the `PaymentMethodSelected` to `Transaction.start()`. |
| `onHeightChange(newHeight)` | No\* | iOS, Android | Invoked when the rendered view's height changes, so you can apply it to your layout. |
| `onUnenroll(success)` | No | iOS, Android | Invoked after the SDK has attempted to remove a saved payment method initiated from the list. Receives a boolean indicating whether the unenroll succeeded. |

<Note>
  **\* `onHeightChange` is optional to *implement*, but you must apply the reported height when your layout constrains the list.**
</Note>

On Web and iOS, `onPaymentSelected` can fire before any tap. When the list preselects the shopper's preferred method on mount, the callback runs with `selectionSource: 'auto'` (`.auto` on iOS). A tap runs it with `selectionSource: 'user'` (`.user` on iOS). On Web it also fires when the shopper taps an express button you mounted. The Web `PaymentMethodSelected` is `{ type, name?, vaultedToken?, selectionSource? }`. Keep the latest value and pass it to `start()` only from your own Pay control.

<Note>
  If the list cannot be loaded because the payment methods service fails, the SDK reports it through your `TransactionController.onStatus` with status `INTERNAL_ERROR` and a `message`: `source` `backend` with the backend error code in `code` (the HTTP status when the body has none) and the error body in `raw`, or `source` `sdk` for network failures, with `context` `MethodsViewImplementation.getPaymentMethods` on iOS and `paymentMethodList.getPaymentMethods` on Web. The list stays empty: show your own error state or request the views again to retry.
</Note>

<Note>
  The **Edit / remove** control that lets a shopper delete a saved method — and the only thing that makes `onUnenroll` fire — is rendered only when **`edit_payment_method_list`** is enabled in **Checkout Builder → Styling** in your [Yuno Dashboard](https://dashboard.y.uno/). It is **off by default** on iOS and Android, so until you turn it on the saved methods show no remove affordance and `onUnenroll` is never invoked. The same setting controls the remove control on Web. Web has no `onUnenroll` callback. After a removal the SDK refetches the session's payment methods and the list re-renders.
</Note>

## Notes

* `getPaymentMethodsViews` is synchronous.
* You can request any combination of types available on your platform in a single call.
* The `PaymentMethodSelected` delivered by `onPaymentSelected` is what you pass to `Transaction.start()`. See [Get Started](/docs/yuno-sdk/get-started).
* On Web, once a payment on the session reaches a final status, the SDK removes the list and marks the checkout session as finished. `start()`, `submit()`, and `mount()` on that session then throw. To pay again, create a new checkout session and a new `Transaction`, or call `transaction.updateCheckoutSession()` with the new session, then mount the list again.

## Related

* [`PaymentMethodSelected`](/docs/yuno-sdk/reference/objects-you-pass#payment-method-selected). The object you receive and pass to `start()`.
* [Get Started](/docs/yuno-sdk/get-started). Full integration walkthrough.


This documentation is built and hosted on [Mintlify](https://mintlify.com), a developer documentation platform.