Test Payment Methods
Yuno´s integration allows you to connect to dozens of payment methods within a single integration, and some of them need certain information required by the payment providers in order to use their sandbox environment. In the following sections, we provide test guidelines on the alternative payment platforms available in Yuno for you to test during your integration.
Payment methods
CARDS
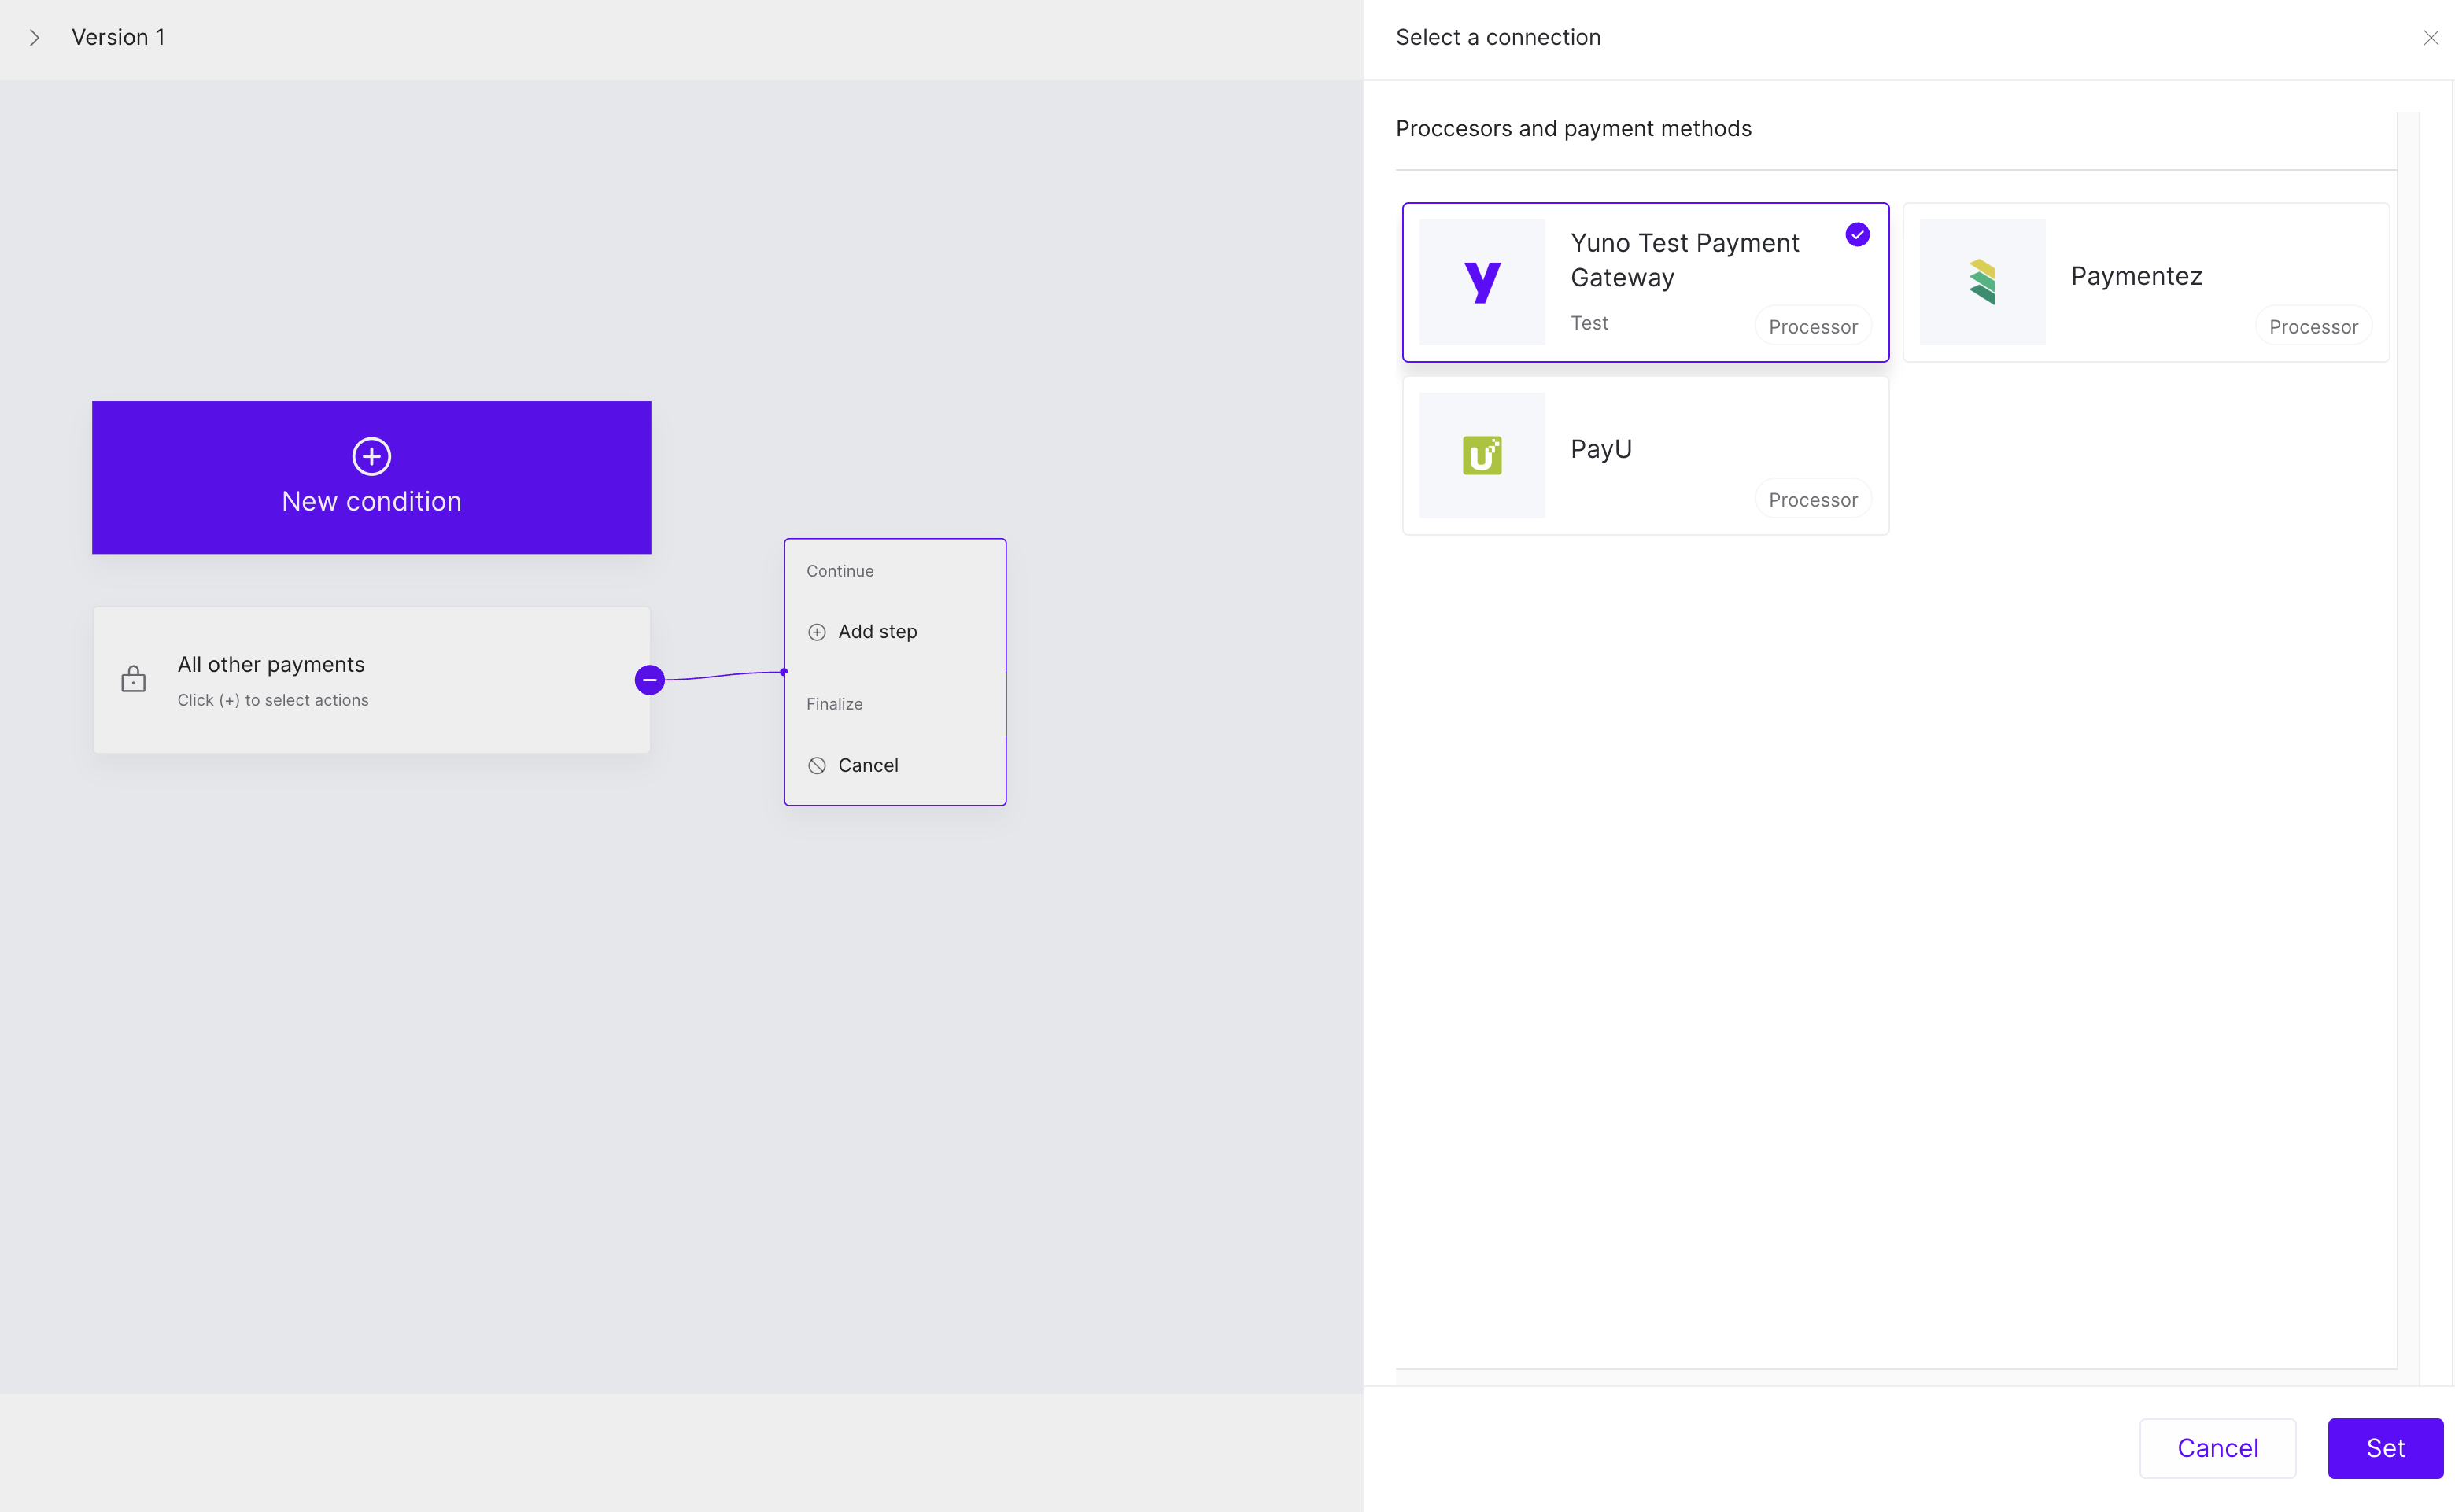
In order to test Card payments in general, you will need to activate the Yuno Test Payment Gateway connection in your Yuno Dashboard.
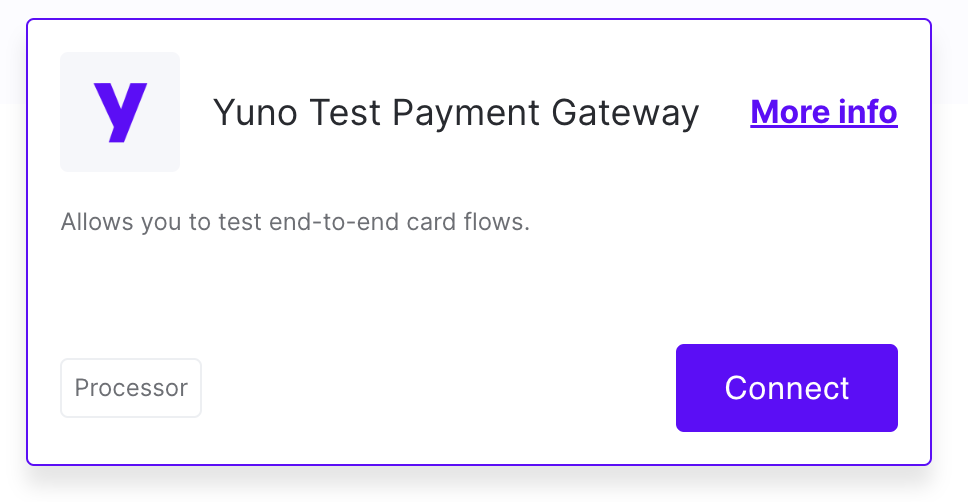
Once your connection turns on, you will need to set the Yuno test Payment Gateway as your card provider in your route defined for Card payments in your routing section.
After that, you are ready to start testing your Card payment method using your Yuno integration. To get the desired result in each test, you need to define the payment description as one of the Transaction Codes available in Yuno. For example: "SUCCESSFUL", "DECLINED", "ERROR".
Cards you can use:
| Number | Security Code | Expiration Date |
|---|---|---|
| 4509 9535 6623 3704 | 456 | 10/26 |
| 3711 803032 57522 | 4567 | 10/26 |
| 5031 7557 3453 0604 | 456 | 10/26 |
{
    "description": "SUCCESSFUL",
    "account_id":"{{account-code}}",
    "merchant_order_id": "0000022",
    "merchant_reference":"Pago de test 001",
    "country": "AR",
    "amount": {
        "currency": "ARS",
        "value": 100
    },
    "checkout": {
        "session": "{{checkout_session}}"
    },
    "customer_payer": {
        "id": "{{customer_id}}",
        "document": {
            "document_type": "DNI",
            "document_number": "38799999"
        },
        "date_of_birth": "1990-02-28",
        "nationality": "{{country}}",
        "phone": {
            "number": "3132450765",
            "country_code": "54"
        }
        },
    "payment_method": {
        "token": {{onetime_token}}
    }
}
ADDI
In order to make a payment using Addi, you should complete the following steps:
- Create Customer
- Create Checkout Session
- Create One Time Token / Get the token from SDK
- Create Payment
- After that, you need to use Retrieve Payment by ID to get the URL (payment.transaction.provider.redirect.init_url) to complete the payment in the Addi platform.
You have to access the Addi checkout with the following info:
| Info | Data |
|---|---|
| APELLIDO | CANO |
| FECHA DE EXPEDICIÓN DOC | 01-01-1996 |
| AMOUNT - CO | Min: 50.000 Max: 500.000 |
| AMOUNT - BR | Min: 45 Max: 3.000 |
| ORDER_ID | Must be changed on every transaction |
| Must be valid and changed in all tests | |
| PHONE_NUMBER | Must be valid and changed in all tests |
ACUOTAZ
In order to make a payment using Acuotaz, you should complete the following steps:
- Create Customer
- Create Checkout Session
- Create One Time Token / Get the token from SDK
- Create Payment
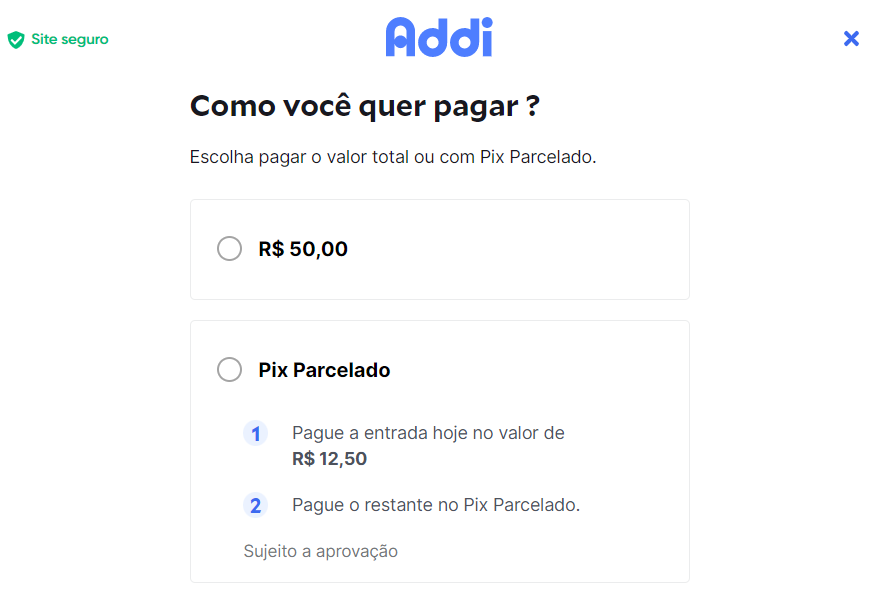
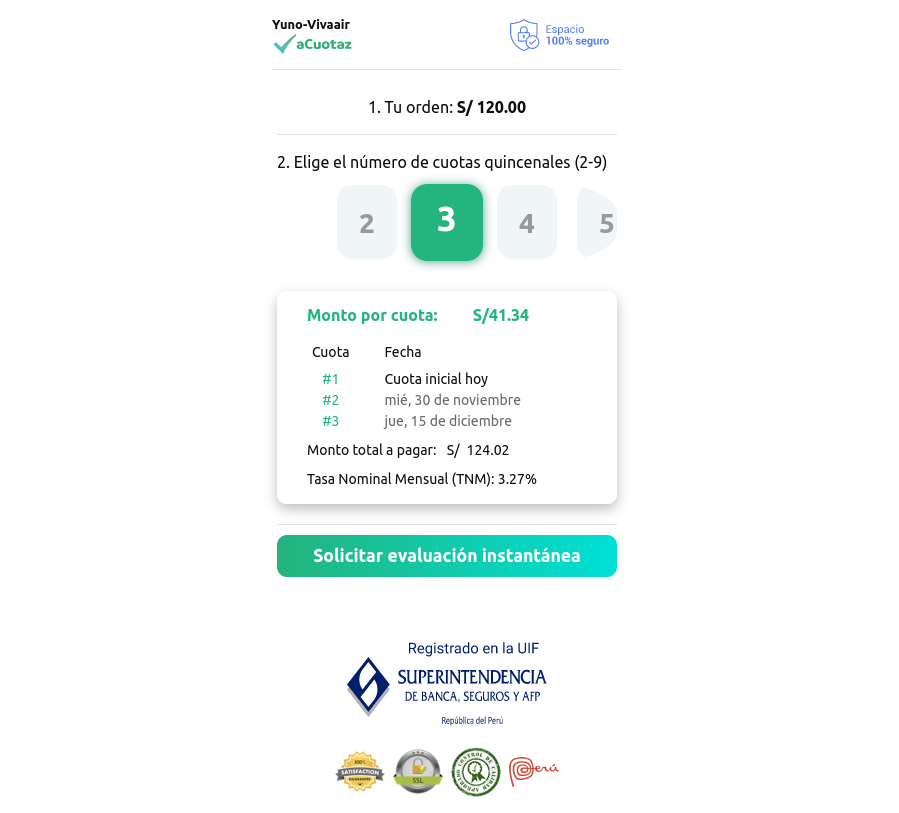
The Create Payment response provides a redirect URL (transactions.provider_data.raw_response.redirect_to), so the user can complete the payment in the Acuotaz platform. The Acuotaz service provides the option to the user select the payment installments before completing the payment, as shown in the following image:
For testing a Payment in Acuotaz, there are two approaches you can use: testing credit card payment or testing bank transfer payment.
Testing credit card payment
If you need to make a payment with the test credentials for the card, you can use the following info:
| Info | Data |
|---|---|
| Name | Any name |
| Card no | 4111 1111 1111 1111 |
| Expiration date | 04/2023 |
| CVV | 123 |
| Address | Any address |
Testing bank transfer payment
If you need to make a payment by bank transfer, you can use the following info:
| Info | Data |
|---|---|
| Image | Any image |
| Bank | Any bank |
| Operation number | 1234567 |
| Payment Amount | Amount |
| Payment Date | Today |
| Payment Type | Full installment payment |
BANCOLOMBIA_TRANSFER
Bancolombia transfer does not have a sandbox environment to interact with the end user. The payment is directly approved after sending the request to the provider in the first instance.
In order to make a payment using Bancolombia Transfer, you should complete the following steps:
- Create Customer
- Create Checkout Session
- Create One Time Token / Get the token from SDK. The total amount should be bigger than COP 1500.
- Create Payment
BANCOLOMBIA_TOKEN_BOX
Bancolombia Tokenbox works as an enrolled payment method. Therefore, you will need to start enrolling it before making a payment. Similar to the Bancolombia transfer, the payment gets automatically approved. However, with Bancolombia, you can test different scenarios for enrollment.
In order to make a payment using Bancolombia Tokenbox, you should complete the following steps:
- Create Customer
- Create Customer Session
- Retrieve Payment Methods Available
- Enroll Payment Method
- Retrieve Payment Method by Customer Session
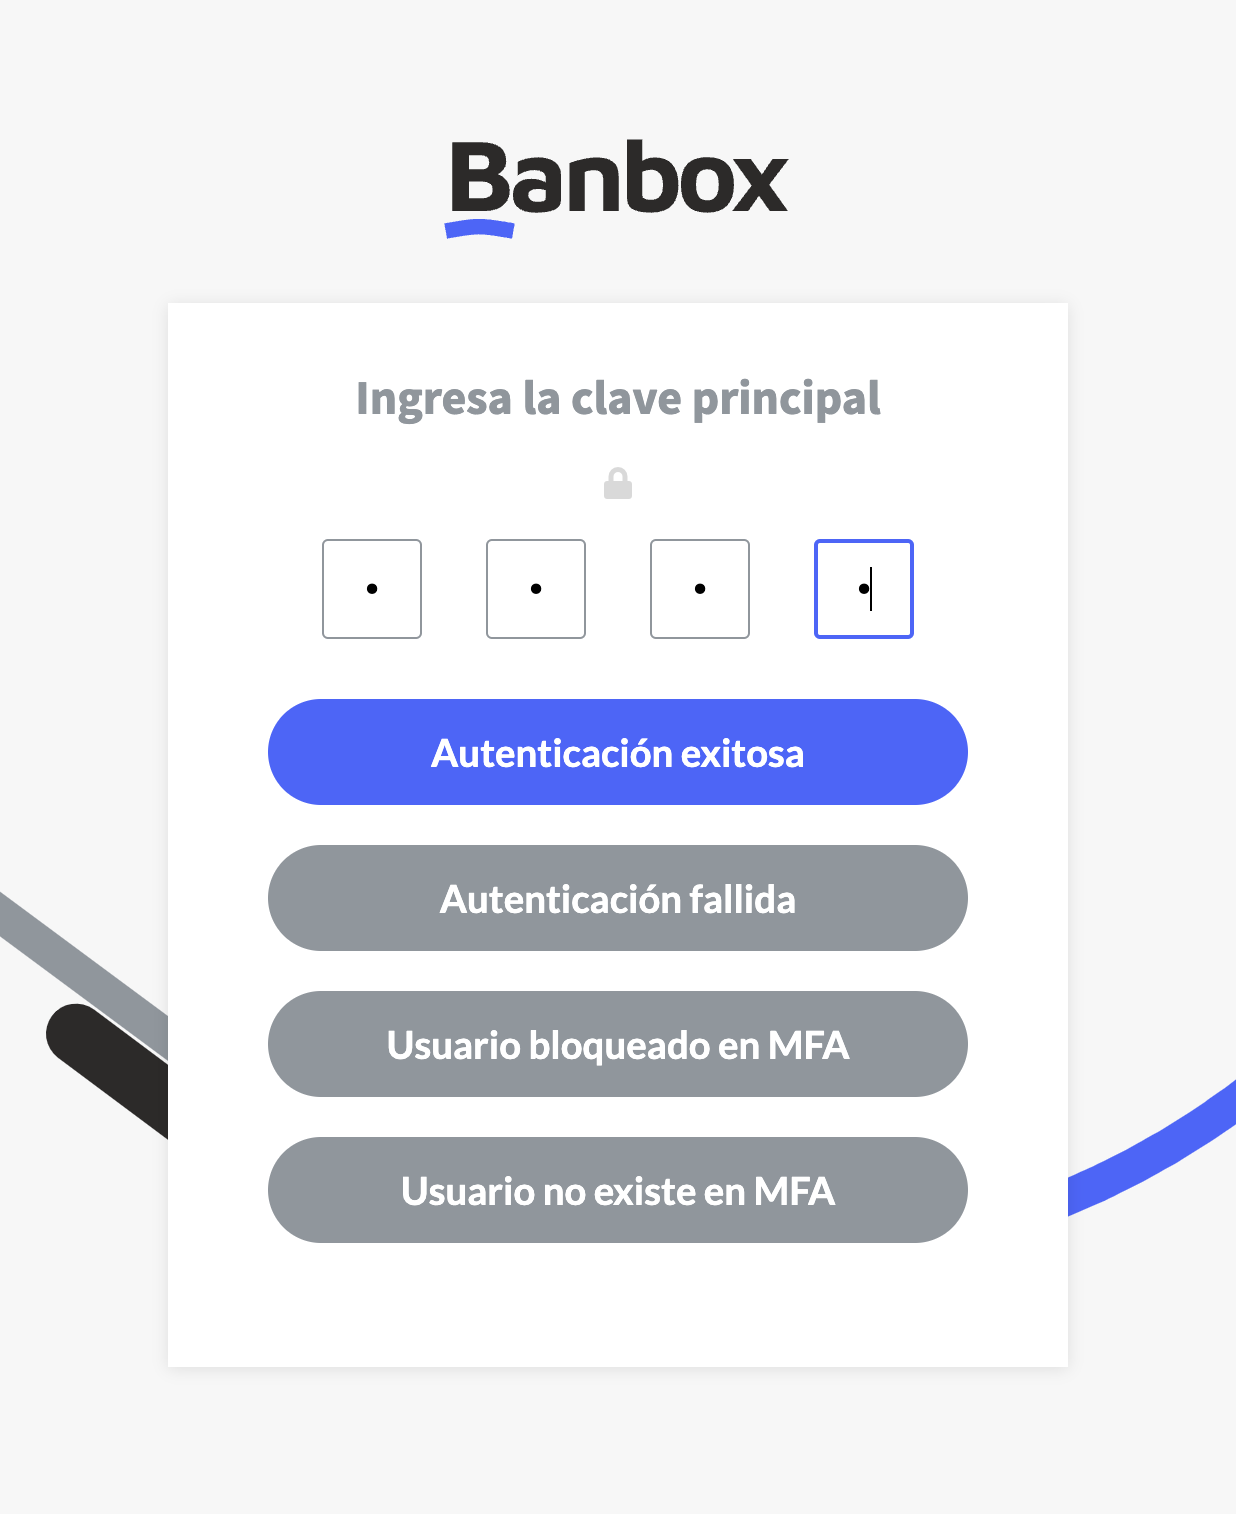
- To complete the enrollment in the Banbox environment, use the redirect URL (provider.redirect.init_url) to follow the next steps and complete the enrollment:
- User: This can be any email with the correct format. For example: [email protected]
- 4-digit password: This can be any 4-digit password. For example: 1234. At that stage, you can choose the result of your enrollment.
- Dynamic key: Can be any 6-digit number. For example: 123456.
- Select account: This could be any of the accounts already available for testing.
- To complete the enrollment in the Banbox environment, use the redirect URL (provider.redirect.init_url) to follow the next steps and complete the enrollment:
DAVIPLATA
In order to make a payment using DaviPlata, you should complete the following steps:
- Create Customer
- Create Checkout Session
- Create One Time Token / Get the token from SDK. Use "DAVIPLATA" as the payment type to generate the One Time Token.
- Create Payment
The response body of the Create Payment request will provide a redirect URL (payment_method.payment_method_detail.bank_transfer.redirect_url) to the DaviPlata service. On this page, select a document type and fill in the document number with "1" to continue with the payment.
MERCADO PAGO
In order to make a payment using Mercado Pago, you should complete the following steps:
- Create Customer
- Create Checkout Session
- Create One Time Token / Get the token from SDK
- Create Payment
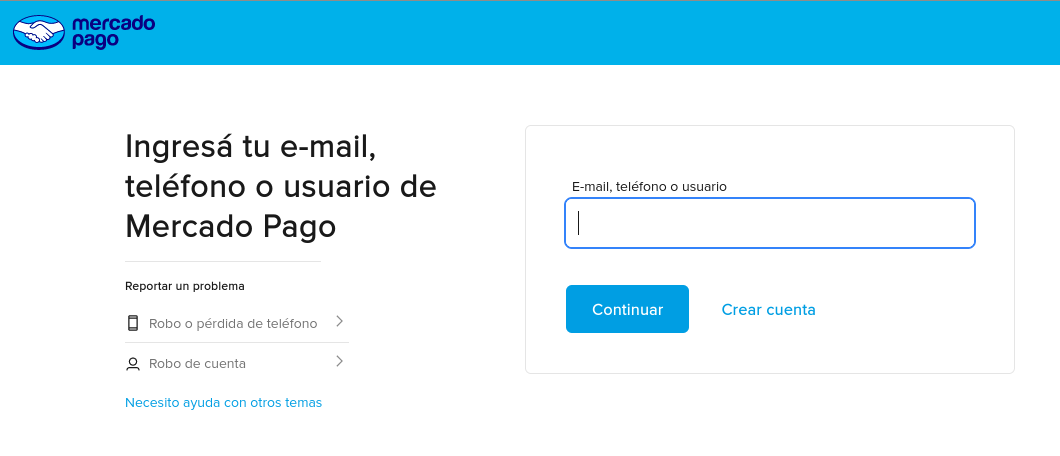
The response body of the Create Payment request will provide a redirect URL (payment_method.payment_method_detail.bank_transfer.redirect_url) to the Mercado Pago service. In this service, use your Mercado Pago account to complete the transaction. The following image shows the page the user will be redirected to:
For additional information, refer to the Mercado Pago documentation. However, as a summary, you basically need to follow the next steps:
- Create test users to use as a “seller” and as a “customer” while developing the integration. Mercado Pago uses these test users to replicate the production environment, and they can only interact with other test users. If you use a real account to pay a checkout created by a test user, you will receive an error message (invalid_users_involved).
Tips
- Always check if you are logged in with a real account before completing a payment. You SHOULD NOT use a real account to perform tests.
- Add account money to the test user account while creating it.
- Get your API credentials and set them on Yuno´s dashboard while creating the payment method. If you do not have an application started yet, create one following to get your API keys.
- Both for enrollments with MercadoPago Wallet or payments with the Mercado Pago Checkout Pro, use the account money available for the test user or test cards provided by Mercado Pago to make a payment.
After creating your Mercado Pago user and performing the payment, you can use the Retrieve Payment by ID to check the payment status. If everything goes correctly, the Retrieve Payment by ID response will have a SUCCEEDED payment.status and a APPROVED payment.sub_status.
MERCADO PAGO WALLET
Mercado Pago Wallet works as an enrolled payment method. Therefore, you will need to start enrolling it before making a payment.
To make a payment using the Mercado Pago Wallet, you should follow the steps:
- Create Customer
- Create Customer Session
- Retrieve Payment Methods Available (Optional)
- Enroll Payment Method
- Retrieve Payment Method by Customer Session
- The response provides a redirect URL (provider.redirect.init_url), so the user can enroll in the payment method using the Mercado Pago service.
- After the login, the user will be requested to connect a new payment method or use cash.
- The user should add credit card info to add a secondary payment method.
- By selecting the cash option, the connection is performed directly.
- For additional information, refer to the Mercado Pago documentation. However, as a summary, you basically need to follow the next steps:
- Create test users to use as a “seller” and as a “customer” while developing the integration. Mercado Pago uses these test users to replicate the production environment, and they can only interact with other test users. If you use a real account to pay a checkout created by a test user, you will receive an error message (invalid_users_involved).
- Get your API credentials and set them on Yuno´s dashboard while creating the payment method. If you do not have an application started yet, create one following to get your API keys.
- Both for enrollments with MercadoPago Wallet or payments with the Mercado Pago Checkout Pro, use the account money available for the test user or test cards provided by Mercado Pago to make a payment.
Tips
- Always check if you are logged in with a real account before completing a payment. You SHOULD NOT use a real account to perform tests.
- Add account money to the test user account while creating it.
- Create Checkout Session
- Retrieve Payment Methods Available for Checkout to get the
vaulted_tokenrelated to the payment enrolled before. - Create Payment using the
vaulted_tokenfrom the last step.
PAYMENTEZ
Paymentez provides multiple payment methods. Here we will explain the testing process for payments using OXXO or cash. There are some differences when testing each payment type. Below, you will find the guide to test Paymentez using OXXO and cash.
In order to make a payment with Paymentez using OXXO or cash, you should complete the following steps:
- Create Customer
- Create Checkout Session
- Create One Time Token / Get the token from SDK. You will need to provide the payment type used on the request body. If you are performing a test using OXXO as the payment method, use "OXXO" as the type. On the other hand, if you are testing for payment with cash, use "CASH" as the type.
- Create Payment
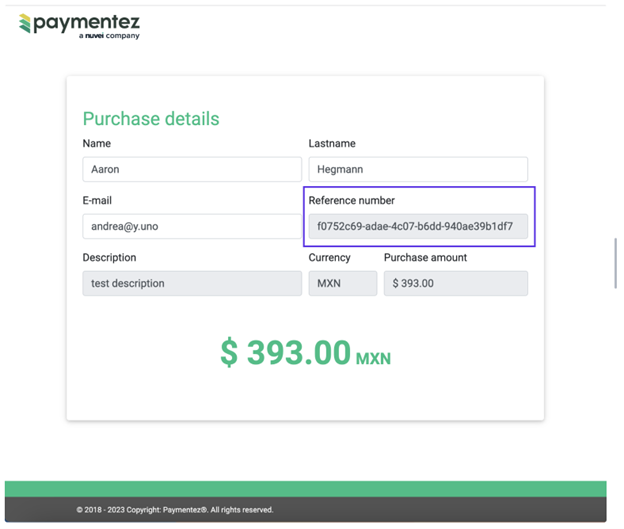
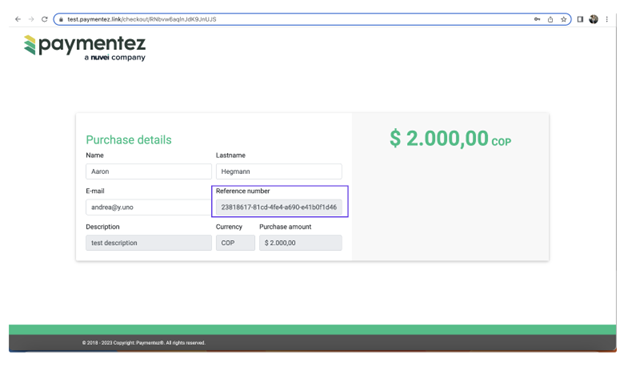
The response body of the Create Payment request will provide a redirect URL (payment_method.payment_method_detail.bank_transfer.redirect_url) to the Paymentez service page. On the Paymentez page, the customer will enter their data and find the reference number to make the payment. The image below presents the Paymentez interface for both OXXO and cash payments.
- Retrieve Payment Methods for Checkout or Retireve Payment by ID to check the payment status.
Paymentez with Cash
In order to make a payment with Paymentez using Cash, you should complete the following steps:
- Create Customer
- Create Checkout Session
- Create One Time Token / Get the token from SDK
- Create Payment
The response body of the Create Payment request will provide a redirect URL (payment_method.payment_method_detail.bank_transfer.redirect_url) to the Paymentez service page. On the Paymentez page, you will find the reference number to make the payment.
NEQUI
Nequi works as an enrolled payment method, meaning you'll need to enroll it before making a payment. The payment gets automatically approved, but you can test different scenarios for enrollment.
In order to make a payment using Nequi, you should complete the following steps:
- Create Customer
- To perform approved or rejected ENROLLMENTS in Nequi's Sandbox environment, you only have to assign the following phone numbers to the customer:
- 3991111111 to automatically enroll and generate an approved transaction (APPROVED)
- 3992222222 to generate a declined transaction (DECLINED)
Note
Keep in mind that any other number you use will result in a transaction with a final status of ERROR.
- Create Customer Session
- Retrieve Payment Methods Available (Optional)
- Enroll Payment Method. The Enroll Payment Method response will provide the status READY_TO_ENROLL.
- Retrieve Payment Method by Customer Session. As explained in step 1, the response will automatically provide the status ENROLLED if the 3991111111 phone number was used.
- Create Checkout Session
- Retrieve Payment Methods for Checkout. The response will provide a list of payment methods available. You should find the Nequi object, which will contain the
vaulted_tokento be used to create the payment. - Create Payment using the
vaulted_token
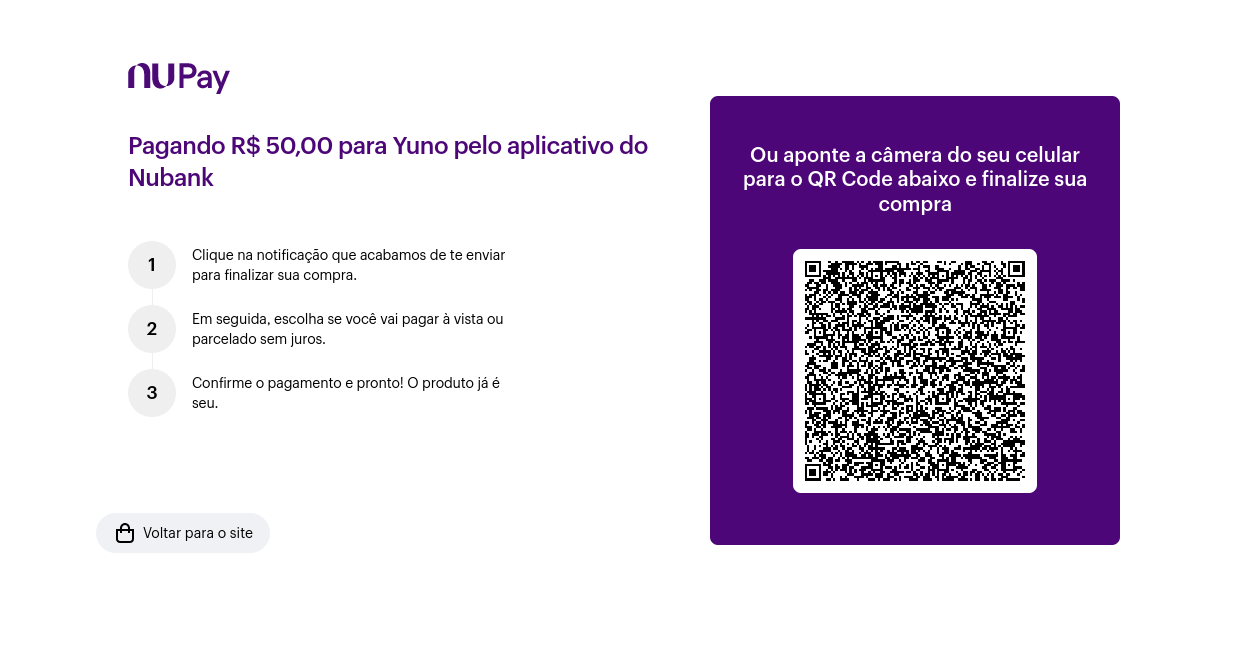
PIX/NUPay
To make a payment using PIX, you should follow the steps:
- Create Customer
- Create Checkout Session
- Create One Time Token / Get the token from SDK
- Create Payment
Instead of a redirect URL, the Create Payment response provides a QR code image (payment_method.payment_method_detail.bank_transfer.provider_image). After creating the order, you must complete and test the payment and access the NuPay sandbox dashboard with your Nubank credentials. Once logged in, you can approve the transaction in the 'Activities' section.

After approving the payment, its status will change to "completo" on the NuPay sandbox dashboard. You can check the payment status using the Retrieve Payment by ID. If the payment were approved, the Retrieve Payment by ID response would provide the status SUCCEEDED, and sub_status APPROVED.
NUPAY
To make a payment using NUPay you should follow the steps:
- Create Customer
- Create Checkout Session
- Create One Time Token / Get the token from SDK
- Create Payment
The Create Payment response provides a redirect URL (payment_method.payment_method_detail.bank_transfer.redirect_url), redirecting the user to a NuBank page that provides a QR code to complete the payment:
After creating the order, you must complete and test the payment and access the NuPay sandbox dashboard with your Nubank credentials. Once logged in, you can approve the transaction in the 'Activities' section:
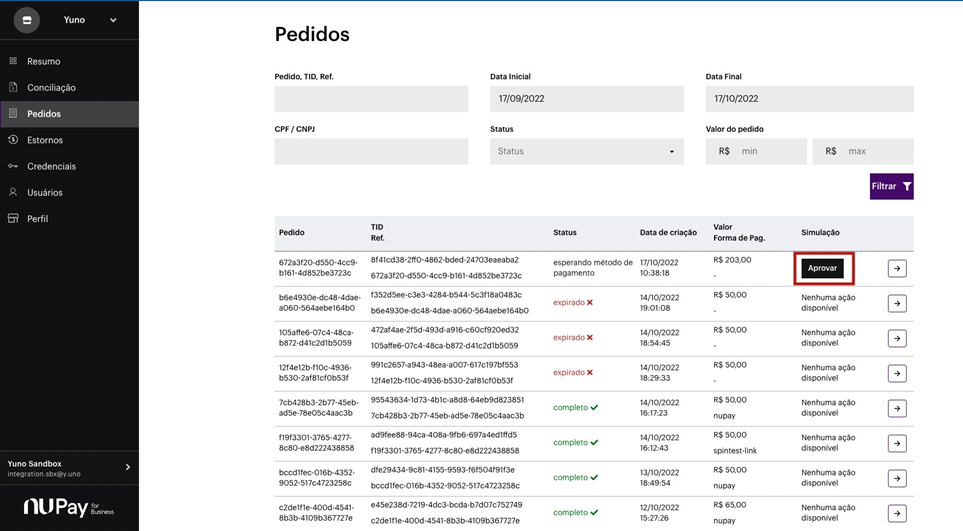
After approving the payment, its status will change to "completo" on the NuPay sandbox dashboard. You can check the payment status using the Retrieve Payment by ID. If the payment were approved, the Retrieve Payment by ID response would provide the status SUCCEEDED, and sub_status APPROVED.
SAFETYPAY
SafetyPay is a non-card payment method. They enable cash payments, bank transfers, and international online transactions for a global consumer market. To perform a payment using the SafetyPay, you should follow the steps:
- Create Customer
- Create Checkout Session
- Retrieve Payment Methods for Checkout (Optional)
- Create One Time Token / Get the token from SDK
- Create Payment
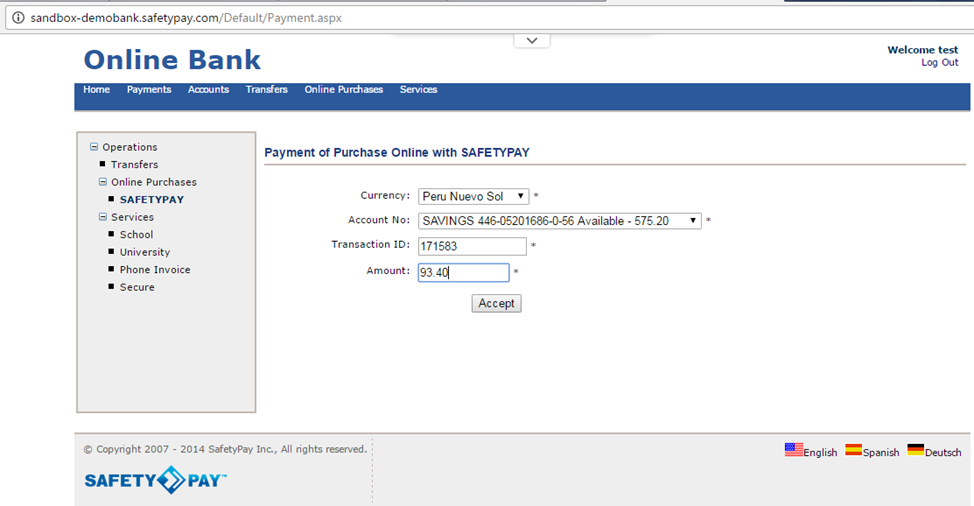
After creating the payment (step 5), the API response will provide a redirect URL (transactions.payment_method.detail.bank_transfer.redirect_url). The URL redirects to the SafetyPay Gateway, where you will find information about the payment, such as the payment code and the total amount, as shown next:
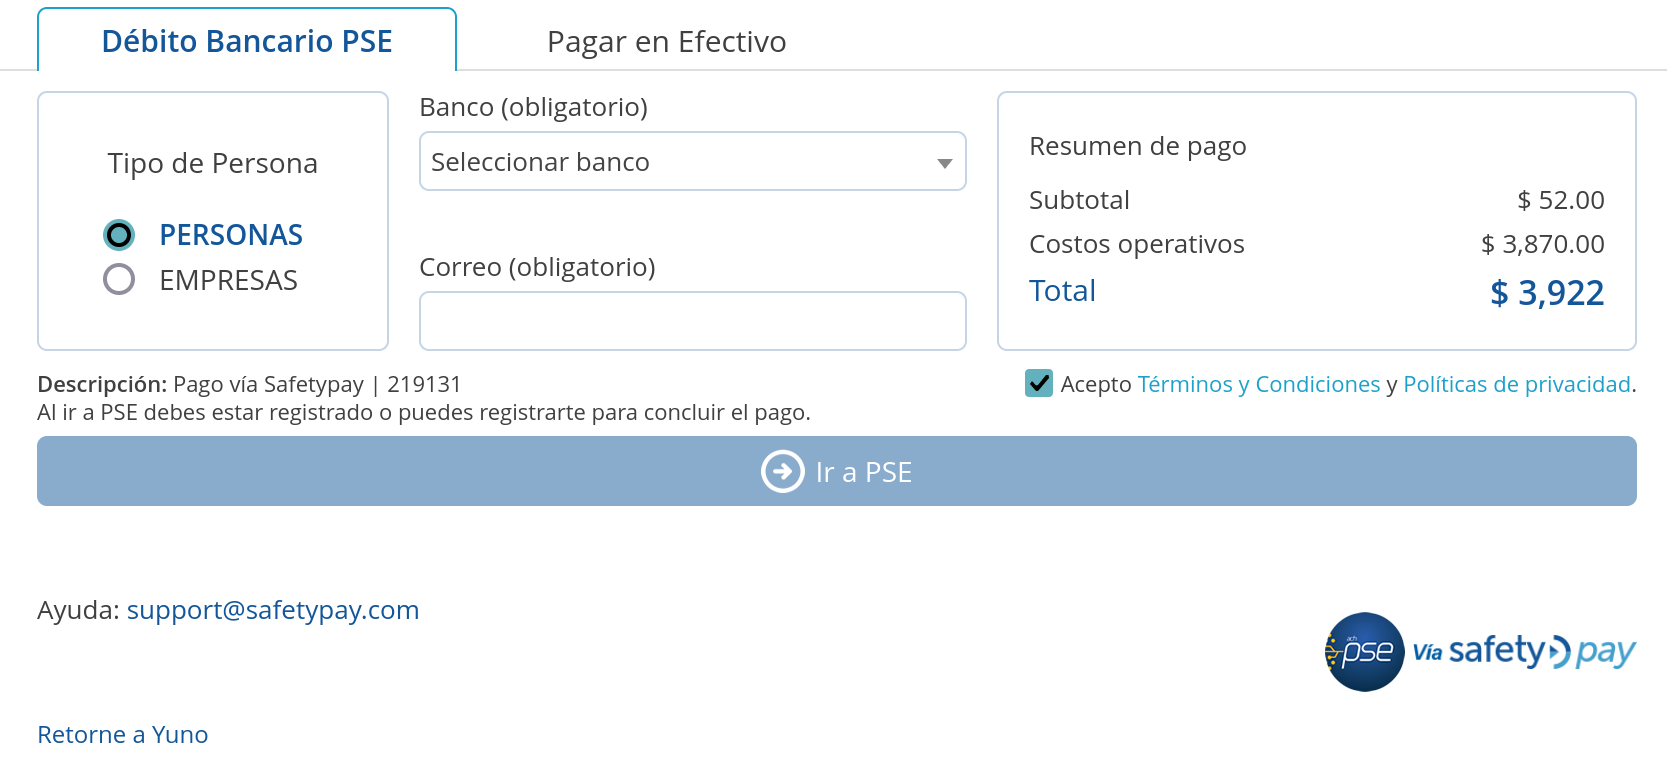
In the above example, the Payment Code is 219131, and the Total Amount is 3922. To approve and complete the payment process, you must follow the instructions:
- Open SafetyPay DemoBank.
- Log in with the following credentials:
- User: test
- Password: test
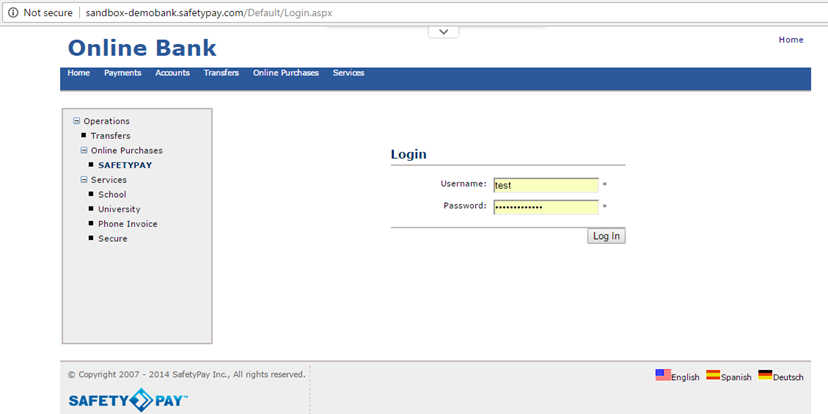
- Enter the transaction information: Currency, Payment Code, and Amount. Do not change Account No. After, click on the Accept button.
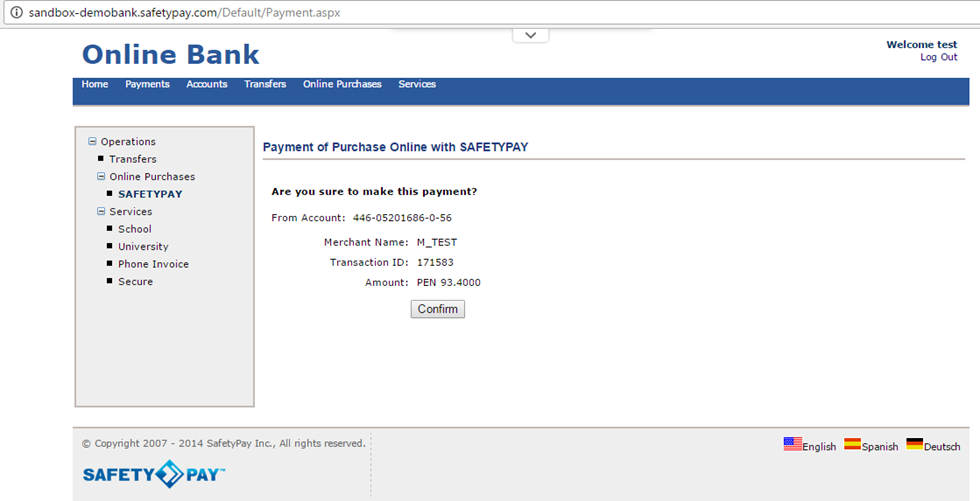
- Click on Confirm button.
- After confirming the payment, you’ll get a message indicating the operation was successfully paid. A table with the transaction summary will be displayed.
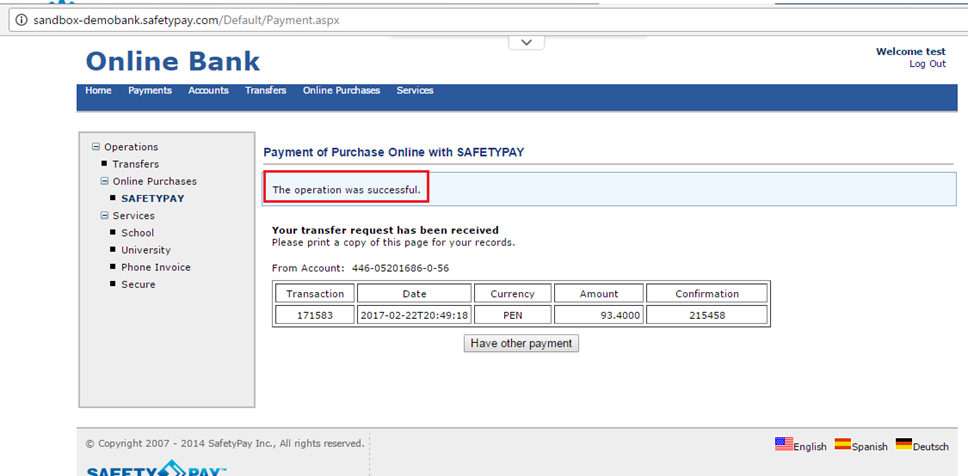
Subsequently confirming the payment, you can check the payment status using the Retrieve Payment by ID route. The status provided by the response should be SUCCEEDED.
WEBPAY
In the Webpay environment, you can use the following card data to get an approved/rejected transaction in the sandbox. At the end of the Webpay checkout, you´ll have the option to choose the payment status.
| Info | Data |
|---|---|
| Card number | 4051 8856 0044 6623 |
| Exp Date | > Today |
| CVV | 123 |
| RUT | 11.111.111-1 |
WIBOND
The sandbox environment in Wibond works the same as the one in production. To make a test payment, you´ll first need to go through a verification process in order to get your account.
Once you have your Wibond account, you´ll just need to enter Wibond's checkout, proceed with the payment with any random information, and select to pay with installments.
Updated 11 months ago